Archives

DROP DB2 Database

DROP DATABASE deletes all user data and log files, as well as any back/restore history for the database.

If the log files are needed for a roll-forward recovery after a restore operation, or the backup history

required to restore the database, these files should be saved prior to issuing this command.

$ db2 list db directory
System Database Directory
Number of entries in the directory =1
Database 1 entry:
Database alias                       = MYDB
Database name                        = MYDB
Local database directory             = /home/db2inst1/MYDB
Database release level               = d.00
Comment                              =
Directory entry type                 = Indirect
Catalog database partition number    = 0
Alternate server hostname            =
Alternate server port number         =

De careful and confirm before you drop the DB

Ensure that not applications are connected to the DB
Use $db2 list applications

To DROP the DATABASE
To drop the Database “MYDB” Execute the db2 drop database command

[db2inst1@mercury adm]$ db2 drop database MYDB

To verify execute $ db2 list db directory

Catalog a DB2 Database


DB2 Client
Before Cataloging the DB2 the DB2 server or atleast a DB2 client should be installed on the machine
from where we are trying to connect to the DB2 Server
Only on a DB2 Server or a DB2 client can a DB be cataloged
>>Ensure that Atleast a DB2 Client is installed
>>DB2 client is free and doesn’t need any license to be installed
>>DB2 Clients can be downloaded from : https://www-304.ibm.com/support/docview.wss?uid=swg27007053

  • >Ensure to select the same version and FixPack as the servers you’re connecting to.
  • >Then select the proper OS.
  • >Select “IBM Data Server Client”

Prerequisites to Catalog DB2
1) REMOTE: Short host name with proper entry in hosts file OR Fully qualified host name OR IP address
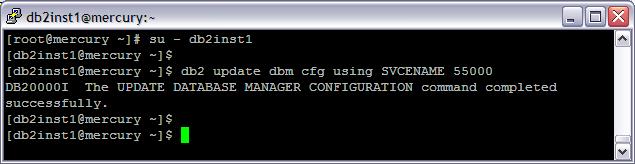
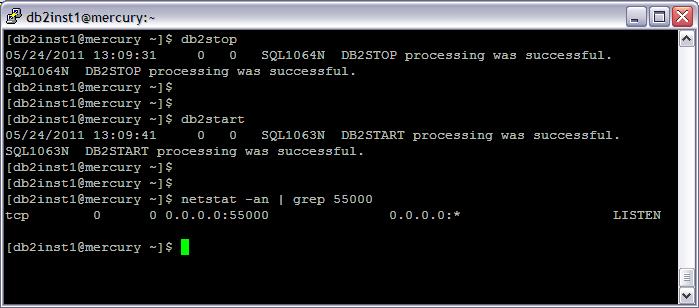
2) SERVER: Port number the db2 server is listening on.
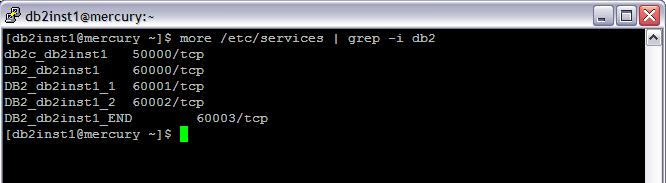
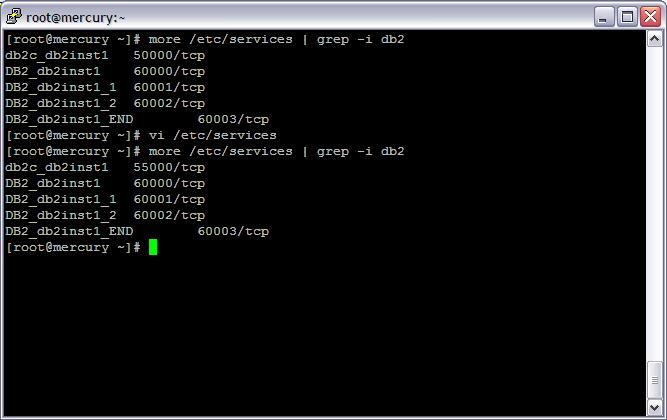
To identify the port no where the DB2 server listening to log into db2 server as the db2instance owner and execute the below command

[db2inst1@mercury ~]$ $ db2 get dbm cfg |grep SVCENAME

3) NODENAME: This is a name that you make up. It can be any name which is logical and easy to understand

====================================================================

Catalog the node

====================================================================
1) Login to the local machine from where you want to connect to remote DB2 Database as
the privileged user who would be connecting and owner of the db2client installation
Execute the below command

db2 catalog tcpip node <NODENAME> remote <REMOTE> server <PORT>

The details of NODENAME, REMOTE and PORT are mentioned above

[db2inst1@mercury ~]$ $ db2 catalog tcpip node PRODDB remote remoteDb2server.domain.com server 60000

====================================================================

Catalog the Database

====================================================================

1) Login to the local machine from where you want to connect to remote DB2 Database as the privileged user who would be connecting and owner of the db2client installation
2) Execute the below command

db2 catalog database <database_name> at node <node_name>

Where database_name is the Database name you want to connect and node_name is the name defined in the above step ( Catalog the Node )

[db2inst1@mercury ~]$ $ db2 catalog database EMPDB at node PRODDB

=============================================================

Disconnect directory

====================================================================

After cataloging, do a db2 terminate to ensure everything shows up

1) Login to the local machine from where you want to connect to remote DB2 Database as the previliged user who would be connecting and owner of the db2client installation
2) Execute the below command

db2 terminate

[db2inst1@mercury ~]$db2 terminate

=============================================================

Testing the Catalog

====================================================================

After cataloging the DB2 instance always check the connectivity

1) Login to the local machine from where you want to connect to remote DB2 Database as the previliged user who would be connecting and owner of the db2client installation
2) Execute the below command

db2 connect to <database_name> user <user_name> using <password>

Where database_name is the Database name you want to connect and user_name is the name defined in the DB Instance owner with its password

[db2inst1@mercury ~]$ db2 connect to EMPDB user db2inst1 using pa@1fasdf

List Database Manager parameters


Database Manager parameters

1) Login as the DB2 Instance Owner
2) Execute “db2 get dbm cfg ”
3) Returns the values of individual entries in the database manager configuration file

Database Manager Configurations
[db2inst1@mercury ~]$ db2 get dbm cfg

ScreenShot : Database manager configuration

db2getdbmcfg

4) There Are various options which can be used with “db2 get dbm cfg” like “-show details” etc

List Database Configuration parameters


1)Login as a DB2 Instance User
2)Execute ” db2 get db cfg” as the Instance User
3)This command returns information only for the partition on which it is executed.
4)This command returns values of individual entries in a specific database configuration file.

Database Configuration for Database
[db2inst1@mercury ~]$ db2 get db cfg

Screeshot : Database Configuration
db2getdbcfg

5) The output shows various parameters like “Path of Logs” ” Page Size ” Etc

Lists the DB2 products


=============================================================
Lists the DB2 products and features installed on your system
=============================================================

Use the db2ls command to list: where DB2 products are installed on your system and list the DB2 product level. All or specific DB2 products and features in a particular installation path.

[db2inst1@mercury ~]$ db2ls

ScreenShot : Lists the DB2 products and features installed on your system
db2ls1

The command lists the following information for each DB2 product installed on your system:
->Installation path
->Level
->Fix pack
->Installation date listing when the DB2 product was last modified.

To query what DB2 database features are installed to a particular path

The Command is as mentioned below
$db2ls -q -a -b (Path of Installation)

[db2inst1@mercury ~]$ db2ls -q -a -b /opt/ibm/db2/V9.1

ScreenShot : To query what DB2 database features are installed to a particular path
db2ls12

Database Partition Configuration File


The database partition configuration file (db2nodes.cfg) contains configuration information that tells DB2 which database partition on which server participates in an instance. There is a db2nodes.cfg file for each instance in a partitioned database environment.

On Linux and UNIX: $HOME/sqlllib/db2nodes.cfg
On Windows: sqllibdb2db2nodes.cfg

Screenshot: db2nodes.cfg in Linux

db2nodes1
The db2nodes.cfg file must contain one entry for each database partition on a particular server that will participate in the instance.
When you create an instance, the db2nodes.cfg file is automatically created, and an entry for the instance-owning database partition is added.

On Linux and UNIX, the database partition configuration file (db2nodes.cfg) uses the following format:
The format of the db2nodes.cfg file is as follows:
nodenum hostname logical port netname resourcesetname

where:
Dbpartitionnum is the number DB2 uses to identify a database partition.
Hostname is the network interface DB2 uses to communicate between database partitions. It is defined in the /etc/hosts file
Port_number is the logical port DB2 uses to distinguish between multiple database partitions on a server.
Netname is the switch network interface DB2 uses to improve performance, If not specified, the default is host name
Resourcesetname defines the operating system resource that the node should be started in

Screenshot: Examples of db2nodes.cfg usage
db2nodes


Fast Communication Manager


The Fast communications manager (FCM) provides communications support for DB2 server products. Each database partition server has one FCM sender, and one FCM receiver daemon to provide communications between database partition servers to handle agent requests and to deliver message buffers.

The FCM daemon is started when you start the instance.

If communications fail between database partition servers or if they re-establish communications, the FCM daemons updates information (that you can query with the database system monitor) and cause the appropriate action (such as the rollback of an affected transaction) to be performed. You can use the database system monitor to help you set the FCM configuration parameters.

You can specify the number of FCM message buffers with the fcm_num_buffers database manager configuration parameter and the number of FCM channels with the fcm_num_channels database manager configuration parameter. The fcm_num_buffers and fcm_num_channels database manager configuration parameter are set to AUTOMATIC as the default value. FCM monitors resource usage when any of these parameter are set to automatic, and incrementally releases resources. It is recommended to leave these parameters set to AUTOMATIC.


Change DB2 Port No

Currently DB is using 50000 we will change to 55000
=============================================================
1) Check the entry in the /etc/services as a root user
=============================================================

[root@mercury ~]# more /etc/services | grep -i db2
db2c_db2inst1 50000/tcp
DB2_db2inst1 60000/tcp
DB2_db2inst1_1 60001/tcp
DB2_db2inst1_2 60002/tcp
DB2_db2inst1_END 60003/tcp
[root@mercury ~]#

Screenshot : Before Updation of /etc/services
db2port

db2c_db2inst1 : Is the entry where the DB is listening to
The others are FCM ports

Using any editor make the changes in /etc/services , change the db2c_db2inst1 port from 50000 to 55000

Screenshot : Updation of /etc/services
db2port11

=============================================================
2) Update the DB2 Manager config ( Login as the db2 instance user )
=============================================================

[db2inst1@mercury ~]$ db2 update dbm cfg using SVCENAME 55000

Screenshot : Update Database Manager Config
db2port21

=============================================================
3) Verify the Port updation in DB2 Mananager
=============================================================

[db2inst1@mercury ~]$ db2 get dbm cfg | grep -i svce

Screenshot : Verify Database Manager Config
db2port3

=============================================================
4) Update the DB2 Profile Registry
=============================================================

Execute the db2set to set the DB2COMM to TCPIP

[db2inst1@mercury ~]$ db2set DB2COMM=TCPIP

To verify the update

[db2inst1@mercury ~]$ db2set -all

ScreenShot : Update the DB2 Profile Registy
db2port4

=============================================================
5) Restart the DB2 Instance
=============================================================

[db2inst1@mercury ~]$ dbstop
[db2inst1@mercury ~]$ dbstart

Validate if the New port is listening

[db2inst1@mercury ~]$ netstat -an | grep 55000

ScreenShot : Validation
db2port5

Stop the Fault Monitor Deamon


Disable the fault monitor processes:
1) Log on as root.
2) Locate where the db2fmcu command runs from by issuing the command: “ps -ef”

For example, on AIX the db2fmcu command is run from DB2DIR/bin directory, where DB2DIR is the location where the DB2 copy is installed.
Switch to the directory indicated by the ps command.
Disable the Fault Monitor Coordinator (FMC) by issuing the command: db2fmcu -d
ie
To prevent the fault monitor controller from being launched at system startup, run the following command “./db2fmcu -d”

Since there is only one Fault Monitor Coordinator, this step affects all DB2 copies on the system.

[root@mercury bin]# cd /opt/ibm/db2/V9.1/bin
[root@mercury bin]# ./db2fmcu -d

=============================================================
To stop the Fault Monitor Daemon
=============================================================
Issue the command: DB2DIR/bin/db2fm -i iname -D
where DB2DIR is the location where the DB2 copy is installed and iname represents the instance owner name.

[root@mercury bin]# cd /opt/ibm/db2/V9.1/bin
[root@mercury bin]# ./db2fm -i db2inst1 -D


DB2 Fault Monitor


Available on UNIX based systems only, DB2 fault monitor facilities keep DB2 databases up and running by monitoring DB2 database manager instances, and restarting any instance that exits prematurely.
The Fault Monitor Coordinator (FMC) is the process of the Fault Monitor Facility that is started at the UNIX boot sequence. The init daemon starts the FMC and will restart it if it terminates abnormally.
The FMC starts one fault monitor for each DB2 instance. Each fault monitor runs as a daemon process and has the same user privileges as the DB2 instance.
Once a fault monitor is started, it will be monitored to make sure it does not exit prematurely.
If a fault monitor fails, it will be restarted by the FMC. Each fault monitor will, in turn, be responsible for monitoring one DB2 instance. If the DB2 instance exits prematurely, the fault monitor will restart it. The fault monitor will only become inactive if the db2stop command is issued. If a DB2 instance is shut down in any other way, the fault monitor will start it up again.

Fault Monitor Coordinator Process
db2fmcd (Fault Monitor Coordinator Daemon (FMCD)),
db2fmd (Fault Monitor Daemon)
db2fm (Fault Monitor) processes running:

=============================================================
1) Check Fault Monitor Process
=============================================================

[dasusr1@mercury ~]$ ps -ef | grep db2fm

=============================================================
2) Enable the Fault Monitor Coordinator
=============================================================
>>Login as root

[root@mercury bin]# cd /opt/ibm/db2/V9.1/bin/
[root@mercury bin]# ./db2fmcu -u -p /opt/ibm/db2/V9.1/bin/db2fmcd
[root@mercury bin]# more /etc/inittab | grep fmc

This step adds an entry to the /etc/inittab so that the FMCD process will be started each time you reboot.
The entry will be similar to the following:
fmc:2345:respawn:/opt/IBM/db2/V8.1/bin/db2fmcd #DB2 Fault Monitor Coordinator

Screenshot: Enable the Fault Monitor Coordinator
db2fmcu

=============================================================
3) Start up the fault monitor daemon
=============================================================
Execute the command “db2fm -i instance_name -U” as root user

[root@mercury bin]# cd /opt/ibm/db2/V9.1/bin
[root@mercury bin]# ./db2fm -i db2inst1 -U

Screenshot: Start fault monitor daemon
db2fm
=============================================================
4) Start up the fault monitor service
=============================================================

Execute the command “./db2fm -i instance_name -u” as root user

[root@mercury bin]# cd /opt/ibm/db2/V9.1/bin
[root@mercury bin]# ./db2fm -i db2inst1 -u

Screenshot: Start up the fault monitor service
db2fm1
=============================================================
5) Turn on the fault monitor for the instance
=============================================================
Execute the command “./db2fm -i instance_name -f on” as root user

[root@mercury bin]# ./db2fm -i db2inst1 -f on

Screenshot : Start fault monitor for the instance
db2fm2
To confirm that fault monitor is no longer running for DB2INST1, type the following command on UNIX systems:

[root@mercury bin]# ps -ef|grep -i fm

=============================================================
6) Verify the fault monitor state
=============================================================
Log in as the instance owner, then perform the command: db2fm -s –S

[[db2inst1@mercury ~]$ db2fm -s -S

Screenshot: Verify the fault monitor state
db2fm3

Reboot the server. The fault monitor service should be available once the server has been rebooted

=============================================================
7) Verify the FMC Daemon state
=============================================================
>>Login as root
>>Verify the FMC Daemon state using the command:db2fmcu

[root@mercury bin]# ./db2fmcu

Screenshot: Verify the FMC Daemon state
db2fm4
Also check the process using “ps -ef grep db2 ”

These processes should be running
[root@mercury bin]# ps -ef | grep db2
dasusr1 5347 1 0 11:47 pts/1 00:00:00 /home/dasusr1/das/adm/db2dasrrm
root 5372 1 0 11:50 ? 00:00:00 /opt/ibm/db2/V9.1/bin/db2fmcd
dasusr1 5383 1 0 11:50 ? 00:00:00 /opt/ibm/db2/V9.1/das/bin/db2fmd -i
dasusr1 -m /opt/ibm/db2/V9. …….

Screenshot : Db2 Process
db2fm5