Archives

Creating of DB2 Instance


Prequisite: Ensure that the Proper users are created
The Groups are Created
The Home Directory of the Instance owner is set

Steps to Create an DB2 instance

1) Login to the server as root or any user under which db2 was installed
2) Execute the db2icrt command within DB2DIR/instance/db2icrt
On Linux and UNIX operating systems, this utility is located in the DB2DIR/instance directory,
where DB2DIR represents the installation location where the current version of the DB2 database system is installed.
3) Run the db2icrt command. For example, on Linux or UNIX operating systems:
DB2DIR/instance/db2icrt -a AuthType -u FencedID InstName
where:
DB2DIR :is the DB2 installation directory.
-a AuthType – AuthType can be one of SERVER, CLIENT, or SERVER_ENCRYPT. SERVER is the default.
-u FencedID – Fenced user defined functions (UDFs) and fenced stored procedures will run.
InstName – Represents the name of instance. The name of the instance must be the same as the name of the instance owning user.

The instance will be created in the instance owning user’s home directory.

[root@mercury instance]# cd /opt/ibm/db2/V9.1/instance/[root@mercury instance]# ls -ltr db2icrt
-r-xr–r– 1 root root 8120 Nov 6 2007 db2icrt

[root@mercury instance]# ./db2icrt -u db2fenc1 db2inst1
DBI1070I Program db2icrt completed successfully.

If you want to assign a port along with the Instance creation we can give the ” -p” option along with the port no

It will also add the Port entries in /etc/services

[root@mercury instance]# ./db2icrt -u db2fenc1 -p 50000 db2inst1
DBI1070I Program db2icrt completed successfully.

4) Check if the instance has been created , use db2ilist command

[db2inst1@mercury instance]# db2ilist
db2inst1

db2icrt
5) Check the directory structure where the db2 instance
On UNIX operating systems, the instance directory is located in the INSTHOME/sqllib directory,
where INSTHOME is the home directory of the instance owner.

On Windows operating systems, the instance directory is located in the /sqllib sub-directory, in the directory where DB2 UDB was installed.

[root@mercury ~]# cd /home/db2inst1[[root@mercury db2inst1]# pwd
/home/db2inst1

[root@mercury db2inst1]# ls -l
drwxrwxr-x 3 db2inst1 db2grp1 4096 May 23 08:58 db2inst1
drwxrwsr-t 15 db2inst1 db2grp1 4096 May 23 20:29 sqllib

db2icrt1

6) Instance is created

What is a DB2 instance


A DB2 instance is a logical database manager environment where you catalog databases and set configuration parameters.
If needed you can create more than one instance. You can use multiple instances to do the following:
->Use one instance for a development environment and another instance for a production environment.
->Tune an instance for a particular environment.
->Restrict access to sensitive information.
->Optimize the database manager configuration for each instance.

It should be noted that multiple instances have some minor disadvantages:
->Additional system resources (virtual memory and disk space) are required for each instance.
->More administration is required because of the additional instances to manage.

The instance directory stores all information that pertains to a database instance. You cannot change the location of the instance directory once it is created.
The directory contains:
->The database manager configuration file
->The system database directory
->The node directory
->The node configuration file (db2nodes.cfg)
->Any other files that contain debugging information, such as the exception or register dump


Important DB2 Commands

=============================================================

Creating of DB2 Instance
[root@mercury instance]# cd /opt/ibm/db2/V9.1/instance
[root@mercury instance]# ./db2icrt -u db2fenc1 db2inst1

=============================================================

Delete DB2 Instance
[root@mercury instance]# cd /opt/ibm/db2/V9.1/instance
[root@mercury instance]# ./db2idrop db2inst1

=============================================================

List the Instance
[root@mercury instance]# cd /opt/ibm/db2/V9.1/instance
[root@mercury instance]# ./db2ilist

=============================================================

Start DB2 Instance
[db2inst1@mercury ~]$ db2start

=============================================================

Stop DB2 Instance
[db2inst1@mercury ~]$ db2stop

=============================================================

List DB2 Applications
[db2inst1@mercury ~]$ db2 list applications
[db2inst1@mercury ~]$ db2 list applications for database sample show detail
[db2inst1@mercury ~]$ db2 list applications for database sample show detail | grep -i “executing”
[db2inst1@mercury ~]$ db2 list applications for database sample show detail | grep -i “lock”

=============================================================

List DB2 TableSpace
[db2inst1@mercury ~]$ db2 list tablespaces
[db2inst1@mercury ~]$ db2 list tablespaces show detail

=============================================================

List DB2 Diagnostic Details
[db2inst1@mercury ~]$ db2pd -inst | head -2
[db2inst1@mercury ~]$ db2pd -osinfo

=============================================================

List DB2 History
[db2inst1@mercury ~]$db2 list history all for SAMPLE
[db2inst1@mercury ~]$db2 list history since 19980201 for sample
[db2inst1@mercury ~]$db2 list history backup containing userspace1 for sample
[db2inst1@mercury ~]$db2 list history dropped table all for db sample

=============================================================

List Active Databases
[db2inst1@mercury ~]$ db2 list active databases

=============================================================

Get DB2 Authorizations
[db2inst1@mercury ~]$ db2 get authorizations

=============================================================

List DB Directory
[db2inst1@mercury ~]$ db2 list db directory
[db2inst1@mercury ~]$ db2 list database directory
[db2inst1@mercury ~]$ db2 list database directory on /home/db2inst1

=============================================================

Db2 License Management
[db2inst1@mercury adm]$cd /home/db2inst1/sqllib/adm/
To view the Licenses
[db2inst1@mercury adm]$ ./db2licm -lFor compliance report
[db2inst1@mercury adm]$ ./db2licm -g /tmp/licences

To Remove the license
[db2inst1@mercury adm]$ ./db2licm -r

=============================================================

Display DB2 Version Info
[root@mercury instance]# db2level

=============================================================

DB2 Backup
Offline Backup:
[db2inst1@mercury adm]$ db2 backup db sampleOnline Backup:
[db2inst1@mercury dbbackup]$ backup db sample online to /databasebkp1, /databasebkp2

List recent backups
[db2inst1@mercury dbbackup]$ db2 list history backup all for sample

Check the integrity of a backup image
[db2inst1@mercury dbbackup]$ db2ckbkp SAMPLE.0.db2inst1.NODE0000.CATN0000.20110524073459.001

=============================================================

DB2 Restore
[db2inst1@mercury dbbackup]$ db2 restore db sample incremental automatic taken at 20110524091023

=============================================================

DB2 Size and Capacity
[db2inst1@mercury dbbackup]$ db2 ‘call get_dbsize_info(?,?,?,0)’

=============================================================

Connect and Disconnect from DB2 Instance
[db2inst1@mercury dbbackup]$ db2 CONNECT TO sample USER db2inst1 using password
[db2inst1@mercury dbbackup]$ db2 connect reset
[db2inst1@mercury dbbackup]$ db2 terminate

=============================================================

Create SAMPLE Db in DB2
[root@mercury instance]# cd /opt/ibm/db2/V9.1/instance
[db2inst1@mercury dbbackup]$ db2sampl

=============================================================

DB2 administration server
[root@mercury instance]# ./dascrt -u dasusr1

=============================================================

DB2 administration server Stop
[root@mercury instance]# ./db2icrt -u db2fenc1 db2inst1

=============================================================

DB2 administration server Start
[dasusr1@mercury ~]$ db2admin start

=============================================================

DB2 Fault Monitor
Enable Fault Monitor Coordinator
[root@mercury bin]# cd /opt/ibm/db2/V9.1/bin/
[root@mercury bin]# ./db2fmcu -u -p /opt/ibm/db2/V9.1/bin/db2fmcdStart up the fault monitor daemon
[root@mercury bin]# cd /opt/ibm/db2/V9.1/bin
[root@mercury bin]# ./db2fm -i db2inst1 -U

Start up the fault monitor service
[root@mercury bin]# cd /opt/ibm/db2/V9.1/bin
[root@mercury bin]# ./db2fm -i db2inst1 -u

Turn on the fault monitor for the instance
[root@mercury bin]# ./db2fm -i db2inst1 -f on

Verify the fault monitor state
[[db2inst1@mercury ~]$ db2fm -s -S

Verify the FMC Daemon state
[root@mercury bin]# ./db2fmcu

=============================================================

Stop the Fault Monitor Deamon
[root@mercury bin]# cd /opt/ibm/db2/V9.1/bin
[root@mercury bin]# ./db2fmcu -d

=============================================================

Lists the DB2 products
[db2inst1@mercury ~]$ db2ls
[db2inst1@mercury ~]$ db2ls -q -a -b /opt/ibm/db2/V9.1

=============================================================

List Database Configuration parameters
[db2inst1@mercury ~]$ db2 get db cfg

=============================================================

List Database Manager parameters
[db2inst1@mercury ~]$ db2 get dbm cfg

DB2 V9.1 Installation on Linux using db2_install

Install the DB2 using db2_install

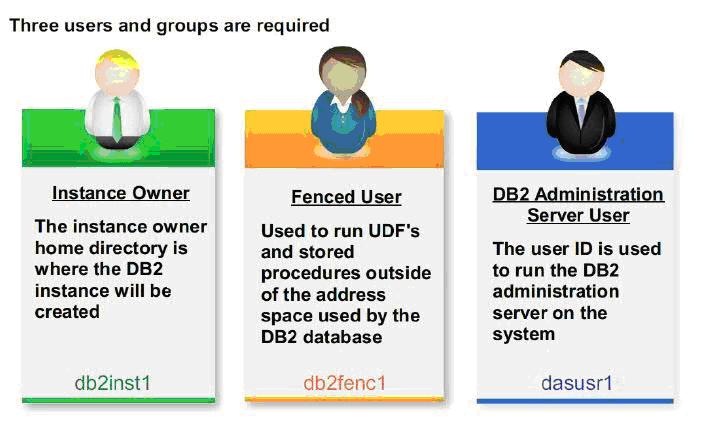
1) Create group and user IDs for a DB2 installation

a) Creation of Groups
[root@mercury db2v9.1]# groupadd -g 999 db2iadm1
[root@mercury db2v9.1]# groupadd -g 998 db2fadm1
[root@mercury db2v9.1]# groupadd -g 997 dasadm1

Validate the Creation of group ID
[root@mercury db2v9.1]# cat /etc/group
gdm:x:42:
pegasus:x:65:
dovecot:x:97:
named:x:25:
ldap:x:55:
;
;;;

db2iadm1:x:999:
db2fadm1:x:998:
dasadm1:x:997:

b) Creation of Users
[root@mercury db2v9.1]# mkdir /db2home
[root@mercury db2v9.1]# useradd -u 1004 -g db2iadm1 -d /db2home/db2inst1 db2inst1
[root@mercury db2v9.1]# useradd -u 1003 -g db2fadm1 -d /db2home/db2fenc1 db2fenc1
[root@mercury db2v9.1]# useradd -u 1002 -g dasadm1 -d /db2home/dasusr1 dasusr1

c) Set the Password for the users

[root@mercury db2v9.1]# passwd db2inst1
Changing password for user db2inst1.
New UNIX password:
BAD PASSWORD: it is based on a dictionary word
Retype new UNIX password:
passwd: all authentication tokens updated successfully.

[root@mercury db2v9.1]# passwd db2fenc1
Changing password for user db2fenc1.
New UNIX password:
BAD PASSWORD: it is based on a dictionary word
Retype new UNIX password:
passwd: all authentication tokens updated successfully.

[root@mercury db2v9.1]# passwd dasusr1
Changing password for user dasusr1.
New UNIX password:
BAD PASSWORD: it is based on a dictionary word
Retype new UNIX password:
passwd: all authentication tokens updated successfully.

Validate the Userid
[root@mercury db2v9.1]# more /etc/passwd
……..
……..

db2inst1:x:1004:999::/db2home/db2inst1:/bin/bash
db2fenc1:x:1003:998::/db2home/db2fenc1:/bin/bash
dasusr1:x:1002:997::/db2home/dasusr1:/bin/bash

2) Create a DB2 Administration Server (DAS)

a)Log in as user with root user authority.
b)Issue the  command to create the DAS:

DB2DIR/instance/dascrt -u DASuser

where
DB2DIR specifies the path where the DB2 database product was installed.
/opt/ibm/db2/V9.1 for Linux operating systems
-u specifies the DAS user you created when creating users and groups.

[root@mercury db2v9.1]# cd /opt/ibm/db2/V9.1/instance/
[root@mercury instance]# pwd
/opt/ibm/db2/V9.1/instance

[root@mercury instance]# ls -l dascrt
-r-xr-xr-x  1 bin bin 4239 Nov  6  2007 dascrt

[root@mercury instance]# ./dascrt -u dasusr1
SQL4406W  The DB2 Administration Server was started successfully.
DBI1070I Program dascrt completed successfully.

3) Create an instance using db2icrt

Log in with proper authority.
Run the db2icrt command. For example, on Linux or UNIX operating systems:

DB2DIR/instance/db2icrt -a AuthType -u FencedID InstName

where:

DB2DIR
is the DB2 installation directory.
On Linux operating systems, the default installation directory is /opt/ibm/db2/V9.7.
-a AuthType (Linux or UNIX)
Represents the authentication type for the instance.
AuthType can be one of SERVER, CLIENT, or SERVER_ENCRYPT. SERVER is the default. This parameter is optional.
-u FencedID
Represents the name of the user under which fenced user defined functions (UDFs) and fenced stored procedures will run.
InstName
Represents the name of instance. The name of the instance must be the same as the name of the instance owning user.

The instance will be created in the instance owning user’s home directory.

For eg :
[root@mercury instance]# pwd
/opt/ibm/db2/V9.1/instance
[root@mercury instance]#

[root@mercury instance]# ./db2icrt -a SERVER -u db2fenc1 db2inst1
DBI1070I Program db2icrt completed successfully.

[root@mercury instance]# ./db2ilist
db2inst1
[root@mercury instance]#

Create links for DB2 files
Configure TCP/IP communications for a DB2 instance

4) Register the license key using the License Center

DB2 license files

On Linux® or UNIX® operating systems, register a DB2 license key by entering the following command:

INSTHOME/sqllib/adm/db2licm -a filename

where INSTHOME represents the home directory of the instance owner and filename is the full path name and file name for the license key that corresponds to the product or feature you have purchased.

To confirm that you have successfully registered the license key, issue the command db2licm -l or db2licm -l show detail.
[db2inst1@mercury adm]$ pwd
/db2home/db2inst1/sqllib/adm
[db2inst1@mercury adm]$ ls -l db2licm
-r-sr-x—  1 root db2iadm1 58261 May 22 15:31 db2licm
[db2inst1@mercury adm]$ ./db2licm -l
Product name:                     “DB2 Enterprise Server Edition”
License type:                     “Restricted”
Expiry date:                      “Permanent”
Product identifier:               “db2ese”
Version information:              “9.1”
Annotation:                       “-4;(_o)”

5) Create a sampleDB to test it

[db2inst1@mercury ~]$ db2sampl

Creating database “SAMPLE”…
Connecting to database “SAMPLE”…
Creating tables and data in schema “DB2INST1″…

‘db2sampl’ processing complete.

db2 => connect to sample

Database Connection Information

Database server        = DB2/LINUX 9.1.4
SQL authorization ID   = DB2INST1
Local database alias   = SAMPLE

db2 => select * from staff

ID     NAME      DEPT   JOB   YEARS  SALARY    COMM
—— ——— —— —– —— ——— ———
10 Sanders       20 Mgr        7  98357.50         –
20 Pernal        20 Sales      8  78171.25    612.45
30 Marenghi      38 Mgr        5  77506.75         –
40 O’Brien       38 Sales      6  78006.00    846.55

This ensures that the DB has been created sucessfully , we would drop the DB after this test

6) Drop Sample Database

[db2inst1@mercury ~]$ db2 drop database sample
DB20000I  The DROP DATABASE command completed successfully.
[db2inst1@mercury ~]$

7) Logs in DB

[db2inst1@mercury db2dump]$ pwd
/db2home/db2inst1/sqllib/db2dump

[db2inst1@mercury db2dump]$ ls -ltr
total 6272
drwxrwxr-t  2 db2inst1 db2iadm1    4096 May 22 15:44 stmmlog
-rw-r—–  1 db2inst1 db2iadm1 6291376 May 22 15:45 db2eventlog.000
-rw-rw-rw-  1 db2inst1 db2iadm1   16192 May 23 03:57 db2inst1.nfy
-rw-r—–  1 db2inst1 db2iadm1   66383 May 23 03:57 db2diag.log
-rw-r–r–  1 db2fenc1 db2iadm1    3420 May 23 03:57 db2sampl_Import.msg

[db2inst1@mercury db2dump]$ ls -l db2diag.log
-rw-r—–  1 db2inst1 db2iadm1 66383 May 23 03:57 db2diag.log

[db2inst1@mercury db2dump]$ tail -f db2diag.log
to lock intent “X” was successful.

2011-05-23-03.57.34.331468+330 E65905G478         LEVEL: Warning
PID     : 2710                 TID  : 3086313152  PROC : db2agent (SAMPLE) 0
INSTANCE: db2inst1             NODE : 000         DB   : SAMPLE
APPHDL  : 0-770                APPID: *LOCAL.db2inst1.110522222722
AUTHID  : DB2INST1
FUNCTION: DB2 UDB, data management, sqldEscalateLocks, probe:3
MESSAGE : ADM5502W  The escalation of “11” locks on table “SYSIBM  .SYSRELS” to
lock intent “X” was successful.

[db2inst1@mercury db2dump]$

Directory of Installation

[db2inst1@mercury ~]$ cd /opt/ibm/db2/V9.1/
[db2inst1@mercury V9.1]$ ls -ltr
total 248
dr-xr-xr-x   3 bin  bin   4096 Nov  6  2007 java
dr-xr-xr-x   4 bin  bin   4096 Nov  6  2007 conv
dr-xr-xr-x   2 bin  bin   4096 Nov  6  2007 icons

7) Check the Ports

[db2inst1@mercury db2dump]$ cat /etc/services


# Local services

DB2_db2inst1    60000/tcp
DB2_db2inst1_1  60001/tcp
DB2_db2inst1_2  60002/tcp
DB2_db2inst1_END        60003/tcp
[db2inst1@mercury db2dump]$

DB2 users and groups

db2users

  • Instance owner
    • The DB2 instance is created in the instance owner home directory.
    • This user ID controls all DB2 processes and owns all filesystems and devices used by the databases contained within the instance.
    • The default user isdb2inst1and the default group isdb2iadm1.
    Fenced user
    • The fenced user is used to run user defined functions (UDFs) and stored procedures outside of the address space used by the DB2 database.
    • The default user isdb2fenc1and the default group isdb2fadm1.
    DB2 administration server user
    • The user ID for the DB2 administration server user is used to run the DB2 administration server (DAS) on your system.
    • The default user isdasusr1and the default group isdasadm1.
    • This user ID is also used by the DB2 GUI tools to perform administration tasks against the local server database instances and databases.
    • There is only one DAS per computer. One DAS services one or more database instances, including database instances that belong to different installations.
    • The DAS release level must be as high (or higher) than the release level of any of the database instances it services.

The user IDs you create will be required to complete subsequent setup tasks.

Default users and groups

User
Example user name
Example group name
Instance owner
db2inst1
db2iadm1
Fenced user
db2fenc1
db2fadm1
DB2 administration server user
dasusr1
dasadm1
 

Procedure to create uses and groups

To create the required groups and user IDs for DB2 database systems:
  1. Log in as a user with root user authority.
  2. Enter the following commands for the Linux operating systems
a) To create groups
#groupadd -g 999 db2iadm1
#groupadd -g 998 db2fadm1
#groupadd -g 997 dasadm1
 
Ensure that the group-id are not in use, we could use any available group-id
 
b) Create users for each group:
#useradd -u 1004 -g db2iadm1 -m -d /home/db2inst1 db2inst1
#useradd -u 1003 -g db2fadm1 -m -d /home/db2fenc1 db2fenc1
#useradd -u 1002 -g dasadm1 -m -d /home/dasusr1 dasusr1
 
Ensure that the user-id are not in use, we could use any available user-id
 
c) Set initial password:
passwd db2inst1
passwd db2fenc1
passwd dasusr1


DB2 Installation Methods

There are various installation methods for DB2. The following table shows the installation methods that are available by operating system.
Installation method by operating system.
Installation method
Windows
Linux or UNIX
DB2 Setup wizard
Yes
Yes
Response file installation
Yes
Yes
db2_install command
No
Yes
Payload file deployment
No
Yes


DB2 Setup wizard : The DB2 Setup wizard is a GUI installer available on Linux, UNIX, and Windows operating systems. The DB2 Setup wizard creates the following
  • Complete Product binaries and core files
  • Creates the Users and relevant Groups
  • Creates DB2 instances
  • Creates the Response File
  • Various Configurations


Prerequisites for Installation of DB2

Installation requirements for DB2 database products
Before proceeding with the installation, we need to check for the prerequisites needed for the installation
    Hardware requirements:
  • Supported processors
  • Disk space requirements
  • Memory requirements
    Software requirements:
  • Linux distributions
  • Kernel levels and libraries requirements
  • Additional software requirements