Tag Archive | Websphere

Deploy / Config Changes when the Websphere DMGR is Down

There could be instances when your Websphere Deployment Manager  server is crashed / down due any reasons .
It could be due to
a) Hardware issues
b) OS issues
c) Filesystem corruption
d) Configuration Issues etc ..

Consider a scenario wherein your DMGR is down, and at the same time there is an urgent configuration change / deployment / upgrade you need to do to your application .

In this case you may need to do the changes directly to the Application server node using wsadmin commands

NOTE : This is not a recommended way 

NOTE : WHENEVER THE DMGR IS UP AND RUNNING THE CHANGES WILL BE LOST DURING THE NODE SYNC Process .

NOTE :Once the DMGR is started, you would need to make the changes which you made on Application Server again to the DMGR and do a complete Sync 

NOTE :For a Clustered Environment ,, the below changes needs to be one on each of the Cluster Nodes 

Following are the highlevel steps to deploy the application when the DMGR is down

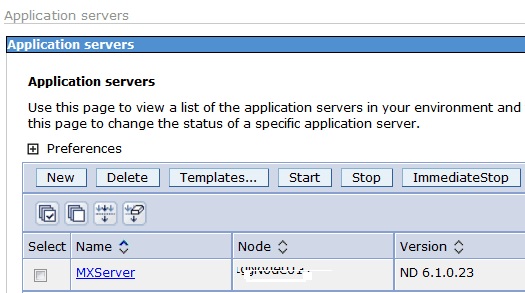
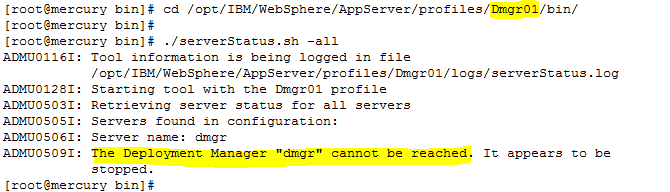
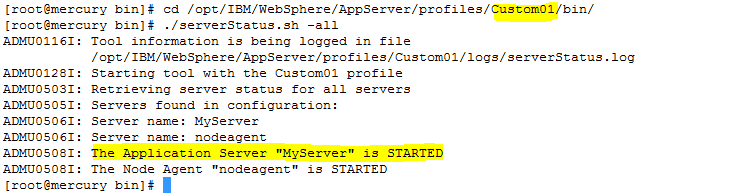
Step 1 : To simulate that scenario of DMGR Crashed, I have stopped the DMGR using ./stopManager.sh

deploy_without_dmgr14

And the Application Servers is started

deploy_without_dmgr15

Step 2 : Login to the Application Server Node as the owner of the WAS installation .

Step 3 : Launch the wsadmin.sh from the APP_SRV_PROFILE/bin

[root@mercury bin]# cd /opt/IBM/WebSphere/AppServer/profiles/Custom01/bin

Execute wsadmin.sh

[root@mercury bin]# ./wsadmin.sh

deploy_without_dmgr

We will get an Error
“WASX7023E: Error creating “SOAP” connection to host “mercury.com”; exception information: com.ibm.websphere.management.exception.ConnectorNotAvailableException: [SOAPException: faultCode=SOAP-ENV:Protocol; msg=; targetException=java.net.MalformedURLException]”

The reason being that the wsadmin.properties file in the /opt/IBM/WebSphere/AppServer/profiles/Custom01/properties    folder still refers to the   DMGR hostname and DMGR Soap Port

We need to modify the values of the com.ibm.ws.scripting.port and  com.ibm.ws.scripting.host values to match the hostname of Application Server Node

Step 4 : Modify the wsadmin.properties file

[root@mercury bin]# cd /opt/IBM/WebSphere/AppServer/profiles/Custom01/properties

Edit the wsadmin.properties

[root@mercury properties]# vi wsadmin.properties

deploy_without_dmgr2

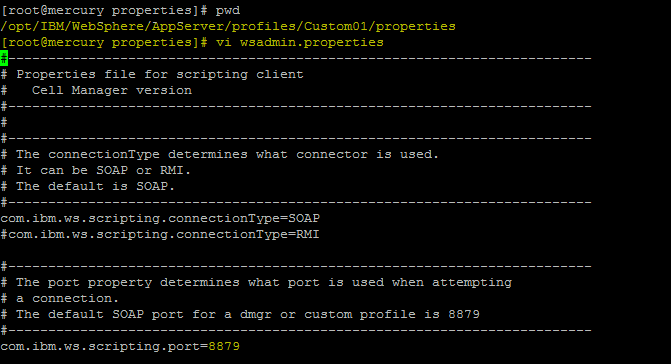
Currently the port 8879 is the SOAP port of the DMGR ..

Change the com.ibm.ws.scripting.port and  com.ibm.ws.scripting.host values to the values of the Application Server Node

deploy_without_dmgr3

Here 8884 is the Soap Port of My application Server “MyServer”

Save the Changes in the wsadmin.properties file

Step 5 : Now execute the wsadmin.sh from the Application Server  Node

[root@mercury properties]# cd  /opt/IBM/WebSphere/AppServer/profiles/Custom01/bin/


[root@mercury properties]# ./wsadmin.sh -lang jython  -conntype NONE

deploy_without_dmgr4

Step 6 : Deploy the application using wsadmin
In the wsadmin Prompt execute the below command . The DefaultApplication.ear is located in /opt/IBM/WebSphere/AppServer/installableApps/

NOTE : You can use wsadmin interactive Steps to deploy the application too

wsadmin>AdminApp.install(‘/opt/IBM/WebSphere/AppServer/installableApps/DefaultApplication.ear’, ‘[-server MyServer]’)

deploy_without_dmgr16

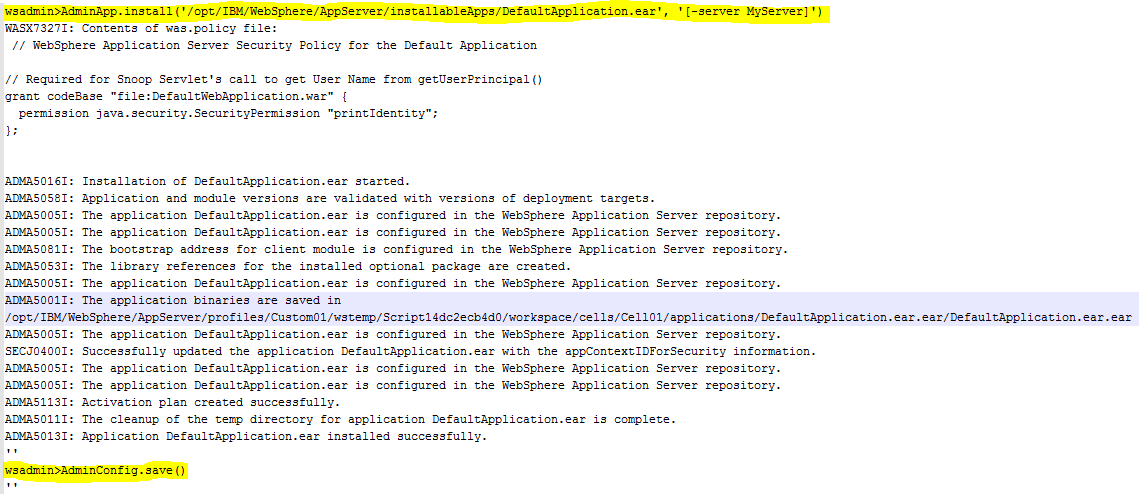
Save the configurations using AdminConfig.save

wsadmin>AdminConfig.save()

NOTE : You can use wsadmin commands to manipulate other  configurations also of the Application Server

NOTE : These changes will get lost when the dmgr is started

Step 7 : Ensure the wc_default and wc_default_secure port of Application Server is available in the virtualhost.xml .

On the Application Server Node

[root@mercury properties]# cd  /opt/IBM/WebSphere/AppServer/profiles/Custom01/config/cell/Cell01

Search for wc_default port in virtualhost.xml

[root@mercury properties]# cat virtualhost.xml | grep 9082

Search for wc_default_secure port in virtualhost.xml

[root@mercury properties]# cat virtualhost.xml | grep 9445

Where 9082  & 9445 are wc_default and wc_default_secure port of the Applicatioin server “MyServer”

NOTE : If the wc_default and wc_default_secure port of your Application Server is not present in the  virtualhost.xml   you will get the error
“A WebGroup/Virtual Host to handle /snoop has not been defined
SRVE0255E: A WebGroup/Virtual Host to handle localhost:80 has not been defined.”


Step 8 : Start the applications using wsadmin or Restart the application server .. depending on the changes which you have done

[root@mercury properties]# cd /opt/IBM/WebSphere/AppServer/profiles/Custom01/bin
[root@mercury bin]# ./stopServer.sh MyServer
[root@mercury bin]# ./startServer.sh MyServer


Step 9 : Validate if the application has been deployed only to the application node and not the DMGR .

Validation 1 : Check the Application Server SystemOut.log after the Application server / Application is started.

Check the systemOut.log to see if the Application DefaultApplication has started properly .

Also check if the web containers are mapped to the proper ports ..
Refer the screenshot of SystemOut.log

deploy_without_dmgr17

Validation 2 : Check the serverindex.xml  of both  Application Server Node and Dmgr Node

Application Node

[root@mercury mercuryNode01]# cat /opt/IBM/WebSphere/AppServer/profiles/Custom01/config/cells/Cell01/nodes/mercuryNode01/serverindex.xml

deploy_without_dmgr7

deploy_without_dmgr8

Here we can see the Application which we deployed ie DefaultApplication.ear.ear in the serverindex.xml

Dmgr Node

[root@mercury mercuryNode01]# cat /opt/IBM/WebSphere/AppServer/profiles/Dmgr01/config/cells/Cell01/nodes/mercuryNode01/serverindex.xml

deploy_without_dmgr5

deploy_without_dmgr6

Similarly in the Dmgr Node’s Serverindex.xml we can not see the deployed application :DefaultApplication.ear.ear

Validation 3 : Check the <Profile_Home>/config/cells/Cell01/applications folder for the deployed application

Application Server Node

[root@mercury mercuryNode01]# ls -l /opt/IBM/WebSphere/AppServer/profiles/Custom01/config/cells/Cell01/applications

deploy_without_dmgr12

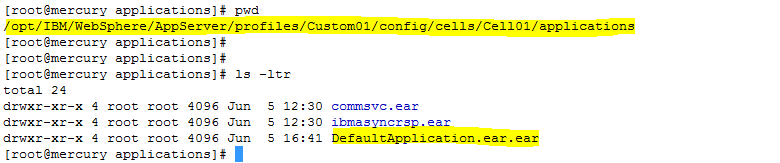
We can see the DefaultApplication.ear.ear in this folder

Dmgr Node

[root@mercury mercuryNode01]# ls -l /opt/IBM/WebSphere/AppServer/profiles/Dmgr01/config/cells/Cell01/applications

deploy_without_dmgr13

There is no DefaultApplication.ear.ear

Step 10 : Check the deployed application using the browser

url : http://IP of the Application Server:wc_default/snoop

As I have deployed the DefaultApplication I will be testing if the application snoop is accessible now on the applicaiton server when the DMGR is down

deploy_without_dmgr9

deploy_without_dmgr11

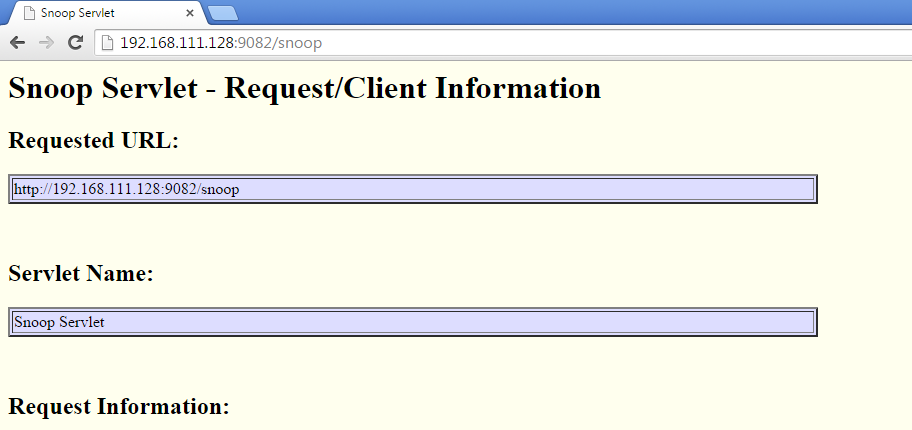
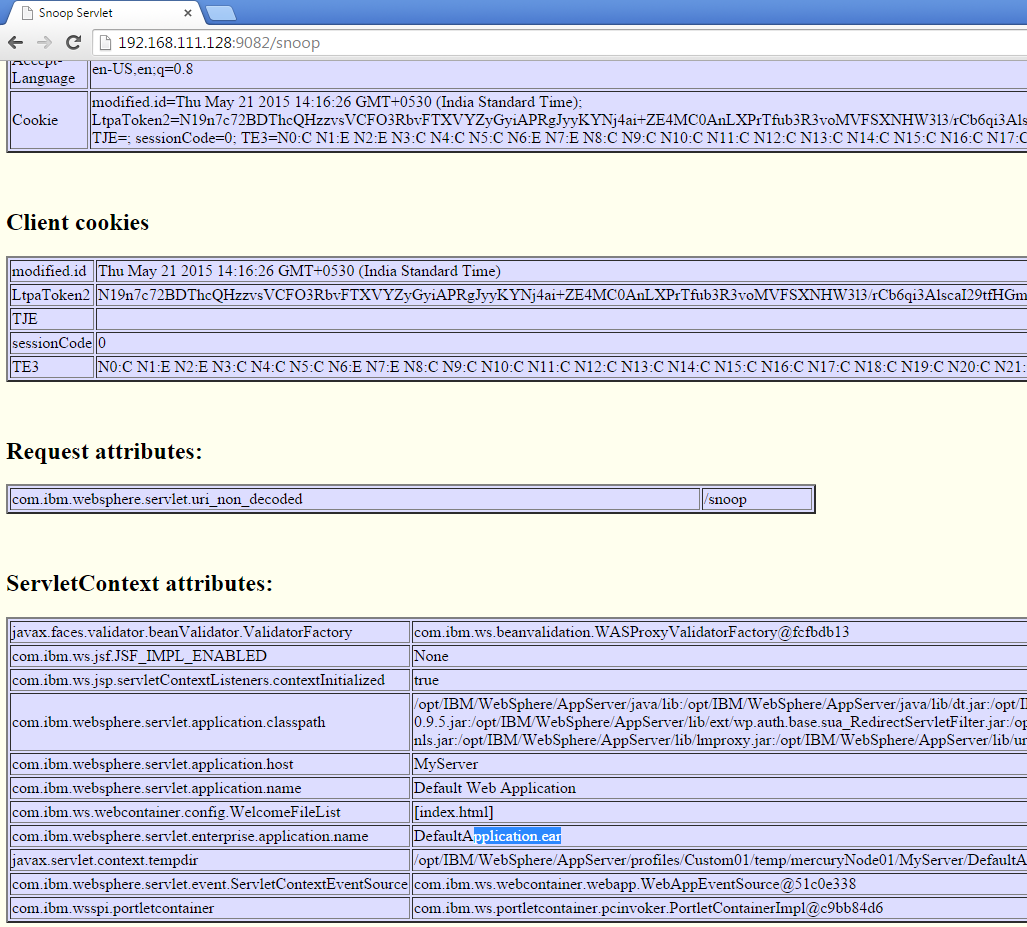
This shows we can deploy the application directly on the Application Server Node when the DMGR is down

NOTE : As mentioned above these changes will get overwritten when the Node sync happens when the DMGR is started

NOTE :Once the DMGR is started, you would need to make the changes which you made on Application Server again to the DMGR and do a complete Sync 


To get automated mail updates of my Posts..
Please subscribe to the site http://webspherepundit.com
And also like the Facebook Page
https://www.facebook.com/webspherepundit


Web Based Mode for Ibm Installation Manager 1.8

With the Release of Ibm Installation Manager 1.8.0 , IBM has added one more Mode for Installation/Un-Installation etc of Websphere Product viz the Web Based Mode

So we have the Following Modes in IIM 1.8:
1) Graphical Mode
2) Silent mode
3) Console Mode
4) Web Based Mode

I have downloaded 1.8.2 for Linux from IBM FIX central . Click HERE for the download

NOTE : Use this Mode ONLY if you have trouble accessing the other Modes . Ensure  you have a Very Stable and High Speed Network to try this But I would not Recommend it

If there is any glitch in the network your installation may be in an inconsistent State Hence use Web Based as a Last Resort

Activity :
a) Install IIM 1.8.2
b) Start the ibmim-web Services from IIM
c) Access the IIM using browser
d) Change the port no of Ibmim-web

Steps :
1) Installation of IIM 1.8.2

a) Download IIM 1.8.2 from Fix Central
b) Extract the zip file in the server

ibmim-web1

c) Install IIM so run #./installc -acceptLicense

NOTE : I am installing IIM using root , but you could use any other user which has the rights to install IIM , In that case use userinstc

ibmim-web2

d) After the Installation of IIM 1.8 .2 Verify it using “#./imcl -version

ibmim-web3


2) Start the IIM Web Mode
The Modules needed to run the IIM Web is allready installed with the IIM 1.8.2 installation under /opt/IBM/InstallationManager/eclipse/web/ibmim-web

a)  To start the Webserver which will start the IIM Web Mode execute the “ibmim-web”
Its present in /opt/IBM/InstallationManager/eclipse/web/ibmim-web

Once this command is run it will also prompt the url for accessing the web iim . Here in this case its http://10.0.0.03:9090/ibmim

ibmim-web4

b)  You can run ibmim-web as background using “&”

#/opt/IBM/InstallationManager/eclipse/web/ibmim-web &

ibmim-web5

3) Verify the Process and the Ports
Check the Process and the Port no for ibmim-web using ps and netstat command

# ps -ef | grep ibmim
# netstat -ntlp | grep 9090

ibmim-web6


4) Access the browser to the url “http://10.0.0.03:9090/ibmim” 

Note : Ensure that you have network connectivity from the desktop to the server you are connecting. Also check the proxy settings of the Browser

ibmim-web7


Navigate to the File options of the  IIM

ibmim-web8


Uninstallation Option of IIM using the IIM Web Mode

ibmim-web9


In this way we can use the IIM Web Mode to Installation , Un-Installation etc etc for Websphere Products


===============================================================

Change the Port No for IBM IM – Web 

===============================================================

There may be situations wherein you would want to change the Port No of the IBM IM – Web
It could be due to the following
1) Port no are already used by some other application
2) Company policy to have a specific range of Ports
3) Difficulty in opening the firewall ports etc etc


a) Stop the ibmim-web process
1) You could terminate the process or Break the command prompt using Ctrl+C
2) Or to stop the web server, from the main menu, select File > Stop server.

b) Modify the port
Edit the ibmim-web.ini file to change the port no . This file is within the /opt/IBM/InstallationManager/eclipse/web/ibmim

ibmim-web10

NOTE: Take the backup before  changing it 

There are two parameters like

-Dorg.osgi.service.http.port=9090
-Dorg.osgi.service.http.port.secure=9095

You need to change the port as per your need to both Http and Https Attribute .

ibmim-web11

Below I changed the http port to 9091

ibmim-web12

c) Start the ibmim-web Services
You can run ibmim-web as background using “&”

#/opt/IBM/InstallationManager/eclipse/web/ibmim-web &

e) Access the url “http://10.0.0.03:9091/ibmim”

ibmim-web13


In this way we can change the port no for IBM Installation Manager Web Mode


To get regular mail updates on my Posts..
Please subscribe to the site http://webspherepundit.com
And also like the Facebook Page
https://www.facebook.com/webspherepundit


IMCL Console Mode for Installation

There may be situations where you will not have the access to the GUI mode of Ibm Installation Manager or may find it difficult to installation using response file.

In such cases you could use the Console mode of IIM

A) Using IMCL console mode  we can also install , uninstall upgrade the WAS  Products.

Activity : 
Here i will show a sample to Install “IBM WebSphere SDK Java Technology Edition (Optional) 7.0.4.1”  using IIM Console Mode 

But you can install all the possible software’s supported by IIM

Steps :
1) Ensure All the prerequisites are satisfied etc
2) Execute “imcl -c ” to Launch the Ibm Installation Manager in the Console Mode

[root@wasnode tools]# ./imcl -c
=====> IBM Installation Manager
Select:
1. Install – Install software packages
2. Update – Find and install updates and fixes to installed software packages
3. Modify – Change installed software packages
4. Roll Back – Revert to an earlier version of installed software packages
5. Uninstall – Remove installed software packagesOther Options:
L. View Logs
S. View Installation History
V. View Installed Packages
————————
P. Preferences
————————
A. About IBM Installation Manager
————————
X. Exit Installation Manager—–> P=====> IBM Installation Manager> PreferencesSelect:
1. Repositories
2. Appearance
3. Files for Rollback
4. SSL/TLS
5. HTTP/FTP Proxy
6. Passport Advantage
7. Updates

R. Return to Main Menu
—–> [1] 1

=====> IBM Installation Manager> Preferences> Repositories

Repositories:
1. [X] /IBMSoftware/was8.5_IHS_8.5/was8.5.5/SDK
2. [X] /IBMSoftware/was8.5_IHS_8.5/was8.5.5/WASND
3. [X] /IBMSoftware/was8.5_IHS_8.5/was8.5.5/WASND/repository.config
4. [X] /IBMSoftware/was8.5_IHS_8.5/was8.5.5/SDK/repository.config

Other Options:
D. Add Repository

S. [X] Search service repositories during installation and updates

R. Restore Defaults
A. Apply Changes and Return to Preferences Menu
P. Temporarily Keep Changes and Return to Preferences Menu

—–> D

=====> IBM Installation Manager> Preferences> Repositories> Add repository

Enter a new repository location. To skip, press Enter:
—–> /IBMSoftware/was8.5_IHS_8.5/was8.5.5/SDK

=====> IBM Installation Manager> Preferences> Repositories> Add repository

ERROR: The repository is already added to the list.

Enter a new repository location. To skip, press Enter:
—–>

=====> IBM Installation Manager> Preferences> Repositories

Repositories:
1. [X] /IBMSoftware/was8.5_IHS_8.5/was8.5.5/SDK
2. [X] /IBMSoftware/was8.5_IHS_8.5/was8.5.5/WASND
3. [X] /IBMSoftware/was8.5_IHS_8.5/was8.5.5/WASND/repository.config
4. [X] /IBMSoftware/was8.5_IHS_8.5/was8.5.5/SDK/repository.config

Other Options:
D. Add Repository

S. [X] Search service repositories during installation and updates

R. Restore Defaults
A. Apply Changes and Return to Preferences Menu
P. Temporarily Keep Changes and Return to Preferences Menu

—–> R

=====> IBM Installation Manager> Preferences> Repositories

Repositories:

Other Options:
D. Add Repository

S. [X] Search service repositories during installation and updates

R. Restore Defaults
A. Apply Changes and Return to Preferences Menu
P. Temporarily Keep Changes and Return to Preferences Menu

—–> D

=====> IBM Installation Manager> Preferences> Repositories> Add repository

Enter a new repository location. To skip, press Enter:
—–> /IBMSoftware/was8.5_IHS_8.5/was8.5.5/SDK
Checking repositories…

=====> IBM Installation Manager> Preferences> Repositories

Repositories:
1. [X] /IBMSoftware/was8.5_IHS_8.5/was8.5.5/SDK

Other Options:
D. Add Repository

S. [X] Search service repositories during installation and updates

R. Restore Defaults
A. Apply Changes and Return to Preferences Menu
P. Temporarily Keep Changes and Return to Preferences Menu

—–> A

=====> IBM Installation Manager> Preferences

Select:
1. Repositories
2. Appearance
3. Files for Rollback
4. SSL/TLS
5. HTTP/FTP Proxy
6. Passport Advantage
7. Updates

R. Return to Main Menu
—–> [1] R

=====> IBM Installation Manager

Select:
1. Install – Install software packages
2. Update – Find and install updates and fixes to installed software packages
3. Modify – Change installed software packages
4. Roll Back – Revert to an earlier version of installed software packages
5. Uninstall – Remove installed software packages

Other Options:
L. View Logs
S. View Installation History
V. View Installed Packages
————————
P. Preferences
————————
A. About IBM Installation Manager
————————
X. Exit Installation Manager

—–> 1
Checking repositories…
Loading repositories…
Checking availability of packages…

=====> IBM Installation Manager> Install

Select packages to install:
1. [ ] IBM WebSphere SDK Java Technology Edition (Optional) 7.0.4.1
2. [ ] IBM WebSphere SDK Java Technology Edition Version 7.0 for Liberty 7.0.4.1

O. Check for Other Versions, Fixes, and Extensions

C. Cancel
—–> [C] 1

=====> IBM Installation Manager> Install> Select

IBM WebSphere SDK Java Technology Edition (Optional) 7.0.4.1

Options:
1. Choose version 7.0.4.1 for installation.
2. Show all available versions of the package.

C. Cancel
—–> [1] 2

=====> IBM Installation Manager> Install> Select> Versions

IBM WebSphere SDK Java Technology Edition (Optional)

Available versions:
1. [X] Version 7.0.4.1

Other Options:
O. OK, C. Cancel
—–> [O]
Preparing and resolving the selected packages…
Loading fixes…

=====> IBM Installation Manager> Install

Select packages to install:
1. [X] IBM WebSphere SDK Java Technology Edition (Optional) 7.0.4.1
2. [ ] IBM WebSphere SDK Java Technology Edition Version 7.0 for Liberty 7.0.4.1

O. Check for Other Versions, Fixes, and Extensions

N. Next, C. Cancel
—–> [N]
Finding compatible package groups…
.

=====> IBM Installation Manager> Install> Location

Existing package groups:
1. [X] IBM WebSphere Application Server V8.5

Selected group id: “IBM WebSphere Application Server V8.5”
Selected location: “/opt/IBM/WebSphere/AppServer”

B. Back, N. Next, C. Cancel
—–> [N]

=====> IBM Installation Manager> Install> Location> Summary

Target Location:
Package Group Name : IBM WebSphere Application Server V8.5
Installation Directory : /opt/IBM/WebSphere/AppServer
Shared Resources Directory : /opt/IBM/IMShared

Packages to be installed:
IBM WebSphere SDK Java Technology Edition (Optional) 7.0.4.1

Options:
G. Generate an Installation Response File

B. Back, I. Install, C. Cancel
—–> [I]
25%                    50%                    75%                     100%
——————|——————|——————|——————|
……………………………………………………………………………………………

=====> IBM Installation Manager> Install> Location> Summary> Completion

The install completed successfully.

Options:
F. Finish
—–> [F]

=====> IBM Installation Manager

Select:
1. Install – Install software packages
2. Update – Find and install updates and fixes to installed software packages
3. Modify – Change installed software packages
4. Roll Back – Revert to an earlier version of installed software packages
5. Uninstall – Remove installed software packages

Other Options:
L. View Logs
S. View Installation History
V. View Installed Packages
————————
P. Preferences
————————
A. About IBM Installation Manager
————————
X. Exit Installation Manager

—–> V

=====> IBM Installation Manager> Installed Packages

View the following installed packages and fixes. Enter the number to see the details of a package group, package, or fix.
1-. IBM WebSphere Application Server V8.5
2. IBM WebSphere Application Server Network Deployment 8.5.5.0
3. IBM WebSphere SDK Java Technology Edition (Optional) 7.0.4.1

Other Options:
O. OK

—–> [O]

=====> IBM Installation Manager

Select:
1. Install – Install software packages
2. Update – Find and install updates and fixes to installed software packages
3. Modify – Change installed software packages
4. Roll Back – Revert to an earlier version of installed software packages
5. Uninstall – Remove installed software packages

Other Options:
L. View Logs
S. View Installation History
V. View Installed Packages
————————
P. Preferences
————————
A. About IBM Installation Manager
————————
X. Exit Installation Manager

—–> X

==================================================================

We have installed “IBM WebSphere SDK Java Technology Edition (Optional) 7.0.4.1”  for the existing WAS Installation


============================================================

B) Check for the installation Completion

[root@wasnode tools]# ./imcl listInstalledPackages
com.ibm.cic.agent_1.6.2000.20130301_2248
com.ibm.websphere.IBMJAVA.v70_7.0.4001.20130510_2103
com.ibm.websphere.ND.v85_8.5.5003.20140730_1249


C) Similarly you can use the IMCL console mode for the Installation , Updation and Installation

===========================================================

To get regular mail updates on my Posts..
Please subscribe to the site http://webspherepundit.com
And also like the Facebook Page
https://www.facebook.com/webspherepundit

Websphere Application Server Fixpack Installation using IMCL

Steps to Install a WAS  FixPack

a) Check if the Fixpack which you are going to install will be compatible with the WAS, OS , Applications which runs on it etc
b) Download the Fixpack from the IBM Fix Central
c) Extract the Fixpack
d) Run “versionInfo.sh -long” to get the version before fixpack

NOTE : TAKE THE BACKUP OF THE IIM Installation PATH and DATA Path , TAKE THE BACKUP OF THE COMPLETE WAS INSTALLATION DIRECTORY


/opt/IBM/WebSphere/AppServer/bin/versionInfo.sh -long > ~/versionInfo_beforeFixpack.txt


[root@wasnode tools]# /opt/IBM/WebSphere/AppServer/bin/versionInfo.sh
WVER0010I: Copyright (c) IBM Corporation 2002, 2012; All rights reserved.
WVER0012I: VersionInfo reporter version 1.15.1.48, dated 2/8/12——————————————————————————–
IBM WebSphere Product Installation Status Report
——————————————————————————–Report at date and time March 12, 2015 9:27:36 PM ISTInstallation
——————————————————————————–
Product Directory /opt/IBM/WebSphere/AppServer
Version Directory /opt/IBM/WebSphere/AppServer/properties/version
DTD Directory /opt/IBM/WebSphere/AppServer/properties/version/dtd
Log Directory /var/ibm/InstallationManager/logsProduct List
——————————————————————————–
ND installedInstalled Product
——————————————————————————–
Name IBM WebSphere Application Server Network Deployment
Version 8.5.5.0
ID ND
Build Level gm1319.01
Build Date 5/14/13
Package com.ibm.websphere.ND.v85_8.5.5000.20130514_1044
Architecture x86 (32 bit)
Installed Features IBM 32-bit WebSphere SDK for Java
WebSphere Application Server Full Profile

e) Stop All the JAVA Processes like dmgr , nodeagent or servers based on which server you are installing
f) For a distributed server , Apply Fixpack for the DMGR first and then the Nodes
g) Execute ./imcl listInstalledPackages to check the versions currently Installed

[root@wasnode tools]# ./imcl listInstalledPackages
com.ibm.cic.agent_1.6.2000.20130301_2248
com.ibm.websphere.IBMJAVA.v70_7.0.4001.20130510_2103
com.ibm.websphere.ND.v85_8.5.5000.20130514_1044
[root@wasnode tools]#

h) Execute ./imcl listInstalledPackages to check the directory where WAS currently Installed

[root@wasnode tools]# ./imcl listInstallationDirectories
/opt/IBM/WebSphere/AppServer

i) List the packages which are available in the Fixpack extracted Directory “/IBMSoftware/was8.5_IHS_8.5/was8.5.5/FP/”

We need to update “com.ibm.websphere.ND.v85” Package as the Product which is installed is “com.ibm.websphere.ND.v85_8.5.5000.20130514_1044”  ( From the versionInfo and listInstalledPackages )

[root@wasnode tools]# ./imcl listAvailablePackages -repositories /IBMSoftware/was8.5_IHS_8.5/was8.5.5/FP/
com.ibm.websphere.BASE.v85_8.5.5003.20140730_1249
com.ibm.websphere.BASETRIAL.v85_8.5.5003.20140730_1249
com.ibm.websphere.DEVELOPERS.v85_8.5.5003.20140730_1249
com.ibm.websphere.DEVELOPERSILAN.v85_8.5.5003.20140730_1249
com.ibm.websphere.EXPRESS.v85_8.5.5003.20140730_1249
com.ibm.websphere.EXPRESSTRIAL.v85_8.5.5003.20140730_1249
com.ibm.websphere.ND.v85_8.5.5003.20140730_1249
com.ibm.websphere.NDDMZ.v85_8.5.5003.20140730_1249
com.ibm.websphere.NDDMZTRIAL.v85_8.5.5003.20140730_1249
com.ibm.websphere.NDTRIAL.v85_8.5.5003.20140730_1249

j) Install the Fixpack by running “imcl install”

Command: imcl install packageID[_version][,featureID]
-repositories source_repository
-installationDirectory installation_directory
-acceptLicense
-sP — Show Progress

[root@wasnode tools]# ./imcl install com.ibm.websphere.ND.v85_8.5.5003.20140730_1249 -repositories /IBMSoftware/was8.5_IHS_8.5/was8.5.5/FP -installationDirectory /opt/IBM/WebSphere/AppServer -acceptLicense -sP
                         25%                       50%                     75%                     100%
——————|——————|——————|——————|
……………………………………………………………………………………………Updated to com.ibm.websphere.ND.v85_8.5.5003.20140730_1249 in the /opt/IBM/WebSphere/AppServer directory.

k) Verify the Installation
We will see that the Websphter.ND is v85_8.5.5003.20140730

[root@wasnode tools]# ./imcl listInstalledPackages
com.ibm.cic.agent_1.6.2000.20130301_2248
com.ibm.websphere.IBMJAVA.v70_7.0.4001.20130510_2103
com.ibm.websphere.ND.v85_8.5.5003.20140730_1249


[root@wasnode tools]# /opt/IBM/WebSphere/AppServer/bin/versionInfo.sh
WVER0010I: Copyright (c) IBM Corporation 2002, 2012; All rights reserved.
WVER0012I: VersionInfo reporter version 1.15.1.48, dated 2/8/12——————————————————————————–
IBM WebSphere Product Installation Status Report
——————————————————————————–Report at date and time March 12, 2015 10:41:14 PM ISTInstallation
——————————————————————————–
Product Directory /opt/IBM/WebSphere/AppServer
Version Directory /opt/IBM/WebSphere/AppServer/properties/version
DTD Directory /opt/IBM/WebSphere/AppServer/properties/version/dtd
Log Directory /var/ibm/InstallationManager/logsProduct List
——————————————————————————–
ND installed
IBMJAVA7 installedInstalled Product
——————————————————————————–
Name IBM WebSphere Application Server Network Deployment
Version 8.5.5.3
ID ND
Build Level cf031430.01
Build Date 7/30/14
Package com.ibm.websphere.ND.v85_8.5.5003.20140730_1249
Architecture x86 (32 bit)
Installed Features IBM 32-bit WebSphere SDK for Java
WebSphere Application Server Full Profile
EJBDeploy tool for pre-EJB 3.0 modules
Embeddable EJB container
Stand-alone thin clients and resource adapters

l) Recheck the Ownership of the “/opt/IBM/WebSphere/AppServer” change the ownership to the owner of the WAS Instance

[root@wasnode tools]# chown -R wasadmin:wasadmin /opt/IBM/WebSphere/AppServer

m) Start the JVM servers and veiw the System logs to check if there are any errors


To get regular mail updates on my Posts..
Please subscribe to the site http://webspherepundit.com
And also like the Facebook Page
https://www.facebook.com/webspherepundit


Important IMCL Commands

 1: Check the version of IBM Installation Manager

Command: ./imcl version

[root@wasnode tools]# pwd
/opt/IBM/InstallationManager/eclipse/tools
[root@wasnode tools]#
[root@wasnode tools]# ./imcl version
Installation Manager (installed)
Version: 1.6.2
Internal Version: 1.6.2000.20130301_2248
[root@wasnode tools]#

imclversion

=========================================================================
 2: List Installed Packages
Command: ./imcl listInstalledPackages

[root@wasnode tools]# ./imcl listInstalledPackages
com.ibm.cic.agent_1.6.2000.20130301_2248
com.ibm.websphere.IBMJAVA.v70_7.0.4001.20130510_2103
com.ibm.websphere.ND.v85_8.5.5003.20140730_1249

====> com.ibm.websphere.IBMJAVA.v70_7.0.4001.20130510_2103   JAVA SDK
====> com.ibm.websphere.ND.v85_8.5.5003.20140730_1249              WAS ND 8.5

imclinstalledversion
=========================================================================
 3: List Installed Directory
Command: ./imcl listInstallationDirectories

[root@wasnode tools]# ./imcl listInstallationDirectories
/opt/IBM/WebSphere/AppServer

The Installation of WAS ND and SDK is done at “/opt/IBM/WebSphere/AppServer

imclinstalleddirectory
=========================================================================
 4) Uninstalling packages by using imcl
Command: ./imcl uninstall
Uninstall packages from the tools directory by using Installation Manager command line (imcl) uninstall commands.
Before you begin
•To identify the package_id_version,feature_id, run the listAvailablePackages command.

Procedure
To uninstall a package by using imcl:
1) Navigate to the tool directory
2) Run the uninstall command: using imcl

imcl uninstall package_id_version,feature_id -installationDirectory installation_directory

NOTE : There are many options available with imcl, use that as per your requirement

3) List the Installed packages to verify the packages you want to uninstall
BE VERY CAREFUL BEFORE YOU SELECT THE PACKAGE IDs .. Bcoz there may be many Other Websphere Packages installed on different directories

[root@wasnode tools]# ./imcl listInstalledPackages
com.ibm.cic.agent_1.6.2000.20130301_2248
com.ibm.websphere.IBMJAVA.v70_7.0.4001.20130510_2103
com.ibm.websphere.ND.v85_8.5.5003.20140730_1249

We will be uninstalling “com.ibm.websphere.IBMJAVA.v70_7.0.4001.20130510_2103 com.ibm.websphere.ND.v85_8.5.5003.20140730_1249″

4) List the directories where the Websphere Packages are installed
BE VERY CAREFUL BEFORE YOU SELECT THE PACKAGE IDs .. Bcoz There many be many Other Websphere Packages installed on different directories

[root@wasnode tools]# ./imcl listInstallationDirectories
/opt/IBM/WebSphere/AppServer
[root@wasnode tools]#

Here I have only one location where WAS is installed

5) Launch the uninstall option for imcl command line

[root@wasnode tools]# ./imcl uninstall com.ibm.websphere.ND.v85_8.5.5003.20140730_1249 com.ibm.websphere.IBMJAVA.v70_7.0.4001.20130510_2103 -installationDirectory /opt/IBM/WebSphere/AppServer
[root@wasnode tools]#

6) Validate it using “imcl listInstalledPackages” to ensure the WAS packages are removed

[root@wasnode tools]# ./imcl listInstalledPackages
com.ibm.cic.agent_1.6.2000.20130301_2248
[root@wasnode tools]#

7) Delete the WAS Installed Folders post un-installation
/opt/IBM/WebSphere/AppServer

imcluninstall

Video

This is how we uninstall WAS ND
=========================================================================
 5: List Available Packages in the Repositories

Command: ./imcl listAvailablePackages
You need to use “imcl listAvailablePackages” command . It will display the Offerings and packages within the Repositories.

[root@wasnode tools]# ./imcl listAvailablePackages -repositories /IBMSoftware/was8.5_IHS_8.5/was8.5.5/WASND
com.ibm.websphere.ND.v85_8.5.5000.20130514_1044[root@wasnode tools]#
[root@wasnode tools]# ./imcl listAvailablePackages -repositories /IBMSoftware/was8.5_IHS_8.5/was8.5.5/SDK
com.ibm.websphere.IBMJAVA.v70_7.0.4001.20130510_2103
com.ibm.websphere.liberty.IBMJAVA.v70_7.0.4001.20130510_2103
[root@wasnode tools]#

=========================================================================

 6: Install of Websphere ND 8.5 using imcl command line

Command: ./imcl install
To install the Product using imcl command you need to use “install” Option of imcl
a) Ensure all the prerequisites are satisfied like space , permission etc
b) Extract the WAS binaries in the server which you have downloaded
c) Execute the “imcl listAvailablePackages “ in the repository to validate the packages

[root@wasnode tools]# cd /opt/IBM/InstallationManager/eclipse/tools
[root@wasnode tools]# ./imcl listAvailablePackages -repositories /IBMSoftware/was8.5_IHS_8.5/was8.5.5/WASND

com.ibm.websphere.ND.v85_8.5.5000.20130514_1044
[root@wasnode tools]#

d) Execute “imcl install” to Install the WAS ND Packages “com.ibm.websphere.ND.v85_8.5.5000.20130514_1044”

[root@wasnode tools]#./imcl install com.ibm.websphere.ND.v85_8.5.5000.20130514_1044 -repositories /IBMSoftware/was8.5_IHS_8.5/was8.5.5/WASND -installationDirectory /opt/IBM/WebSphere/AppServer -acceptLicense -sP
25%               50%                     75%                       100%
——————|——————|——————|——————|
……………………………………………………………………………………………
Installed com.ibm.websphere.ND.v85_8.5.5000.20130514_1044 to the /opt/IBM/WebSphere/AppServer directory.
[root@wasnode tools]#

Similarly you can install the SDK 7 Package too

[root@wasnode tools]# ./imcl listAvailablePackages -repositories /IBMSoftware/was8.5_IHS_8.5/was8.5.5/SDK
com.ibm.websphere.IBMJAVA.v70_7.0.4001.20130510_2103
com.ibm.websphere.liberty.IBMJAVA.v70_7.0.4001.20130510_2103
[root@wasnode tools]#
[root@wasnode tools]# ./imcl install com.ibm.websphere.IBMJAVA.v70_7.0.4001.20130510_2103 -repositories /IBMSoftware/was8.5_IHS_8.5/was8.5.5/SDK -installationDirectory /opt/IBM/WebSphere/AppServer -acceptLicense -sP25%                     50%                   75%                100%
——————|——————|——————|——————|
……………………………………………………………………………………………
Installed com.ibm.websphere.IBMJAVA.v70_7.0.4001.20130510_2103 to the /opt/IBM/WebSphere/AppServer directory.

e) List the Installed packages to verify the packages you have installed

[root@wasnode tools]# ./imcl listInstalledPackages
com.ibm.cic.agent_1.6.2000.20130301_2248
com.ibm.websphere.IBMJAVA.v70_7.0.4001.20130510_2103
com.ibm.websphere.ND.v85_8.5.5003.20140730_1249

f) List the directories where the Websphere Packages are installed

[root@wasnode tools]# ./imcl listInstallationDirectories
/opt/IBM/WebSphere/AppServer
[root@wasnode tools]#

This completes the installation of WAS ND and JAVA SDK 7

=========================================================================
 6: Updation of Websphere ND 8.5.5.1 FIXPACK using imcl command line
Command : ./imcl install

Current Version : WAS ND 8.5.5.0
New Version : WAS ND 8.5.5.1

Procedure
a) Stop All the WAS Processes ( dmgr, Nodeagent , Server ) Also Apply the Fixpack to Dmgr First before applying to other nodes

b) Take the tar backup of the WAS directories, Profiles, IIM, IIM Data ( var/ibm ) etc to revert in case of any issues

c) Check the Current version of the WAS Installation using “./imcl listInstalledPackages”

[root@connections tools]# cd /opt/IBM/InstallationManager/eclipse/tools
[root@connections tools]# ./imcl listInstalledPackages
com.ibm.cic.agent_1.8.2001.20150409_1833
com.ibm.websphere.ND.v85_8.5.5000.20130514_1044

The version is WAS ND 8.5.5.0
Imcl

d) Check the Path of the WAS installation using “./imcl listInstallationDirectories”

[root@connections bin]# cd /opt/IBM/InstallationManager/eclipse/tools
[root@connections tools]# ./imcl listInstallationDirectories
/opt/IBM/WebSphere/AppServer

Imcl3

e) Also Check the Version of WAS using “versionInfo.sh”

[root@connections tools]# cd /opt/IBM/WebSphere/AppServer/bin/
[root@connections bin]# ./versionInfo.sh
WVER0010I: Copyright (c) IBM Corporation 2002, 2012; All rights reserved.
WVER0012I: VersionInfo reporter version 1.15.1.48, dated 2/8/12——————————————————————————–
——————————————————————————–
Name IBM WebSphere Application Server Network Deployment
Version 8.5.5.0
ID ND

Imcl2

e) Extract the Fixpack zip 8.5.5-WS-WASND-FP0000001-part1.zip & 8.5.5-WS-WASND-FP0000001-part2.zip in the same Folder .

I have extracted it in /IBMsoftware/Fixpacks/WASND_8.5.5.1FP/

f) List the Available packages in the fixpack Extracted path ie /IBMsoftware/Fixpacks/WASND_8.5.5.1FP/

Command : ./imcl listAvailablePackages -repositories /IBMsoftware/Fixpacks/WASND_8.5.5.1FP/

[root@connections tools]# ./imcl listAvailablePackages -repositories /IBMsoftware/Fixpacks/WASND_8.5.5.1FP/ com.ibm.websphere.BASE.v85_8.5.5001.20131018_2242
…………………..
com.ibm.websphere.ND.v85_8.5.5001.20131018_2242
………………………..
com.ibm.websphere.NDTRIAL.v85_8.5.5001.20131018_2242
[root@connections tools]#
[root@connections tools]#

Here we can see “com.ibm.websphere.ND.v85_8.5.5001.20131018_2242” Package .. We will upgrade this package as we are using websphere.ND.V8.5.5

Imcl5

g) Update the Fixpack using the imcl command
Command: ./imcl install com.ibm.websphere.ND.v85_8.5.5001.20131018_2242 -repositories /IBMsoftware/Fixpacks/WASND_8.5.5.1FP/ -installationDirectory /opt/IBM/WebSphere/AppServer -acceptLicense -sP

[root@connections tools]# ./imcl install com.ibm.websphere.ND.v85_8.5.5001.20131018_2242 -repositories /IBMsoftware/Fixpacks/WASND_8.5.5.1FP/ -installationDirectory /opt/IBM/WebSphere/AppServer -acceptLicense -sP
25%                  50%                     75%                     100%
——————|——————|——————|——————|
…………………………………………:….

Imcl6

h) After the completion of the above command .  check the updated version of WAS , it should be WAS 8.5.5.1 now .
We can see that the package is now “com.ibm.websphere.ND.v85_8.5.5001.20131018_2242″

[root@connections ]# cd /opt/IBM/InstallationManager/eclipse/tools/
[root@connections tools]# ./imcl listInstalledPackages
com.ibm.cic.agent_1.8.2001.20150409_1833
com.ibm.websphere.ND.v85_8.5.5001.20131018_2242
[root@connections tools]#

Imcl7

i) Check the versionInfo.sh to see if the Version of the WAS has been updated .

[root@connections tools]# cd /opt/IBM/WebSphere/AppServer/bin/
[root@connections bin]# ./versionInfo.sh
WVER0010I: Copyright (c) IBM Corporation 2002, 2012; All rights reserved.
——————————————————————————–Name IBM WebSphere Application Server Network Deployment
Version 8.5.5.1
ID ND ………….

Imcl8

j) Start the Dmgr, NodeAgent, WAS Servers after the fixpack updation and check the SystemOut.log to see if there are any errors

This is how we can easily update the fixpack using imcl


To get regular mail updates on my Posts..
Please subscribe to the site http://webspherepundit.com
And also like the Facebook Page
https://www.facebook.com/webspherepundit

=========================================================================

Record Mode of IBM Installation Manager

There are many times when you want to to use the Silent Installation for WAS , IHS , Plugin or any other Products which uses Installation Manager

We can use the Record Function in the IBM Installation Manager to create the XML response files on the Test Machine or ur Desktop where you have IIM installed and then use these XML files on the Intended Server where you want to install the Websphere Products

We can also directly run the record function on the Intended serve if we have the GUI Enabled to launch the IIM

Steps as follows

Record mode of Ibm Installation Manager is used to generate the response.xml files which can be used to install/uninstall and upgrade the Websphere Installation 

It works on all the products which can be installed using IIM

a) Install the IBM Installation Manager on the server
b) Navigate to the tools folder of IIM
             cd <IIM Install Home/eclipse/tools
c) Generating the response.xml files using the record function of IIM
In This example we will create a response file for Websphere Application Server 8.5 Installation

Execute #./IBMIM –record /apps/WAS8.8.8_Install.xml –skipInstall /tmp/was8.5.5

Where

-record : ensures we are using the record function
/apps/WAS8.8.8_Install.xml : is the response file which will be created ( any file name can be used)
-skipInstall : This is to skip the installation and only create the response
/tmp/was8.5.5 : is a temp location where the Installation Manager will extract the files ( this can be any location )

silentwas8.517

This will launch the Installation Manager in Skip Install Recording mode (Highlighted in Yellow)

silentwas8.518

b) Add the repositories needed for WAS 8.5.5 install
c) We will be installing the fixpack also together along with the base install

silentwas8.519

Select the repository.config for was8.5.5

silentwas8.520

Similarly do it for the repository.config for SDK folder and the fixpack 3

silentwas8.521

Click OK

c) Then Click Install to launch the installer function

silentwas8.522

This will display the packages for the installation ( We wil deselect the SDK for Liberty profile as its not needed for now)

silentwas8.523

e) Accept the License

silentwas8.524

f) Provide the path of the Shared Repository Directory ..

I gave it /apps/IMShared as I want all the installation binaries in /apps

silentwas8.525

g) Provide the path where you want the WAS8.5.5.3 to be installed

silentwas8.526

h) Select the options needed

silentwas8.527

Summary screen is displayed. Click Install
Here you can observe that the IBM WAS version is provided 8.5.5.3
IM has automatically detected the Fixpack also added in the repository

silentwas8.528

Click Finsh .

i) A file /apps/WAS8.8.8_Install.xml which is the response file for WAS8.5.5.3 Installation

silentwas8.529

Response file

silentwas8.530

Open the file /apps/WAS8.8.8_Install.xml
Some observation :
We can see the repository location for the packages
“/ibmSoftware…….”

j) Modify the installLocation as per your needs
Change the Profile id as required .. though not necessary unless you allready have an installation of was with the same profile id
Eg “ IBM WebSphere Application Server V8.5 MY SERVER”

Verify that the files once again for any typo error and save it

silentwas8.531

k) Execute the imcl to install the WAS


[root@mqnode was8.5.5]# /apps/InstallationManager/eclipse/tools/imcl input /apps/WAS8.5.5_Install.xml -acceptLicense -sP

silentwas8.532

After few minutes if all is well then it will give the output that WAS 8.5.5.3 is installed

silentwas8.533

l) Verify the Installation

silentwas8.534

m) Check the version using ./versionInfo.sh

silentwas8.535

Here we can see WAS ND 8.5.5.3 is installled at /apps/IBM location

NOTE:This response file can be used to install similar was8.5.5.3 on different machines

Also using the record function any Installation response file can be created ie for IHS , BPM8, Websphere Portal 8 etc .


Silent Installation of Installation Manager

Silent Installation of Installation Manager 1.6

a) Unzip the Installation Manager setup  agent.installer.linux.gtk.x86_1.6.0.20120831_1216.zip

silentwas8.53

#unzip agent.installer.linux.gtk.x86_1.6.0.20120831_1216.zip

silentwas8.54

The extracted folder

silentwas8.55

Edit install.xml to define the location for IM installation
         b)    #vi install.xml

Add the below entries in the install.xml file

<profile kind=’self’ installLocation=’/apps/InstallationManager/eclipse’ id=’IBM Installation Manager’>
</profile>

Highlighted the entries in yellow where “/apps/InstallationManager/eclipse” is the location where I need to install the Installation Manager

silentwas8.56

         c)  Install IM1.6 silently
Execute #./installc –acceptLicense

This command reads the install.xml file and installed  it in the location mentioned in it

silentwas8.57

Once the installation is completed the message “Installed <package> to the <location> directory is displayed

             d) Verify the installation and the versions of Installation Manager

Navigate to /apps/InstallationManager/ folder

silentwas8.58


silentwas8.59


             Execute ./imcl -version to check the version of IM fron /apps/InstallationManager/eclipese/tools/

       THIS IS HOW WE INSTALL INSTALLATION MANAGER SILENTLY 


How to manually generate a Heapdump in Websphere

Occasionally a heapdump needs to be generated without waiting for an OutOfMemoryError condition to occur.

Method 1: Using Kill command in unix
1) Login n the Administrative Console:
2) Navigate to  Servers > Application Servers > serverName:
3) In the Server Infrastructure section open Java and Process Management, then select Process Definition:
4) In the Additional Properties select Java™ Virtual Machine:
5) Add the following string to the Generic JVM arguments field:
-Xdump:heap:events=user
6) Press OK, and save the configuration.
7) Recycle the App Server for the changes to take effect

genericjvmargument1
To generate the heapdump, send the Application Server an interrupt. Use the “kill” command:

kill -3 <java process ID>

This will not “kill” the Application Server process, it just generate the heap  dump and thread dump in the Profile_HOME

Method 2: wasadmin command
1)Wsadmin provides functions to trigger a heapdump or javacore manually.
2)To call this functionality you need to first query the JVM MBean you are interested in and can then invoke “generateHeapDump” or “dumpThreads” functionality.

Invoke the generateHeapDump operation on a JVM MBean, for example,
a) Finding JVM objectName:
   wsadmin>$AdminControl queryNames type=JVM,*
WebSphere:name=JVM,process=server1,platform=proxy,node=IBM-ADCC282A82BNode04,j2eeType=JVM,J2EEServer=server1,…

b) Set the  variable for the concerned server
wsadmin>set jvm [$AdminControl queryNames type=JVM,*]
WebSphere:name=JVM,process=server1,platform=proxy,node=IBM-ADCC282A82BNode04,j2eeType=JVM,J2EEServer=server1,…

(set jvm is just a name given for the variable )

b) Invoking the generateHeapDump operation on JVM MBean:
wsadmin>$AdminControl invoke $jvm generateHeapDump


Method 3: Environment Entries

Update the Environment variables for the Path where you want to generate the heap , core and thread .. for each JVM where you want it set. I want the dumps generated under /appprofiles/server1/

a) Create the necessary directories

mkdir -p /appprofiles/server1/core
mkdir -p /appprofiles/server1/heapdump
mkdir -p /appprofiles/server1/javacore

b) In the admin console Navigate to the below path

Application servers > server1 > Process definition > Environment Entries

c) Set these Environment Entries

IBM_JAVACOREDIR
/appprofiles/server1/javacore

IBM_HEAPDUMP
true

IBM_HEAPDUMPDIR
/appprofiles/server1/heapdump

IBM_HEAP_DUMP
true

IBM_COREDIR
/appprofiles/server1/core

d) Restart the server

e) You can use kill-3 pid to generate the dumps . it will get created in the specific path you have mentioned

Also when the application server will automatically generate the dumps it will get created in the above path


3) heap dumps can be found under profile_rootprofile-name with naming heapdump.<date>..<timestamp><pid>.phd

AutoRestarting Application Servers With Nodeagent in WebSphere

In WebSphere 7, by default, the Nodeagent will take no action if an application server fails. In order for the Nodeagent to intervene and automatically restart a failed application server instance, the ‘monitoring policy’ must be set for that application server.

Login to the Admin console, perform the following:

1 . Click Servers.>>Select Server Types >> Select WebSphere Application Servers. >>Select <server_name> to monitor

docview.wss


2) Navigate to <Application Server> –> Java and Process Management –> Monitoring Policy


docview.ws1s

3)  Check the box next to “Automatic Restart”

4).  In the “Node Restart State“, set the state to “STOPPED


docview.wss2


  • If set to ‘STOPPED‘ actions above will allow the nodeagent to auto-restart a failed or killed application server
  • If set to ‘RUNNING‘ not only will the nodeagent restart a failed or killed application server, but it will autostart the application server upon a nodeagent restart.  (This may be unwanted in certain environments where application servers are only supposed to run at certain times or if there is a specific application start order.)
  • If set to ‘PREVIOUS‘ will enable  to return to its current state after the node restarts.

If you wish to have the nodeagent automatically start application servers when it comes online, set the state to “RUNNING“.