Archives

Multi-hopping with 4 Qmgrs

Just an Extension for Multi-hopping messages between 4  Queue Managers

Reference Links :
1) Distributed MQ communication Part 1
2) Distributed Two Way MQ Communication — Part2
3) MultiHopping with 3 Qmgrs

MultiHopping With 4 Qmgrs

Quick Reference Guide
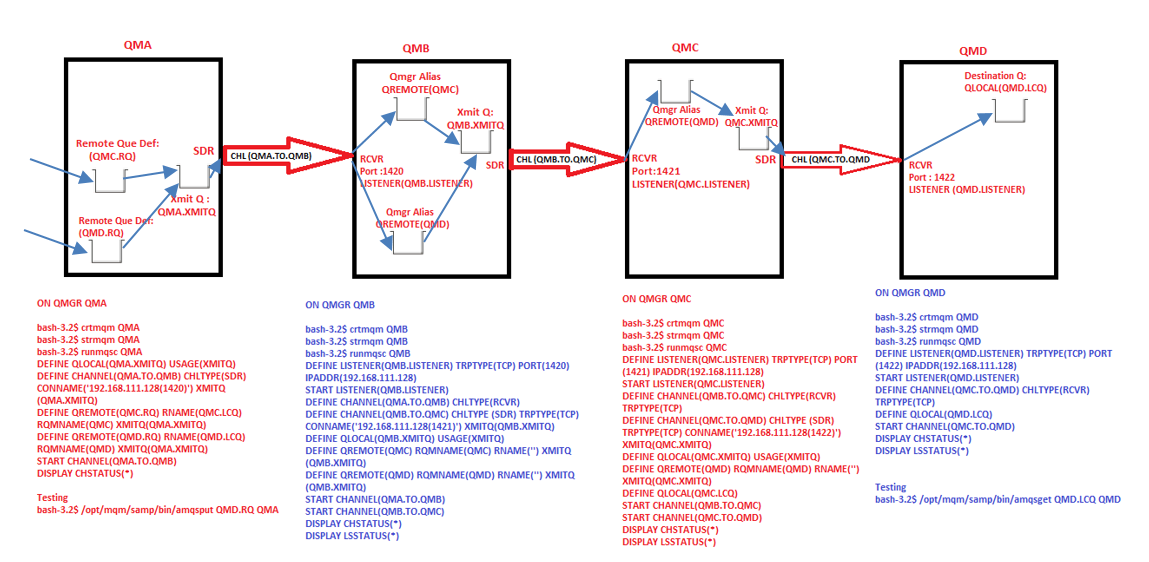
Multi-hopping with 4 QMGRS , QMA–> QMB–> QMC–> QMD

On Queue Manager QMA
bash-3.2$ crtmqm QMA
bash-3.2$ strmqm QMA
bash-3.2$ runmqsc QMA
DEFINE QLOCAL(QMA.XMITQ) USAGE(XMITQ)
DEFINE CHANNEL(QMA.TO.QMB) CHLTYPE(SDR) CONNAME(‘192.168.111.128(1420)’) XMITQ(QMA.XMITQ)
DEFINE QREMOTE(QMC.RQ) RNAME(QMC.LCQ) RQMNAME(QMC) XMITQ(QMA.XMITQ)
DEFINE QREMOTE(QMD.RQ) RNAME(QMD.LCQ) RQMNAME(QMD) XMITQ(QMA.XMITQ)
START CHANNEL(QMA.TO.QMB)
DISPLAY CHSTATUS(*)On Queue Manager QMBbash-3.2$ crtmqm QMB
bash-3.2$ strmqm QMB
bash-3.2$ runmqsc QMB
DEFINE LISTENER(QMB.LISTENER) TRPTYPE(TCP) PORT(1420) IPADDR(192.168.111.128)
START LISTENER(QMB.LISTENER)
DEFINE CHANNEL(QMA.TO.QMB) CHLTYPE(RCVR)
DEFINE CHANNEL(QMB.TO.QMC) CHLTYPE (SDR) TRPTYPE(TCP) CONNAME(‘192.168.111.128(1421)’) XMITQ(QMB.XMITQ)
DEFINE QLOCAL(QMB.XMITQ) USAGE(XMITQ)– Qmgr Alias for QMC and QMD
DEFINE QREMOTE(QMC) RQMNAME(QMC) RNAME(”) XMITQ(QMB.XMITQ)
DEFINE QREMOTE(QMD) RQMNAME(QMD) RNAME(”) XMITQ(QMB.XMITQ)

START CHANNEL(QMA.TO.QMB)
START CHANNEL(QMB.TO.QMC)
DISPLAY CHSTATUS(*)
DISPLAY LSSTATUS(*)

On Queue Manager QMC

bash-3.2$ crtmqm QMC
bash-3.2$ strmqm QMC
bash-3.2$ runmqsc QMC
DEFINE LISTENER(QMC.LISTENER) TRPTYPE(TCP) PORT(1421) IPADDR(192.168.111.128)
START LISTENER(QMC.LISTENER)
DEFINE CHANNEL(QMB.TO.QMC) CHLTYPE(RCVR) TRPTYPE(TCP)
DEFINE CHANNEL(QMC.TO.QMD) CHLTYPE (SDR) TRPTYPE(TCP) CONNAME(‘192.168.111.128(1422)’) XMITQ(QMC.XMITQ)
DEFINE QLOCAL(QMC.XMITQ) USAGE(XMITQ)

— Qmgr Alias of QMD
DEFINE QREMOTE(QMD) RQMNAME(QMD) RNAME(”) XMITQ(QMC.XMITQ)
DEFINE QLOCAL(QMC.LCQ)
START CHANNEL(QMB.TO.QMC)
START CHANNEL(QMC.TO.QMD)
DISPLAY CHSTATUS(*)
DISPLAY LSSTATUS(*)

On Queue Manager QMD

bash-3.2$ crtmqm QMD
bash-3.2$ strmqm QMD
bash-3.2$ runmqsc QMD
DEFINE LISTENER(QMD.LISTENER) TRPTYPE(TCP) PORT(1422) IPADDR(192.168.111.128)
START LISTENER(QMD.LISTENER)
DEFINE CHANNEL(QMC.TO.QMD) CHLTYPE(RCVR) TRPTYPE(TCP)
DEFINE QLOCAL(QMD.LCQ)
START CHANNEL(QMC.TO.QMD)
DISPLAY CHSTATUS(*)
DISPLAY LSSTATUS(*)

Testing of MultiHopping on 4 Qmgrs

bash-3.2$ /opt/mqm/samp/bin/amqsput QMD.RQ QMA
Sample AMQSPUT0 start
target queue is QMD.RQ
This is 4 hopping qmgr

Sample AMQSPUT0 end

bash-3.2$ /opt/mqm/samp/bin/amqsget QMD.LCQ QMD
Sample AMQSGET0 start
message


MultiHopping with 3 Websphere MQ Qmgrs

Requirement : To set up a minimal steps for a Two Way MQ communication between two queue managers ie From QMA to  QMB & From QMB to QMC

Reference Links :
1) Distributed MQ communication Part 1
2) Distributed Two Way MQ Communication — Part2

Passing the messages between more than one intermediate queue managers is called Multi-Hopping. Multi-hopping occurs when a message needs to traverse one or more queue-managers in order to reach the destination queue-manager.

The Setup in which a QMGR is networked with the next QMGR which is networked to the next QMGR ie  (QMA -> QMB -> QMC -> QMD -> QME).

If a message is created on QMA, and the destination queue-manager is on QME, then the message must flow from QMB to QMC, to QMD to QME.

QMB and QMC will need a queue-manager aliases since they are non-adjacent (don’t have a transmission queue) to the destination queue-manager.

QMB needs a definition to move the message from QMB to the next hop QMC. and so on

So, when the message arrives on QMB, a queue-manager alias must exist to resolve the queue-manager name in the XQH (transmission queue header):
DEF QR(QME) RQMname(QME) XMITQ(QMC).

This definition tells the MCA (message channel agent) on QMB to move the message to transmission queue named QMC, so that the message will be sent to QMC.

When the message arrives on QMC, again a queue-manager alias will be need to be defined  to move the message to a transmission queue named QMD:
DEF QR(QME) RQMname(QME) XMITQ(QMD).

So QMA doesn’t know any thing about QME so by defining the QM alias the message is reached to the destination QME.

The only thing and the only route that QMA knows is how to get to QMB. Everything else is resolved at QMB. So as long as QMB is *secured*, then no application can send messages to QMC without going through QMB
Env Architecture :
OS : Linux Redhat 5.6
MQ Version : 7.0

Capture1

Quick Reference Commands  for Multi Hopping with 3 QMGRS

On Queue Manager QMA

bash-3.2$crtmqm QMA
bash-3.2$strmqm QMA
bash-3.2$ runmqsc QMA
DEFINE QLOCAL(QMA.XMITQ) USAGE(XMITQ)
DEFINE CHANNEL(QMA.TO.QMB) CHLTYPE(SDR) CONNAME(‘192.168.111.128(1420)’) XMITQ(QMA.XMITQ)
DEFINE QREMOTE(QMC.RQ) RNAME(QMC.LCQ) RQMNAME(QMC) XMITQ(QMA.XMITQ)
START CHANNEL(QMA.TO.QMB)
DISPLAY CHSTATUS(*)

On Queue Manager QMB

bash-3.2$crtmqm QMB
bash-3.2$strmqm QMB
bash-3.2$ runmqsc QMB
DEFINE CHANNEL(QMA.TO.QMB) CHLTYPE(RCVR)
DEFINE QLOCAL(QMB.XMITQ) USAGE(XMITQ)
DEFINE LISTENER(QMB.LISTENER) TRPTYPE(TCP) PORT(1420) IPADDR(192.168.111.128)
START LISTENER(QMB.LISTENER)
DEFINE CHANNEL(QMB.TO.QMC) CHLTYPE (SDR) TRPTYPE(TCP) CONNAME(‘192.168.111.128(1421)’) XMITQ(QMB.XMITQ)

— Qmgr Alias needs to be set in the QMB

DEFINE QREMOTE(QMC) RQMNAME(QMC) RNAME(”) XMITQ(QMB.XMITQ)
START CHANNEL(QMA.TO.QMB)
START CHANNEL(QMB.TO.QMC)
DISPLAY CHSTATUS(*)
DISPLAY LSSTATUS(*)

On Queue Manager QMC

bash-3.2$crtmqm QMC
bash-3.2$strmqm QMC
bash-3.2$ runmqsc QMC
DEFINE LISTENER(QMC.LISTENER) TRPTYPE(TCP) PORT(1421) IPADDR(192.168.111.128)
DEFINE CHANNEL(QMB.TO.QMC) CHLTYPE(RCVR) TRPTYPE(TCP)
START LISTENER(QMC.LISTENER)
DEFINE QLOCAL(QMC.LCQ)
START CHANNEL(QMB.TO.QMC)
DISPLAY CHSTATUS(*)
DISPLAY LSSTATUS(*)

Testing of MultiHopping

bash-3.2$ pwd
/opt/mqm/samp/bin
bash-3.2$ ./amqsput QMC.RQ QMA
Sample AMQSPUT0 start
target queue is QMC.RQ
This is a test

Sample AMQSPUT0 end
bash-3.2$ ./amqsbcg QMC.LCQ QMC


To get automated mail updates of my Posts..
Please subscribe to the site http://webspherepundit.com
And also like the Facebook Page
https://www.facebook.com/webspherepundit


Distributed Two Way MQ Communication — Part2

Refer the Below Link for more details on Distributed MQ communication Part 1:
http://webspherepundit.com/?p=1608

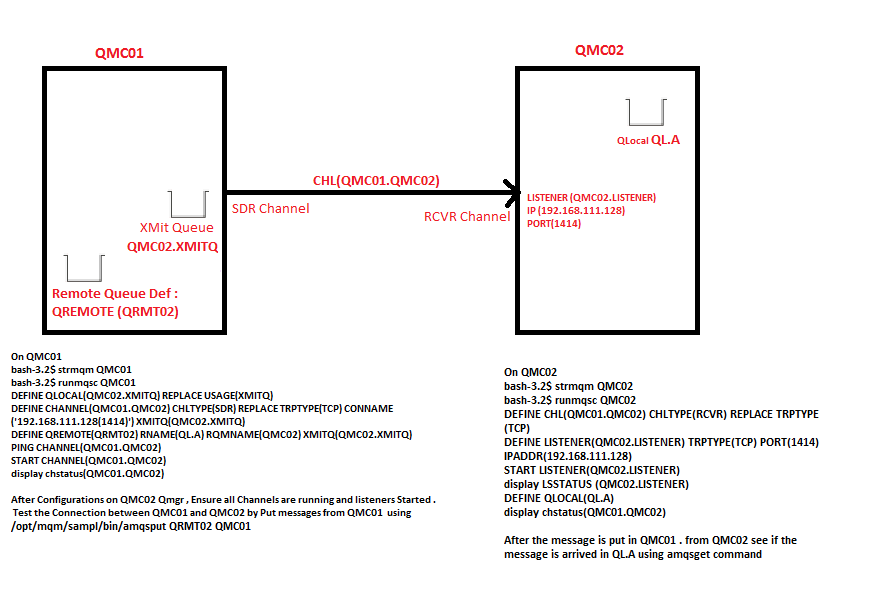
Requirement : To set up a minimal steps for a Two Way MQ communication between two queue managers ie From QMC01 to  QMC02 & From Qmc02 to QMC01

Architecture :
OS : Linux Redhat 5.6
MQ Version : 7.0

Infrastructure Diagram :

TwoWayMQDistributed_Communiction

HighLevel Steps for Two Way Distributed Communication with Two Queue Manager :

TwoWayMQDistributed_Communiction1

Quick References commands for Two Way MQ Communication :

ON Queue Manager QMC01
As mqm user
—– Create the Queue Manager QMC01
bash-3.2$crtmqm QMC01
—–Start Queue Manager QMC01
bash-3.2$strmqm QMC01

—–Launch MQSC prompt for QMC01
bash-3.2$runmqsc QMC01

—–Create the Transmission Queue as the same name as Dest Qmgr as a best practice
DEF QL(QMC02) REPLACE USAGE(XMITQ)

—–Create the Sender Channel from QMC01 to QMC02 where 9002 is the listening port on Dest Qmgr QMC02
DEF CHL(QMC01.QMC02) CHLTYPE(SDR) REPLACE TRPTYPE(TCP) CONNAME(‘10.0.0.20(9002)’) XMITQ(QMC02)

—–Create a Receiver channel from QMC02 to QMC01 (we are creating a two way communication)
DEF CHL(QMC02.QMC01) CHLTYPE(RCVR) REPLACE TRPTYPE(TCP)

—–Create a Local Queue as the Dead Letter Queue
DEF QL(DLQ) REPLACE

—–Modify the DEADQ attribute of qmgr to use the Qlocal created above
ALTER QMGR DEADQ(DLQ)

—–Create Listener on Qmgr QMC01 with listen port as 9001
DEFINE LISTENER(QMC01.LISTENER) TRPTYPE(TCP) PORT(9001) IPADDR(10.0.0.20)

—–Start the listener on QMC01 
START LISTENER(QMC01.LISTENER)

—–DISPLAY the listener Status on QMC01
DISPLAY LSSTATUS (QMC01.LISTENER)

—–Start Sender Channel QMC01.QMC02
START CHL(QMC01.QMC02)

—–Check Ping Status
PING CHL(QMC01.QMC02)

—–Check Channel Status
DISPLAY CHSTATUS(QMC01.QMC02)

DISPLAY CHSTATUS(QMC02.QMC01)

—–Define Remote Queue Definitions (QRMT02) to Local Queue QL.A which is on QMC02
DEF QR(QRMT02) REPLACE RNAME(QL.A) RQMNAME(QMC02) XMITQ(QMC02)

—–Define Local Queue QL.B for the messages put from QMC02
DEF QL(QL.B) REPLACE

###############################################################

###############################################################

ON Queue Manager QMC02

—– Create the Queue Manager QMC01
bash-3.2$crtmqm QMC02

—–Start Queue Manager QMC01
bash-3.2$strmqm QMC02

—–Launch MQSC prompt for QMC01
bash-3.2$runmqsc QMC02

—–Create the Transmission Queue as the same name as Dest Qmgr as a best practice
DEF QL(QMC01) REPLACE USAGE(XMITQ)

—–Create the Sender Channel from QMC02 to QMC01 where 9001 is the listening port on Dest Qmgr QMC01
DEF CHL(QMC02.QMC01) CHLTYPE(SDR) REPLACE TRPTYPE(TCP) CONNAME(‘10.0.0.20(9001)’) XMITQ(QMC01)

—–Create a Receiver channel from QMC02 to QMC01 (we are creating a two way communication)
DEF CHL(QMC01.QMC02) CHLTYPE(RCVR) REPLACE TRPTYPE(TCP)

—–Create a Local Queue as the Dead Letter Queue
DEF QL(DLQ) REPLACE

—–Modify the DEADQ attribute of qmgr to use the Qlocal created above
ALTER QMGR DEADQ(DLQ)

—–Create Listener on Qmgr QMC02 with listen port as 9002
DEFINE LISTENER(QMC02.LISTENER) TRPTYPE(TCP) PORT(9002) IPADDR(10.0.0.20)

—–Start the listener on QMC02
START LISTENER(QMC02.LISTENER)

—–DISPLAY the listener Status on QMC02
DISPLAY LSSTATUS (QMC02.LISTENER)

—–Start Sender Channel QMC02.QMC01
START CHL(QMC02.QMC01)

—–Check Ping Status
PING CHL(QMC02.QMC01)

—–Check Channel Status
DISPLAY CHSTATUS(QMC01.QMC02)

DISPLAY CHSTATUS(QMC02.QMC01)

—–Define Local Queue QL.A for the messages put from QMC01
DEF QL(QL.A) REPLACE

—–Define Remote Queue Definitions (QRMT01) to Local Queue QL.B which is on QMC01
DEF QR(QRMT01) REPLACE RNAME(QL.B) RQMNAME(QMC01) XMITQ(QMC01)

###############################################################

###############################################################
Testing for Two Way MQ communication

—–On QMC01 Put message on QRemote QRMT02
bash-3.2$/opt/mqm/samp/bin/amqsput QRMT02 QMC01

—–On QMC02 get message on Qlocal QL.A
bash-3.2$/opt/mqm/samp/bin/amqsget QL.A QMC02


—–On QMC02 Put message on QRemote QRMT01
bash-3.2$/opt/mqm/samp/bin/amqsput QRMT01 QMC02

—–On QMC01 get message on Qlocal QL.B
bash-3.2$/opt/mqm/samp/bin/amqsget QL.B QMC01


Troubleshooting

Step 1: Ensure that Sender Channel in the Source Qmgr and Listener and Reciever Channel in the Destination Qmgr is started and running

Step 2: The Sender channel Name in the Source Qmgr  the  Receiver channel Name in the destination Qmgr should have the same name

Step 3: The Listener port shouldn’t be used by any other application

Step 4: Recheck the configurations done

Step 5: Check if the message is there in the transmission queue


To get automated mail updates of my Posts..
Please subscribe to the site http://webspherepundit.com
And also like the Facebook Page
https://www.facebook.com/webspherepundit


Distributed MQ Channel Setup – Single Way communication

Requirement : To set up a minimal steps for a Single way MQ communication between two queue managers ie From QMC01 to  QMC02

Architecture :
OS : Linux Redhat 5.6
MQ Version : 7.0
Source Qmgr :  QMC01
Destination Qmgr : QMC02 ( Both the Qmgrs on same IP)

Infrastructure Diagram :

distributed communication

High level Steps create the Single WAY MQ  communication between QMGRs :

Destination QMGR
Step1:  Create the Destination QMGR
Step2: Create Local queue where the message needs to be received
Step3: Define Listener and Start the Listener
Step4: Creating Receiver Channel with same name as the Sender channel
Step5: Start the Receiver Channel

Source QMGR
Step1: Create the qmgr
Step2: Define Transmission Queue
Step3: Creating Sender Channel
Step4: Create Remote Queue Definitions
Step5: Start the Sender Channel

######################################################################################
                         Detailed Steps
######################################################################################

 Destination QueueManager
Step1: Create a Destination Queue Manager QMC02

bash-3.2$ crtmqm QMC02

Step2:  Start the Queue Manager QMC02

bash-3.2$ strmqm QMC01

Step3:  Enter the Mqsc prompt of QMC02

bash-3.2$ runmqsc QMC01

Step4: Create the Local Queue in the Dest Qmgr where the message is to be received from the Source Qmgr Qmc01

DEFINE QLOCAL(QL.A)

Step5:  Define Listener for Source Qmgrs to connect to Dest Qmgrs

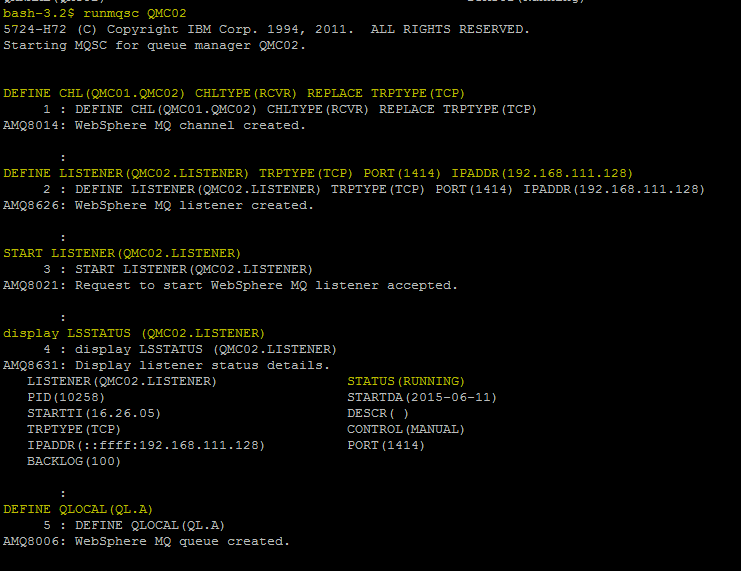
DEFINE LISTENER(QMC02.LISTENER) TRPTYPE(TCP) PORT(1414) IPADDR(192.168.111.128)

Step6: Start Listeners (QMC02.LISTENER) on the Dest Qmgr QMC02

START LISTENER(QMC02.LISTENER)


NOTE : Listener can be started by the command line to as mentioned below

/opt/mqm/bin/runmqlsr -r -m QMC02 -t TCP -p 1414 -i 192.168.111.128

Step7: Define the Receiver Channel CHL(QMC01.QMC02)

DEFINE CHL(QMC01.QMC02) CHLTYPE(RCVR) REPLACE TRPTYPE(TCP)

Step8: Start the Receiver Channel

START CHANNEL(QMC01.QMC02)

Step9: Display Listener Status

DISPLAY LSSTATUS (QMC02.LISTENER)

Step10: Display Receiver Channel Status

DISPLAY CHSTATUS(QMC01.QMC02)

Step11: Check if the listener is running on the Destination Qmgr server

ps -ef | grep runmqlsr


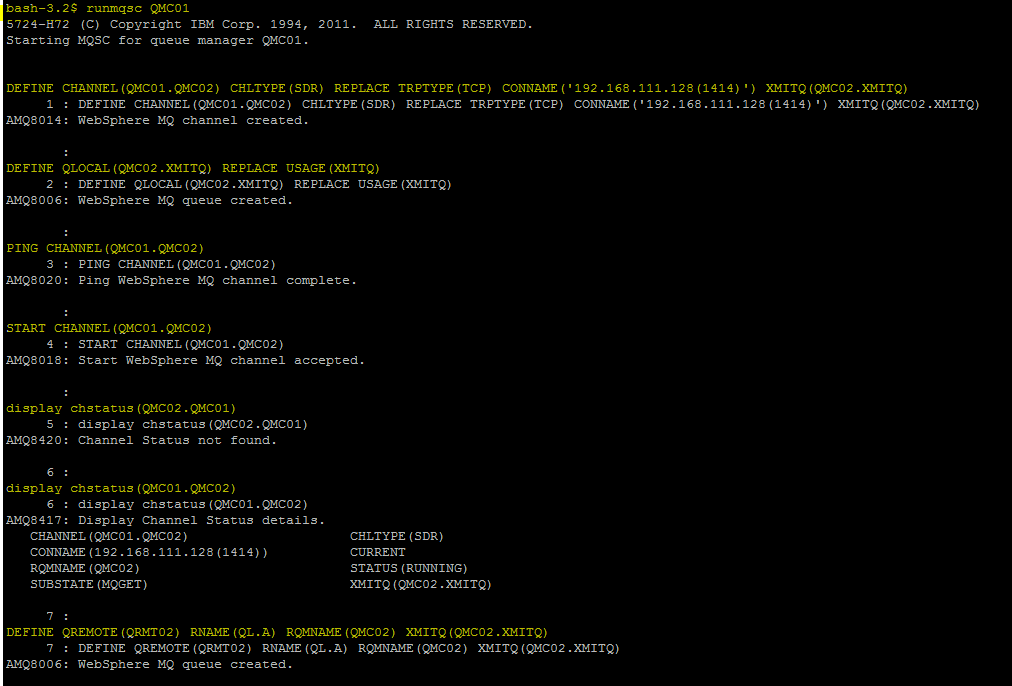
Screenshots for commands

MQcommunication1


######################################################################################

 Source QueueManager
Step1: Create the source queue manager QMC01

bash-3.2$ crtmqm QMC01

Step2: Start the Queue Manager  QMC01

bash-3.2$ strmqm QMC01

Step3: Enter the MQSC prompt of the QMC01

bash-3.2$ runmqsc QMC01

Step4: Create the Transmision Queue : QMC02.XMITQ 

DEFINE QLOCAL(QMC02.XMITQ) REPLACE USAGE(XMITQ)

Step5: Create the Sender Channel QMC01.QMC02  with these details
a)  CHLTYPE and TRPTYPE ( as we are using TCP protocol for connection )
b) CONNAME ( Use the Ip address of the Destination QMgr and the port of the Dest Listener)
c) XMITQ ( Use the Transmission Queue for the senders channel )

NOTE : The Sender Channel Name created here should be same as the Receive Channel created for the Destination QMgr QMC02

Usually the naming  convention is source.to.destination for ease of understanding the infra

DEFINE CHANNEL(QMC01.QMC02) CHLTYPE(SDR) REPLACE TRPTYPE(TCP) CONNAME(‘192.168.111.128(1414)’) XMITQ(QMC02.XMITQ)

Step6: Define the Remote Queue Definitions with Remote Queue Name and Remote Qmgr Name

DEFINE QREMOTE(QRMT02) RNAME(QL.A) RQMNAME(QMC02) XMITQ(QMC02.XMITQ)

Step7: Start the Sender Channel QMC01.QMC02
NOTE: As the receiver channel is still not created and started, … the sender channel will still not be in the running status

START CHANNEL(QMC01.QMC02)

Step8: Display the Channel Status QMC01.QMC02

display chstatus(QMC01.QMC02)

Screenshots for commands

MQcommunication3


######################################################################################

Testing

######################################################################################

Step1: Ensure that the listeners is started and running on the Dest Qmgr Server QMC02

START LISTENER(QMC02.LISTENER)

Step2: Check the Status of Listeners on Qmgr QMC02

DISPLAY LSSTATUS (QMC02.LISTENER)

Step3: Ensure the Receiver channel is started on the Destination Qmgr Server QMC02

START CHANNEL(QMC01.QMC02)

Step4: Display the Receiver Channel Status on the Destination Qmgr Server QMC02

DISPLAY CHSTATUS(QMC01.QMC02)

Step5: Ensure that the Sender Channel is started and running on the Source Qmgr Server QMC01

START CHANNEL(QMC01.QMC02)

Step6: Display the channel Status QMC01.QMC02 on the Source Qmgr Server QMC01

DISPLAY CHSTATUS(QMC01.QMC02)

Step7: Check the Queue Depth of the Dest Queue ie QL.A

bash-3.2$echo “DISPLAY QLOCAL(QL.A) CURDEPTH ” | runmqsc QMC02 | grep CURDEPTH

MQcommunication4

Step8: Put the message in the Source Qmgr using the “./amqsput [Remote Queue Def]  [Source Qmgr] “ 

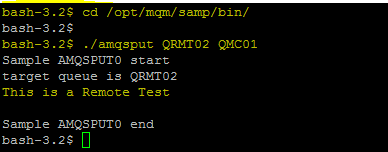
bash-3.2$/opt/mqm/samp/bin/amqsput QRMT02 QMC01

MQcommunication5

I put the message “This is a Remote Test” in the Remote Queue Definition  QRMT02 in the source Qmgr QMC01 .

So if the configurations are proper then this message should be received by the Destination Queue QL.A on Qmgr QMC02

So the Message would flow internally from

MQcommunication8


Step9: View the Queue Depth of Destination Queue QL.A

bash-3.2$echo “DISPLAY QLOCAL(QL.A) CURDEPTH ” | runmqsc QMC02 | grep CURDEPTH

MQcommunication6

The Message has successfully arrived at the destination Queue ie QL.A

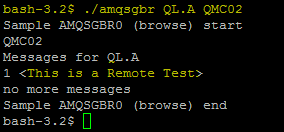
Step10: Browser the messages from the QL.A using “./amqsgbr [Dest Queue]  [Dest Qmgr]” or get the message using “./amqsget [Dest Queue]  [Dest Qmgr]”

bash-3.2$/opt/mqm/samp/bin/amqsgbr QL.A QMC02

Put some messages form the Source Qmgr and see if the messages is recived in the Destination Qmgrs and in Queue specified


MQcommunication7

######################################################################################

Troubleshooting

######################################################################################

Step1: Ensure that Sender Channel in the Source Qmgr and Listener and Reciever Channel in the Destination Qmgr is started and running

Step2: The Sender Channel Name in the Source Qmgr  and the  Receiver Channel Name in the destination Qmgr should have the same Name

Step3:  The Listener port shouldn’t be used by any other application

Step4:  Recheck the configurations done

Step5:  Check if the message is there in the transmission queue


To get automated mail updates of my Posts..
Please subscribe to the site http://webspherepundit.com
And also like the Facebook Page
https://www.facebook.com/webspherepundit


Quick Reference For MQ Triggering

For More detailed information MQ TRIGGERING click below 

 http://webspherepundit.com/?p=1605


These are the quick references for setting up simple TRIGGERING with few different examples for FIRST , EVERY and DEPTH Modes


Example1 :To start the http process on a First message put in the Queue

NOTE : The method to stop/start http as mqm is not covered in this tutorial .
Http Process is just used for example .. you can use any process as per your requirement ( Ensure that mqm user should be able to stop/start those processes)

——- Start QMgr
bash-3.2$ strmqm QMC01                     

bash-3.2$ runmqsc QMC01

——- Create Initiation Queue
DEFINE QL(TRIGGER.INITIATION.QUEUE) like SYSTEM.DEFAULT.INITIATION.QUEUE

——- Create Local Queue with Triggering Options with TRIGTYPE(FIRST)
DEFINE QLOCAL(TRIGGER.Q) TRIGGER TRIGDPTH(1) TRIGTYPE(FIRST) INITQ(TRIGGER.INITIATION.QUEUE) PROCESS(TRIG.PROCESS)

——- Create Process with APPLICID ( /etc/init.d/httpd start ) It can be any process as per env 
DEFINE PROCESS (‘TRIG.PROCESS’) APPLTYPE(UNIX) APPLICID(‘/etc/init.d/httpd start’)
 

——- Display QueueDepth before testing to ensure there are no messages in the QUEUE
bash-3.2$ echo “DISPLAY QL(TRIGGER.Q) CURDEPTH TRIGGER ” | runmqsc QMC01


——- Run runmqtrm command on the Initiation Queue 
bash-3.2$ runmqtrm -m QMC01 -q TRIGGER.INITIATION.QUEUE

——- Put Messages using amqsput  
bash-3.2$/opt/mqm/sampl/bin/amqsput TRIGGER.Q QMC01

——- On the first message put to the QUEUE the triggering would be fired , view the putty console where runmqtrm is running .. here we will see if the trigger event is run and triggering invoked and http process started

——- Display QueueDepth 
bash-3.2$ echo “DISPLAY QL(TRIGGER.Q) CURDEPTH TRIGGER ” | runmqsc QMC01

——- Check if the http Process is saterted by the just putting the Message in Queue
bash-3.2$ps –ef | grep http


Example2:  Enable triggering to start a unix script with a receipt of a message .
In this example we will be running a script instead of starting a process with trigerring set for FIRST( ie On the arrival of the first message )

——- Create a script when run will browse the message using amqsgbr and redirect to a script.log
bash-3.2$ vi /var/mqm/testscript.sh
############################
echo `date` >> /var/mqm/script.log
/opt/mqm/samp/bin/amqsgbr TRIGGER.Q QMC01 | grep “[1-9] <” >> /var/mqm/script.log
echo “==========================” >> /var/mqm/script.log
############################

——- Make the script executable 
bash-3.2$ chmod 755 /var/mqm/testscript.sh

——- Start Queue Manager
bash-3.2$ strmqm QMC01
bash-3.2$ runmqsc QMC01

——- Create an Initiation Queue 
DEFINE QL(TRIGGER.INITIATION.QUEUE) like SYSTEM.DEFAULT.INITIATION.QUEUE

——- Create a Local Queue where Triggering is enabled with TRIGTYPE(FIRST)
DEFINE QLOCAL(TRIGGER.Q) TRIGGER TRIGDPTH(1) TRIGTYPE(FIRST)  INITQ(TRIGGER.INITIATION.QUEUE) PROCESS(TRIG.PROCESS)

——- Create Process with APPLICID /var/mqm/testscript.sh ie run testscript.sh on triggering
DEFINE PROCESS (‘TRIG.PROCESS’) APPLTYPE(UNIX) APPLICID(‘/var/mqm/testscript.sh‘)

——- Run runmqtrm command for the Initiation Queue 
bash-3.2$ runmqtrm -m QMC01 -q TRIGGER.INITIATION.QUEUE

——- Display QueueDepth before testing to ensure there are no messages in the QUEUE
bash-3.2$ echo “DISPLAY QL(TRIGGER.Q) CURDEPTH TRIGGER ” | runmqsc QMC01 | grep CURDEPTH

——- Put Messages using amqsput
bash-3.2$/opt/mqm/sampl/bin/amqsput TRIGGER.Q QMC01

——- On the first message put to the QUEUE the triggering would be fired and and the script testscript.sh is run . view the putty console where runmqtrm is running .. here we will see if the trigger event is run and triggering invoked
Also The script.log will let us know if it has run properly and triggering invoked.

——- Display QueueDepth 
bash-3.2$ echo “DISPLAY QL(TRIGGER.Q) CURDEPTH TRIGGER ” | runmqsc QMC01 | grep CURDEPTH

——- Check the script.log for ensuring the testscript.sh has run properly due to triggering
bash-3.2$tail -f /var/mqm/script.log


Example3 :We will Test the Triggering method for
EVERY Message instead of the FIRST message entering the Trigger queue

——- Create a script when run will browse the message using amqsgbr and redirect to a script.log
bash-3.2$ vi /var/mqm/testscript.sh
############################
echo `date` >> /var/mqm/script.log
/opt/mqm/samp/bin/amqsgbr TRIGGER.Q QMC01 | grep “[1-9] <” >> /var/mqm/script.log
echo “==========================” >> /var/mqm/script.log
############################——- Make the script executable 
bash-3.2$ chmod 755 /var/mqm/testscript.sh——- Start Queue Manager
bash-3.2$ strmqm QMC01
bash-3.2$ runmqsc QMC01——- Create an Initiation Queue 
DEFINE QL(TRIGGER.INITIATION.QUEUE) like SYSTEM.DEFAULT.INITIATION.QUEUE

——- Create Process with APPLICID /var/mqm/testscript.sh ie run testscript.sh on triggering
DEFINE PROCESS (‘TRIG.PROCESS’) APPLTYPE(UNIX) APPLICID(‘/var/mqm/testscript.sh‘)

——- Create a Local Queue where Triggering is enabled with TRIGTYPE(EVERY) 
ALTER QLOCAL(TRIGGER.Q) TRIGGER TRIGDPTH(1) TRIGTYPE(EVERY) INITQ(TRIGGER.INITIATION.QUEUE) PROCESS(TRIG.PROCESS)

——- Run runmqtrm command for the Initiation Queue
bash-3.2$ runmqtrm -m QMC01 -q TRIGGER.INITIATION.QUEUE

——- Display QueueDepth before testing to ensure there are no messages in the QUEUE
bash-3.2$ echo “DISPLAY QL(TRIGGER.Q) CURDEPTH TRIGGER ” | runmqsc QMC01 | grep CURDEPTH

——- Put Messages using amqsput , Put 3 messages to test
/opt/mqm/sampl/bin/amqsput TRIGGER.Q QMC01

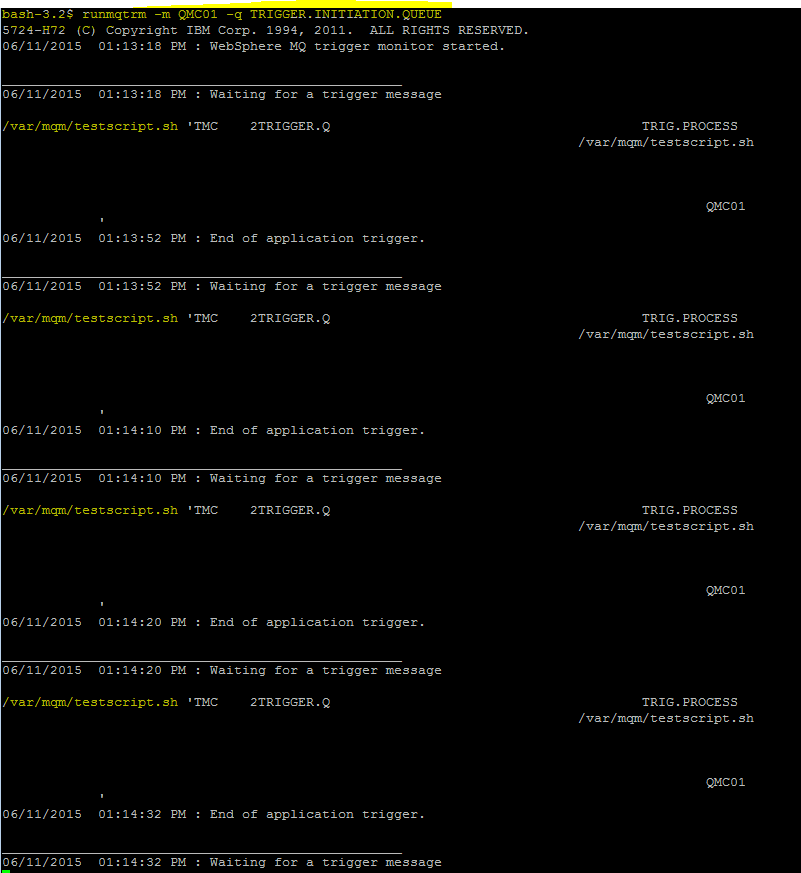
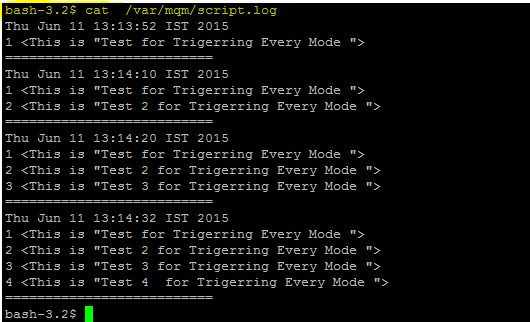
——- For every Message put in the Queue TRIGGER.Q , a trigger event would start and the script would run 3 times and the output captured in script.log . View the putty console where runmqtrm is running .. here we will see if the trigger event is run and triggering invoked

——- Display QueueDepth before testing to ensure there are no messages in the QUEUE
bash-3.2$ echo “DISPLAY QL(TRIGGER.Q) CURDEPTH TRIGGER ” | runmqsc QMC01 | grep CURDEPTH

——- Check the script.log for ensuring the testscript.sh has run properly due to triggering
bash-3.2$tail -f /var/mqm/script.log


Example4 :We will test the triggering for the Depth of the Queue ie when the QUEUE Depth reaches the defined setting a triggering should be fired

——- Create a script when run will browse the message using amqsgbr and redirect to a script.log
bash-3.2$ vi /var/mqm/testscript.sh
############################
echo `date` >> /var/mqm/script.log
/opt/mqm/samp/bin/amqsgbr TRIGGER.Q QMC01 | grep “[1-9] <” >> /var/mqm/script.log
echo “==========================” >> /var/mqm/script.log
############################ 

——- Make the script executable
bash-3.2$ chmod 755 /var/mqm/testscript.sh


——- Start Queue Manager
bash-3.2$ strmqm QMC01
bash-3.2$ runmqsc QMC01——- Create an Initiation Queue 
DEFINE QL(TRIGGER.INITIATION.QUEUE) like SYSTEM.DEFAULT.INITIATION.QUEUE

——- Create Process with APPLICID /var/mqm/testscript.sh ie run testscript.sh on triggering
DEFINE PROCESS (‘TRIG.PROCESS’) APPLTYPE(UNIX) APPLICID(‘/var/mqm/testscript.sh‘)

——- Create a Local Queue where  Triggering is enabled
ALTER QLOCAL(TRIGGER.Q) TRIGGER TRIGDPTH(3) TRIGTYPE(DEPTH) INITQ(TRIGGER.INITIATION.QUEUE) PROCESS(TRIG.PROCESS)

——- Run runmqtrm command for the Initiation Queue
bash-3.2$ runmqtrm -m QMC01 -q TRIGGER.INITIATION.QUEUE

——- Display QueueDepth before testing to ensure there are no messages in the QUEUE
bash-3.2$ echo “DISPLAY QL(TRIGGER.Q) CURDEPTH TRIGGER ” | runmqsc QMC01 | grep CURDEPTH

——- Put 3 Messages in the TRIGGER.Q  using amqsput
/opt/mqm/sampl/bin/amqsput TRIGGER.Q QMC01

——- Display QueueDepth before testing to ensure there are no messages in the QUEUE
bash-3.2$ echo “DISPLAY QL(TRIGGER.Q) CURDEPTH TRIGGER ” | runmqsc QMC01 | grep CURDEPTH

——- Only onces the Depth of the QUEUE has reached to the TRIGDPTH ie “3” messages the triggering will be invoked. It can be seen from the putty console of “runmqtrm”  and also visible from the /var/mqm/script.log the triggering result 

——- Check the script.log for ensuring the testscript.sh has run properly due to queue depth triggering
bash-3.2$tail -f /var/mqm/script.log

——- After the triggering is fired the Triggering for the QUEUE “TRIGGER.Q” in the Example , It gets disabled ..

——- It needs to be Re-Enabled using below command or use MQSET to renable the TRIGERR from the Application.

——- So for every time trigger is invoked due to QUEUE DEPTH ( TRIGDPTH ) the Triggering needs to be enabled again 

——- Reenable the Triggering for the TRIGGER.Q
bash-3.2$ echo “ALTER QLOCAL(TRIGGER.Q) TRIGGER ” | runmqsc QMC01


Example4 :Runmqtrm as a SERVICE


——- Start Queue Manager
bash-3.2$ strmqm QMC01
bash-3.2$ runmqsc QMC01
 

——- Define Service for TRIGGER Monitor
DEFINE SERVICE(TRIGMON) CONTROL(QMGR) SERVTYPE(SERVER) +
STARTCMD(‘+MQ_INSTALL_PATH+bin/runmqtrm’) +
STARTARG(‘-m +QMNAME+ -q SYSTEM.DEFAULT.INITIATION.QUEUE’) +
STOPCMD(‘+MQ_INSTALL_PATH+bin/amqsstop’) +
STOPARG(‘-m +QMNAME+ -p +MQ_SERVER_PID+’) STDOUT(‘/tmp/TrigMon.stdout’) +
STDERR(‘/tmp/TrigMon.stderr’)


——- Start the Service
START SERVICE(TRIGMON)


——- View the Services attributes
DISPLAY SVSTATUS(TRIGMON)


——- Triggering Std Out and Error
bash-3.2$ ls -lt /tmp/Trig*
-rw-r–r– 1 mqm mqm 239 2014-03-20 13:18 /tmp/TrigMon.stdout
-rw-r–r– 1 mqm mqm 0 2014-03-20 13:18 /tmp/TrigMon.stderr


To get automated mail updates of my Posts..
Please subscribe to the site http://webspherepundit.com
And also like the Facebook Page
https://www.facebook.com/webspherepundit


Setting up MQ Triggerring

MQ Triggering
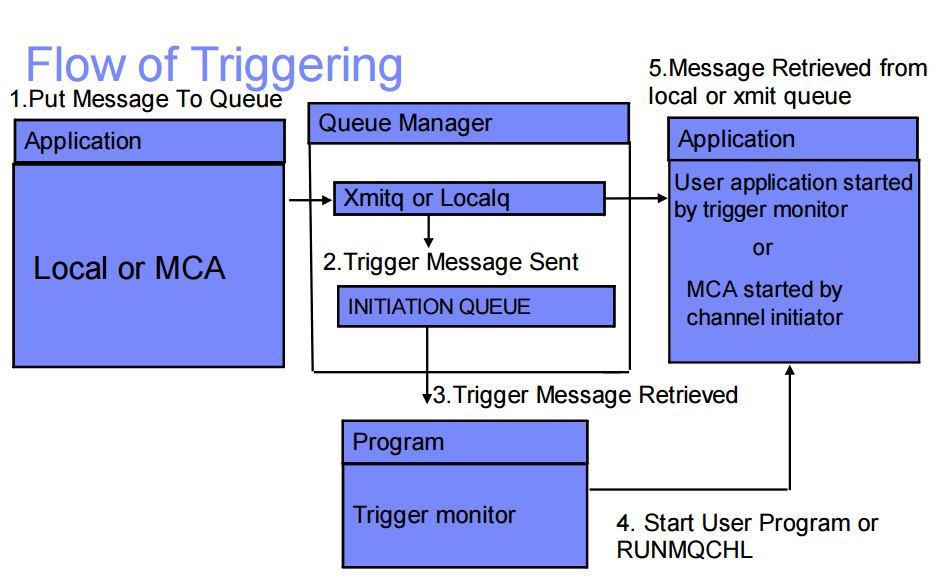
WebSphere MQ provides a feature that enables an application or channel to be started automatically when there are messages available to retrieve from a queue
mqtriggering

1) A message is put to a queue defined as triggered.
2) If a series of conditions are met, the queue manager sends a trigger message to an initiation queue.
3) This is called a trigger event.
4) A trigger monitor reads the trigger message and takes the appropriate action based on the contents of the message, which is typically to start a program to process the triggered queue.
5) Trigger monitors may be built-in or user defined

Some links for more elaborate details on triggering
https://hursleyonwmq.wordpress.com/2007/02/09/triggering-checklist/
http://blog.niklasottosson.com/?p=598
http://www-01.ibm.com/support/docview.wss?uid=swg27039569
http://www-01.ibm.com/support/docview.wss?rs=171&uid=swg27008375
http://www-01.ibm.com/support/docview.wss?uid=swg27041673&aid=1

Types of triggering:
1. Channel Triggering
2. Application Triggering
3. Client Triggering

Modes of Triggering
Trigger on first message- Call a program when depth of queue goes from 0 to 1
Trigger on every message- Call a program for every message entering the queue
Trigger on depth- Call a program when depth of queue gets to a certain number like on 10 messages

In this tutorial I will display the minimal steps to start the application triggering

High level steps for Application triggering
a) Create an initiation queue or use the default SYSTEM.DEFAULT.INITIATION.QUEUE.
b) Create a process definition.
c) Create or alter a local or model queue.
d) Associate the initiation queue and process definition with the local queue, and specify the trigger attributes .

Environment Details :
MQ Version : 7.0
OS : Redhat Linux
TYPE : Application Triggering
MODE : FIRST,EVERY,DEPTH

For a QUICK REFERENCE on TRIGGERING refer to  http://webspherepundit.com/?p=1699

######################################################################################
######################################################################################

Example 1
Trigerring Scenario : To start the http process on a First message put in the Queue

Assumption
a) The http process can be started an stopped using mqm user ( the method to stop/start http as mqm is not covered in this tutorial .. may be for some other day
NOTE : It can be any process/script which you want to start , I used it to get the proper understanding of starting a process using trigerring
b) Your queue manager is created and started
NOTE : create a queue manager : crtmqm QMC01
Start the queue manager : strmqm QMC01

Step1 : Start the queue manager QMC01
As user mqm .. start the queue manager QMC01

bash-3.2$ strmqm QMC01

Step2 : Launch the MQSC prompt for the queue manager QMC01 using runmqsc

bash-3.2$ runmqsc QMC01

mqtriggering1

Step3 : Initiation Queue : Create an Initiation queue which the trigger monitor process will monitor

DEFINE QL(TRIGGER.INITIATION.QUEUE) like SYSTEM.DEFAULT.INITIATION.QUEUE

mqtriggering2

Step4 : Local Queue with Trigerring: Define a Local queue where you want the triggering to be set

NOTE : We will set the MODE as FIRST ie on the First message which the queue receives the trigger will be enabled and for the subsequent message the trigger will not be fired

DEFINE QLOCAL(TRIGGER.Q) TRIGGER TRIGDPTH(1) TRIGTYPE(FIRST) INITQ(TRIGGER.INITIATION.QUEUE) PROCESS(TRIG.PROCESS)

mqtriggering3

Step5 : Process Definition : Define the Process which needs to be started by the trigger
In this case its ‘/etc/init.d/httpd start’

DEFINE PROCESS (‘TRIG.PROCESS’) APPLTYPE(UNIX) APPLICID(‘/etc/init.d/httpd start’)

mqtriggering4


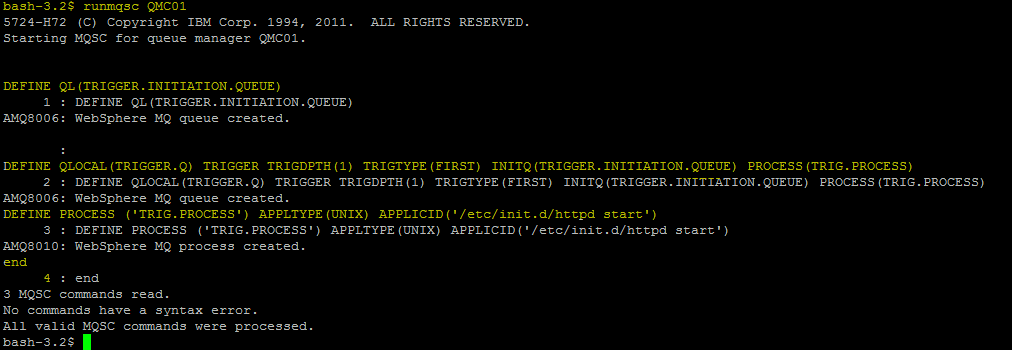
Complete Sample

mqtriggering5

Testing for Example 1
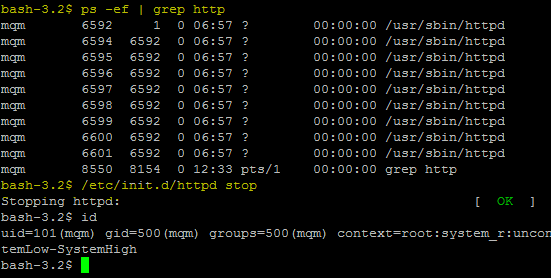
Step1 :  Stopping httpd as mqm to simulate the testing
mqtriggering6

Step2 : Check the Message depth of the Trigger Queue .. it will be zero now

bash-3.2$ echo “DISPLAY QL(TRIGGER.Q) CURDEPTH TRIGGER ” | runmqsc QMC01

mqtriggering7

Step3 :  Start the MQ triggering Process which will monitor the initiation queue

bash-3.2$ runmqtrm -m [QMGR Name] -q [INITIATION QUEUE] 

It can be run in the background using

bash-3.2$ runmqtrm -m [QMGR Name] -q [INITIATION QUEUE]  &

mqtriggering43

runmqtrm can be run as a service too in MQ & It will be covered later in this blog

bash-3.2$ runmqtrm -m QMC01 -q TRIGGER.INITIATION.QUEUE

mqtriggering8

Step4 :
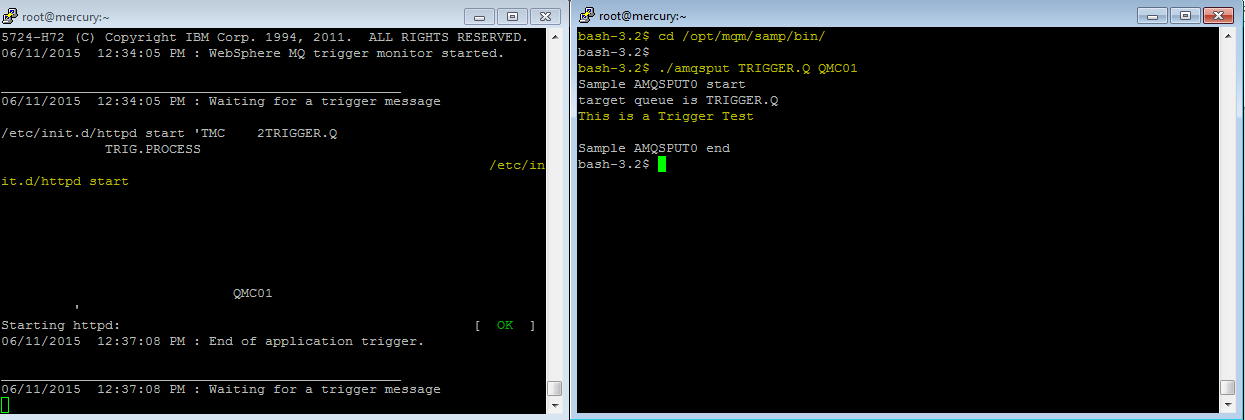
Open another Putty session and Put the Message to the TRIGGER.Q and see the response of the runmqtrm on the other session
Put a message in TRIGGER.Q using ./amqsput TRIGGER.Q 

mqtriggering9

Step5 :  Check the TRIGGER.Q depth count it will be 1

bash-3.2$ echo “DISPLAY QL(TRIGGER.Q) CURDEPTH TRIGGER ” | runmqsc QMC01

mqtriggering10

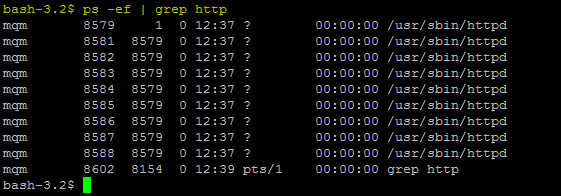
Step6 : Check the http process .. it should be started now using ps –ef | grep http

mqtriggering11
######################################################################################
######################################################################################

Example 2
Trigerring Scenario : Enable triggering to start a unix script with a receipt of a message

In this example we will be running a script instead of starting a process with trigerring set for FIRST( ie On the arrival of the first message )

Step1 :  Create a test script as per the sample below  (It can be any script of your choice)
This script will use amqsgbr output and send it to a  file /var/mqm/script.log

Create a script file testscript.sh

bash-3.2$ vi /var/mqm/testscript.sh
############################
echo `date` >> /var/mqm/script.log
/opt/mqm/samp/bin/amqsgbr TRIGGER.Q QMC01 | grep “[1-9] <” >> /var/mqm/script.log
echo “==========================” >> /var/mqm/script.log
############################

mqtriggering12

Step2 :  Change the permission to make it executable

bash-3.2$ chmod 755 /var/mqm/testscript.sh

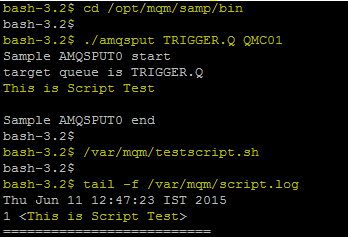
Step3 :  Testing the script : Test this script works

bash-3.2$ cd /opt/mqm/samp/bin
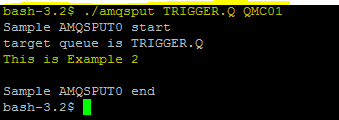
bash-3.2$ ./amqsput TRIGGER.Q QMC01
Sample AMQSPUT0 start
target queue is TRIGGER.Q
This is Script TestSample AMQSPUT0 end
bash-3.2$bash-3.2$ /var/mqm/testscript.sh
bash-3.2$
bash-3.2$ tail -f /var/mqm/script.log
Thu Jun 11 12:47:23 IST 2015

mqtriggering13

Enabling Triggering to run this script

Now that we know the script works , Put it for triggering

Step1 : We will use the same example1 only we will alter the process definition with APPLICID(‘ /var/mqm/testscript.sh’)
we will alter APPLICID(‘/etc/init.d/httpd start’)”  with  APPLICID(‘ /var/mqm/testscript.sh’)  

ALTER PROCESS (‘TRIG.PROCESS’) APPLTYPE(UNIX) APPLICID(‘/var/mqm/testscript.sh’)


mqtriggering14

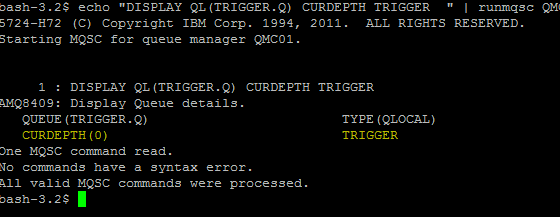
Step2 : Check the Queue Depth of Trigger Queue .. IT should be “Zero”

bash-3.2$ echo “DISPLAY QL(TRIGGER.Q) CURDEPTH TRIGGER ” | runmqsc QMC01 | grep CURDEPTH

mqtriggering15

Step3 : Run the “runmqtrm” command

bash-3.2$ runmqtrm -m QMC01 -q TRIGGER.INITIATION.QUEUE

Testing for Example 2

NOTE: use ./amqsget TRIGGER.Q or CLEAR TRIGGER.Q to clear the messages in  TRIGGER.Q before starting the test 

Step1: Put a message in the TRIGGER.Q

mqtriggering16

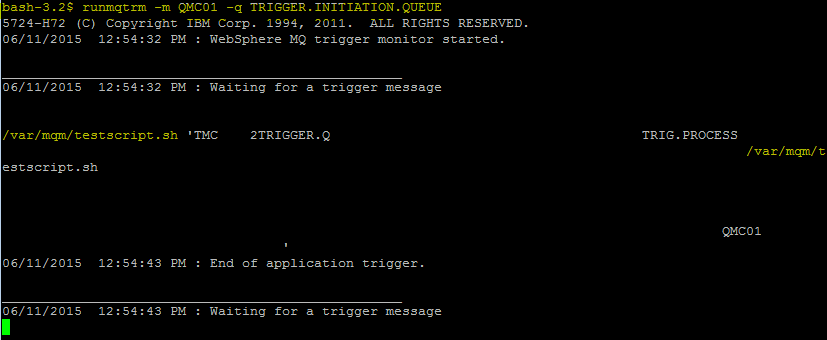
Step2 : View the runmqtrm console

mqtriggering17

Step3 : Tail the script has run by seeing the logs

mqtriggering18


Now even if we put more messages in the Queue TRIGGER.Q the trigger will only happen once ( ie the First message ie when the Queue Depth goes from Zero to One .

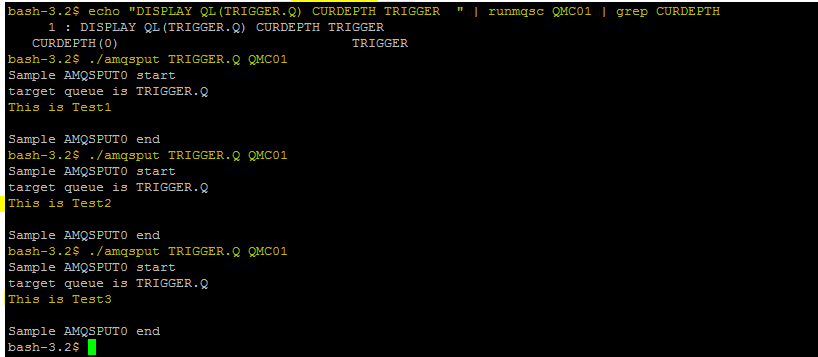
For eg : The initial queue depth of “TRIGGER.Q” is zero .. Then I put 3 messages in it

mqtriggering20

mqtriggering22

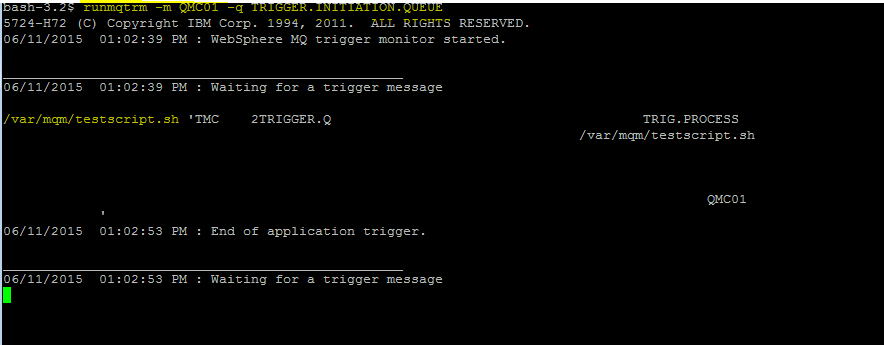
But with the runmqtrm  we see that the script only ran only ONCE.

mqtriggering21

mqtriggering23

With this we have simulated a situation wherein the only the first message to a queue ( Queue depth Zero to One)  will trigger the  script to run 

######################################################################################

######################################################################################

Example 3

Trigerring Scenario : We will Test the Trigerring method for EVERY Message instead of the FIRST message entering the Trigger queue.
I will use the same object created in the previous Example 2 

bash-3.2$  runmqsc QMC01

Step1 : Alter the Definitions of the TRIGGER.Q with  TRIGTYPE(EVERY)

ALTER QLOCAL(TRIGGER.Q) TRIGGER TRIGDPTH(1)  TRIGTYPE(EVERY) INITQ(TRIGGER.INITIATION.QUEUE) PROCESS(TRIG.PROCESS)

mqtriggering24

Step2 : Run the runmqtrm for the Initiation Queue

bash-3.2$ runmqtrm -m QMC01 -q TRIGGER.INITIATION.QUEUE

 Testing for Example 3

Step1 : Check the Current Depth of the TRIGGER.Q its “Zero”
NOTE: use ./amqsget TRIGGER.Q or CLEAR TRIGGER.Q to clear the messages in  TRIGGER.Q

mqtriggering26

Step2 :Clear the script logs

mqtriggering27

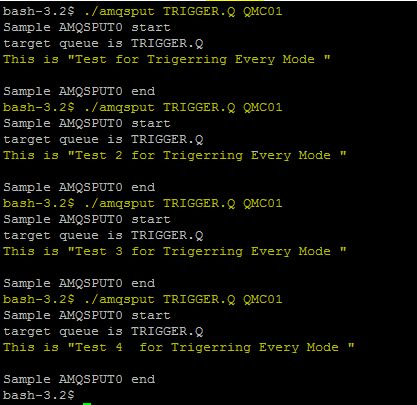
Step3 :Put 4 messages using amqsput TRIGGER.Q . So if our configurations are corrent for each message the trigger monitor will execute the testsctipt.sh

mqtriggering28

Step4 :Check the output of the trigger ie runmqtrm. You will see for each message the testscript.sh is run

mqtriggering29

Step5 : Check the Logs to ensure the script has run for each trigger

bash-3.2$ tail -f /var/mqm/script.log


mqtriggering30

bash-3.2$ echo “DISPLAY QL(TRIGGER.Q) CURDEPTH TRIGGER ” | runmqsc QMC01 | grep CURDEPTH

######################################################################################

######################################################################################

Example 4
Trigerring Scenario : We will test the triggering for the Depth of the Queue ie when the QUEUE Depth reaches the defined setting a triggering should be fired

We will use the same Example 2 for this test 

Step1 : Clear the queue TRIGGER.Q of the messages

bash-3.2$ ./amqsget TRIGGER.Q QMC01
bash-3.2$ >/var/mqm/script.log

mqtriggering32


Step2 : Alter the Queue definitions for TRIGDPTH(3) TRIGTYPE(DEPTH)

ALTER QLOCAL(TRIGGER.Q) TRIGGER TRIGDPTH(3) TRIGTYPE(DEPTH) INITQ(TRIGGER.INITIATION.QUEUE) PROCESS(TRIG.PROCESS)

mqtriggering33

Step3 : Run the runmqtrm for the Initiation Queue

bash-3.2$ runmqtrm -m QMC01 -q TRIGGER.INITIATION.QUEUE

Testing for Example 4

Step1 : Put 3 messages in the Queue TRIGGER.Q .. Observe that until we put 3 messages in the TRIGGER.Q the triggering is not fired
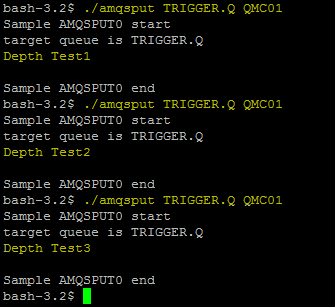
 

mqtriggering35


Step2 :The trigger is run only one when the Queue Depth reaches 3 messages
Check the output of the script which writes to the logs script.log to ensure that the script has run only once when the Depth is 3 

mqtriggering38


One thing to observe is that once the triggering is fired for TRIGTYPE( DEPTH) the triggering is disabled for the Queue

Here we can see that the Triggering is disabled “NOTRIGGER”  onces the triggering is fired

mqtriggering39

We need to enable TRIGGERING Again for the TRIGGER.Q as below

bash-3.2$ echo “ALTER QLOCAL(TRIGGER.Q) TRIGGER ” | runmqsc QMC01


mqtriggering40


NOTE : An Application can use MQSET within it to re-enable the Triggering the QUEUE

######################################################################################

######################################################################################

Runmqtrm as a SERVICE

Instead of running runmqtrm from the putty prompt , A better way to runmqtrm is as a service
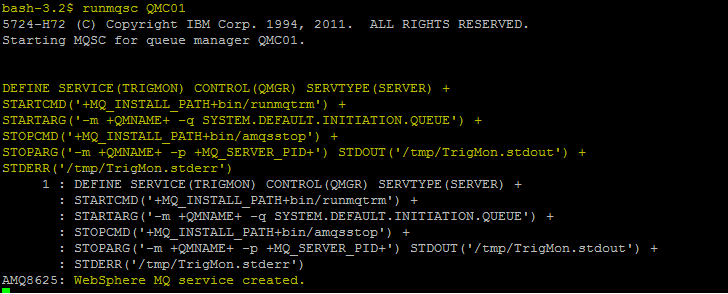
Step1 : Define Service

DEFINE SERVICE(TRIGMON) CONTROL(QMGR) SERVTYPE(SERVER) +
STARTCMD(‘+MQ_INSTALL_PATH+bin/runmqtrm’) +
STARTARG(‘-m +QMNAME+ -q SYSTEM.DEFAULT.INITIATION.QUEUE’) +
STOPCMD(‘+MQ_INSTALL_PATH+bin/amqsstop’) +
STOPARG(‘-m +QMNAME+ -p +MQ_SERVER_PID+’) STDOUT(‘/tmp/TrigMon.stdout’) +
STDERR(‘/tmp/TrigMon.stderr’)


mqtriggering44

Step2 :Start the Service

START SERVICE(TRIGMON)

mqtriggering45

Step3 :View the Services attributes

DISPLAY SVSTATUS(TRIGMON)


mqtriggering46

mqtriggering48
Step4 : Notice that the output files defined for the trigger monitor are created:

STDOUT(‘/tmp/TrigMon.stdout’)
STDERR(‘/tmp/TrigMon.stderr’)

Step5 : List the OutPut files

bash-3.2$ ls -lt /tmp/Trig*
-rw-r–r– 1 mqm mqm 239 2014-03-20 13:18 /tmp/TrigMon.stdout
-rw-r–r– 1 mqm mqm 0 2014-03-20 13:18 /tmp/TrigMon.stderr


bash-3.2$ cat /tmp/TrigMon.stdout
5724-H72 (C) Copyright IBM Corp. 1994, 2011. ALL RIGHTS RESERVED.
03/20/2014 01:18:24 PM : WebSphere MQ trigger monitor started.
__________________________________________________
03/20/2014 01:18:25 PM : Waiting for a trigger message

At this point, notice that the trigger monitor has not handled any messages yet:


To get automated mail updates of my Posts..
Please subscribe to the site http://webspherepundit.com
And also like the Facebook Page
https://www.facebook.com/webspherepundit
 

Update Trial License of WebSphere MQ to Prod License

There are many cases wherein you have installed the Trial version of WebSphere MQ.
Later you purchased the fully supported version and would like to install the Licenced version without affecting the current MQ infrastructure which you have configured and running.

When you Create or Start a Queue Manager in the Trial MQ Installation  you will get a message
“There are 90 days left in the trial period for this copy of WebSphere MQ”

The evaluation trial version license will soon expire after 90 days and you will not be able to use the MQ later .

setmqprd

So you would need to Purchase a license for WebSphere MQ from your IBM sales representative and update the Trial License

Activity : Update the Production License of MQ on Trial Websphere MQ version MQ 7.1 on Linux

Prerequisites : Installed version of Trail Webspsphere MQ . In this activity i have installed
“Trial Websphere MQ version MQ 7.1 on Linux”

Get the PROD License :
1) Use the CD which you have got
2) Download the Same version of MQ product from the Passport Advantage site

Background : 
“setmqprd” command is used to update the PROD license over the existing Trial Version of MQ

For UNIX: setmqprd {PATH_TO_NEW_CODE}/licenses/amqpcert.lic
For Windows: setmqprd {PATH_TO_NEW_CODE}\licenses\amqpcert.lic

NOTE : Ensure that you have same version purchased as to the trial version which you have installed

The license is named amqXcert.lic, where X is the license type.

amqtcert.lic – is a trial license
amqbcert.lic – is a beta license
amqpcert.lic – is a full production license


Steps to update the MQ Trial  License  to PROD 

Step 1 :  Stop the Running queue managers in the Installation using endmqm

setmqprd5

setmqprd6
Step 2 : Extract the Production License for MQ 7.1
a) Use the MQ Product CD which you have received
               OR
                b)Download the Same version of MQ product from the Passport Advantage site

setmqprd4
I have extracted the Complete Version of  MQ 7.1 in /IBMSoftware/mq/. Within this there is a “licenses” folder .
In the license folder there is a amqpcert.lic file which represents the Production MQ License


Step 3 :
Run “setmqprd”

#setmqprd {PATH_TO_NEW_CODE}/lib/amqpcert.lic

[root@mercury ~]# /opt/mqm/bin/setmqprd  /IBMSoftware/mq/licenses/amqpcert.lic

setmqprd8


Step 4 :
Once you run the setmqprd the prod license file amqpcert.lic gets saved in /opt/mqm/lib/ .

If amqtcert.lic file also exists in the /opt/mqm/lib/ along with the amqpcert.lic .
Then Delete the MQ Trial Licence file (amqtcert.lic) from the /opt/mqm/lib/ folder

setmqprd7

bash-3.2$ cd /opt/mqm/lib/
bash-3.2$ rm amqtcert.lic

NOTE : If you dont delete the MQ Trial Licence file (amqtcert.lic) from the /opt/mqm/lib/ folder . You might get the error ” AMQ7155 : Licence file not found or not valid.”

Click HERE to get more Information about this error

setmqprd9


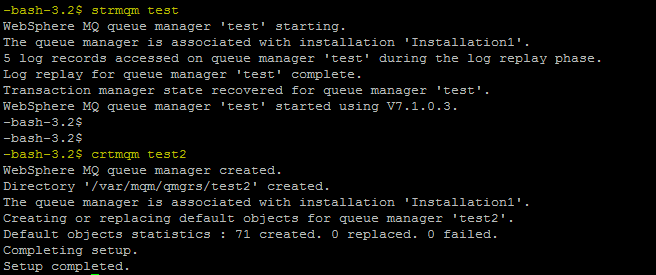
Step 5: Start the queue managers now using “strmqm”

bash-3.2$ strmqm test

setmqprd10

We are not receiving the message “There are 90 days left in the trial period for this copy of WebSphere MQ”

This  indicates that the License has been updated to PROD


To get automated mail updates of my Posts..
Please subscribe to the site http://webspherepundit.com
And also like the Facebook Page
https://www.facebook.com/webspherepundit


MQ Error : AMQ7155: License file not found or not valid

After we update the  Trial License of MQ with the Production License of the MQ .

Sometimes we may get the error “AMQ7155: License file not found or not valid”  when we start the Queue Manager

setmqprd9

Click HERE for the details to update the Prod MQ License

Some reasons for this error

Step 1: License File missing : Check if the amqpcert.lic file is available in “/opt/mqm/lib”

Step 2: Permission Issue : Check if the permissions is proper in “/opt/mqm/lib” for the .lic files in it

Step 3: Multiple License file Available :  When we run the setmqprd command the /opt/mqm/lib may also have the Trail MQ license file amqtcert.lic .

As the “/opt/mqm/lib”  has both the Trail MQ license file (amqtcert.lic) and Prod MQ license file (amqpcert.lic) . The MQ is not able to identify which one it should use and hence gives an error
setmqprd7
Step 4 :  Remove  the Trail MQ license file (amqtcert.lic) from the “/opt/mqm/lib” folder.  The Queue Manager will pick up the changes once it is started back up.

bash-3.2$ cd /opt/mqm/lib/
bash-3.2$rm amqtcert.lic

Step 5: Start the Queue Manager and check if starts properly

setmqprd10


To get automated mail updates of my Posts..
Please subscribe to the site http://webspherepundit.com
And also like the Facebook Page
https://www.facebook.com/webspherepundit


Mqconfig: Check Kernal Parameter needs for MQ

The mqconfig command is run to verify the system configuration matches or exceeds that which is required by IBM MQ. The configuration values are minimum values, and large installations might require values greater than those checked by this command.

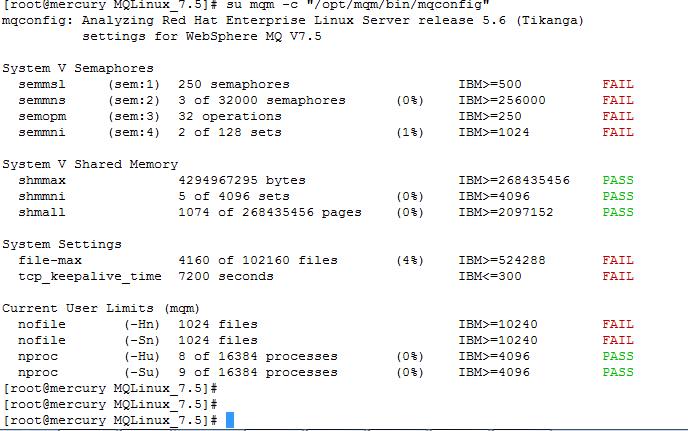
1) When i ran mqconfig before Installing MQ ,  these were the failures for the Kernal Paramater

mqinstall9
2) You need to modify these Parameters which are failed

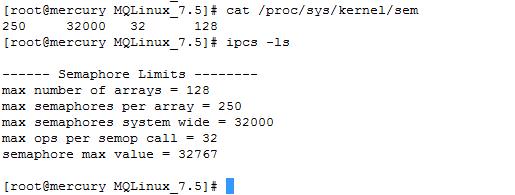
Run the below commands to check the values of the Semaphores paramaters

a) These parameters can only be changed with a root or a superuser .
b) These changes also may affect the other applications which are running on that Node. These needs to be concurred by the other application owners if any
#cat /proc/sys/kernel/shmmni
#cat /proc/sys/kernel/shmall
#cat /proc/sys/kernel/shmmax
#cat /proc/sys/kernel/sem
#cat /proc/sys/fs/file-max

For eg
mqinstall10
3) To Modify these values as per the MQ recommendations , Log on as a user with root authority.

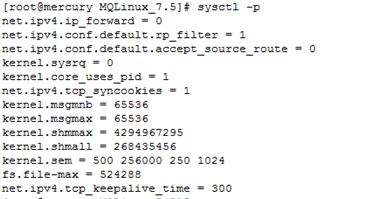
4) Open the file /etc/sysctl.conf with a text editor, then add or change the following entries to the values shown
a ) #vi /etc/sysctl.conf
b) Enter the below parameters in this file and Save and Exit
kernel.shmmni = 4096
kernel.shmall = 2097152
kernel.shmmax = 268435456
kernel.sem = 500 256000 250 1024
fs.file-max = 524288

c) To load these sysctl values immediately, enter the command
#sysctl -p
Capture12
4) Maximum open files : ie “nofiles
If the system is heavily loaded, you might need to increase the maximum possible number of open files.
Issuing the following command to check the current set value
cat /proc/sys/fs/file-max

a) Edit the /etc/security/limits.conf files
b) Add the below values in the limits.conf
mqm soft nofile 10240
mqm hard nofile 10240

Capture13
5) Maximum Process : ie “nproc
a) A running WebSphere MQ queue manager consists of a number of thread programs, and each connected application will increase the number of threads running in the queue manager processes.
b)  You should ensure that the maximum number of processes which the mqm user is allowed to run is not restricted .
c) Set
nproc for the mqm user to 4090 or more.
d) Edit the /etc/security/limits.d/90-nproc.conf to increase the nproc limit for all users .You can also set it for specific user too ..
mqm soft nproc 4090

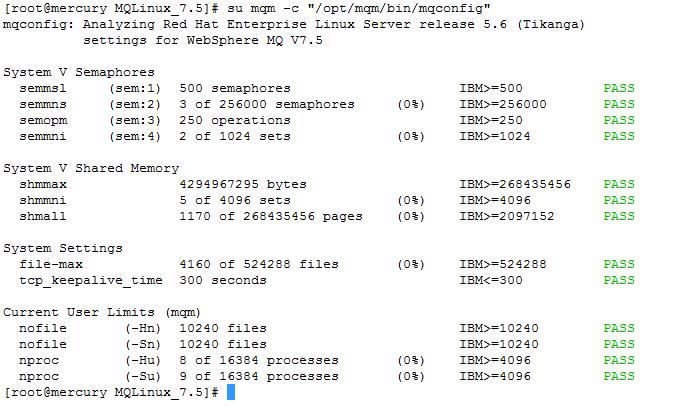
6) ReRun the mqconfig.sh to check the all the kernal paramaters are Passed

mqinstall16

7) Once all the paramaters are sucessful you could proceed with the installation of the MQ on these nodes

NOTE : These are the basic kernal values you need for MQ . But these may vary based on your application load and usage . So you may have to do a Trial and Error method to arrive at an appropriate value . but in most of the cases these values suffice


To get regular mail updates on my Posts..
Please subscribe to the site http://webspherepundit.com
And also like the Facebook Page
https://www.facebook.com/webspherepundit
Websphere MQ 7.5 Installation on Linux

Steps to Install MQ 7.5 on Linux

1) Ensure that all the prerequisites are validated and checked before downloading and installing it
2) Recommended to create two partitions for the Installation and the Data filesystem ( ie /opt/mqm and /var/mqm)
3) Its Important to check/modify  the kernal parameters for the Unix using the mqconfig.sh. I have created a Post for this  . You can refer to the Link  HERE
The current mqconfig.sh output before installation ( i have done the  necessary changes in linux kernal parameters)

mqinstall16

All are PASSED

NOTE: These values may differ based on large setup , load etc 

4) Download the MQ setup from the Passport Advantage
5) I have saved the setup  WS_MQ_LINUX_ON_X86_32B_V7.5.0.2.tar     in /IBMSoftware/MQLinux_7.5

mqinstall1

6) Extract the tar file in the same location using tar -xvf command

mqinstall2
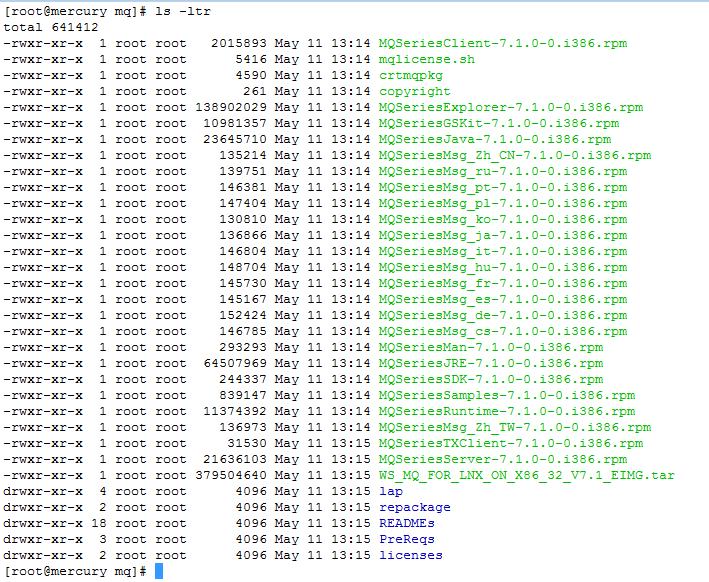
7) The tar file consists of the rpms for MQ and other supporting packages for it

mqinstall3
8) Check if MQ is already installed using rpm command : rpm -qa | grep -i mq
mqinstall4
9) Login as root or any super user

a) Create the mqm user and mqm groups using the Unix commands
#groupadd mqm 

#useradd -g mqm mqm 
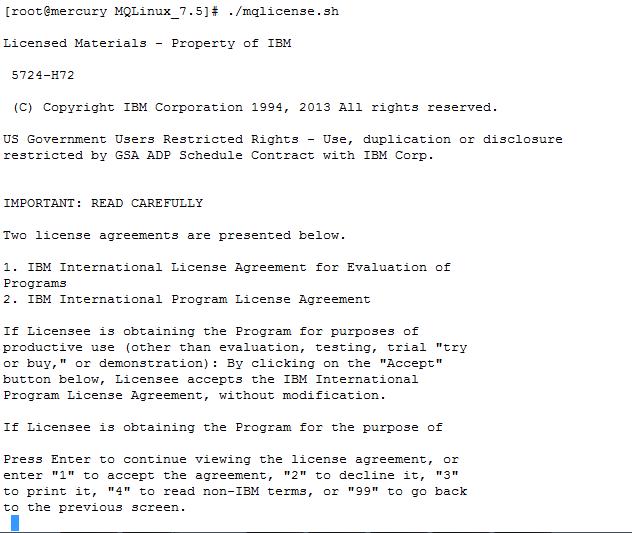
b) Execute the “ ./mqlicense.sh” script to accept the License .
mqinstall6
Press Enter , Enter to go to the last of the License Agreement

Enter “ 1” to accept the license
mqinstall7

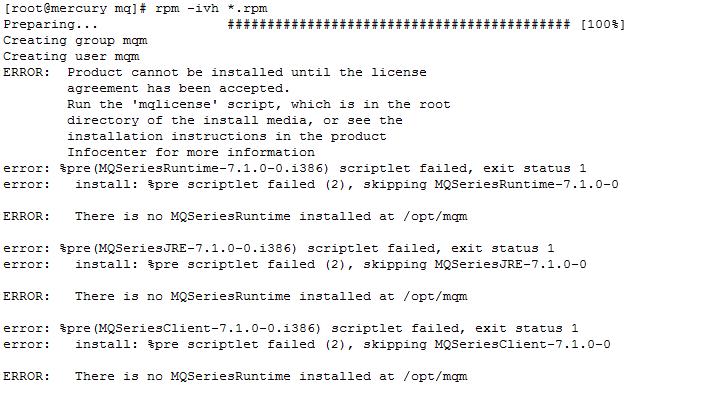
NOTE : If you don’t accept the License and try to install the rpms you will receive the below error
Product cannot be installed until the license agreement has been accepted

mqinstall5
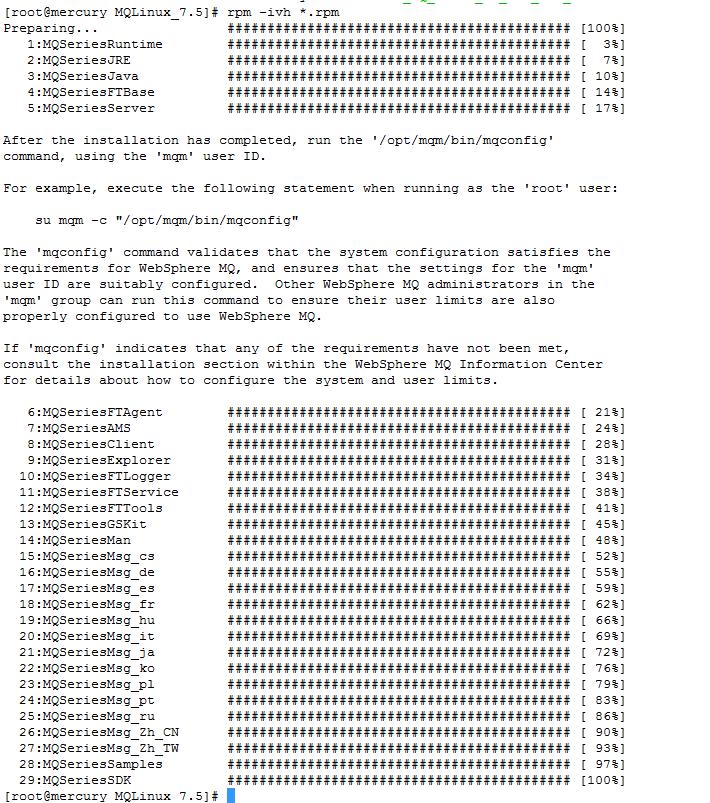
10) Run the rpm command to install the MQ rpms
ie rpm -ivh < rpm package name >;

You can simply run “ rpm -ivh *.rpm” from the folder where the MQsetup Tar was extracted . In my case its /IBMSoftware/MQLinux_7.5

a) “rpm -ivh *.rpm” will take care of the dependencies between the rpms .
Alternatively you could run individual rpms 

[root@mercury MQLinux_7.5]# rpm -ivh MQSeriesServer-7.5.0-2.i386.rpm

b) Also below are the sequence of the dependencies which needs to be followed if individually installing the rpms
 
mqinstall8

NOTE: Running these rpms will create the user mqm and the group mqm with user mqm as it member if the users are not allready created 

11) Check if MQ is installed properly . you can use rpm -qa | grep -i MQ to check the rpms installed
Capture3

a) Use rpm -qi MQSeriesServer-7.5.0-2  to get more information on the specific package like versions , path of installation , license etc.

Capture
12) Navigate to the locations /opt/mqm and /var/mqm and validate the permissions . It should be mqm

13) Check the users and group mqm creation

mqinstall18

mqinstall19
14) Switch user to mqm using su – mqm
a) # su – mqm
b) Load the environment variable for MQ using setmqenv
$. /opt/mqm/bin/setmqenv

mqinstall20
NOTE: a) You can Ignore the message AMQ8588
b) Also you can add “. /opt/mqm/bin/setmqenv ” in the .bash_profile file of                                   the 
user  to load the Env Variables every time automatically when logging in.

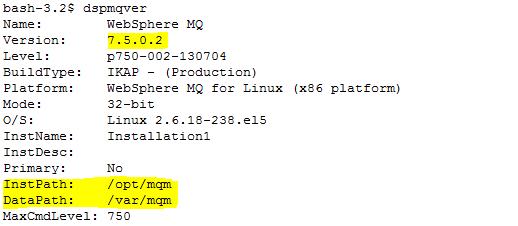
15 ) Validate the versions of MQ execute “dspmqver” as mqm user

mqinstall21
Here its 7.5.0.2 with “Installation Path” as /opt/mqm and “Data Path” as /var/mqm

16 ) You could create some test Queue Managers to validate the installation too ( i will write a separate post for the Queue Manager creation )

This is how we install the MQ on a Linux Server .


To get regular mail updates on my Posts..
Please subscribe to the site http://webspherepundit.com
And also like the Facebook Page
https://www.facebook.com/webspherepundit