Sample User addition ldif file for Tivoli Directory Server
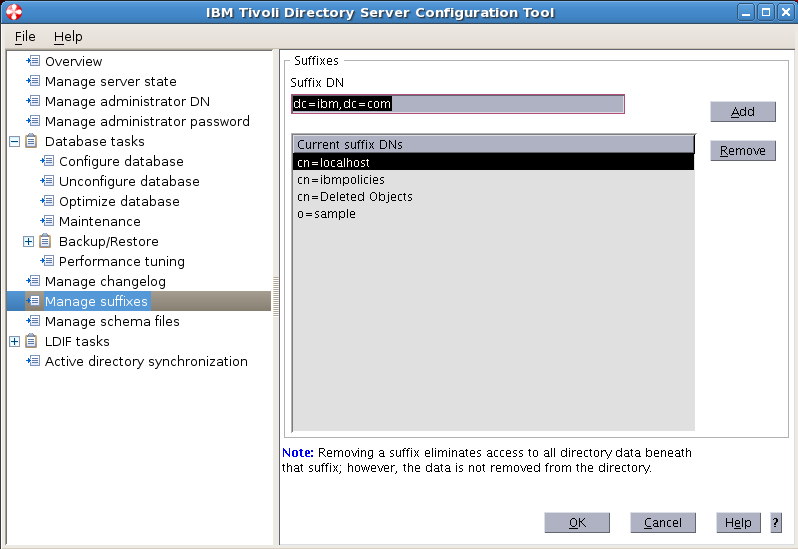
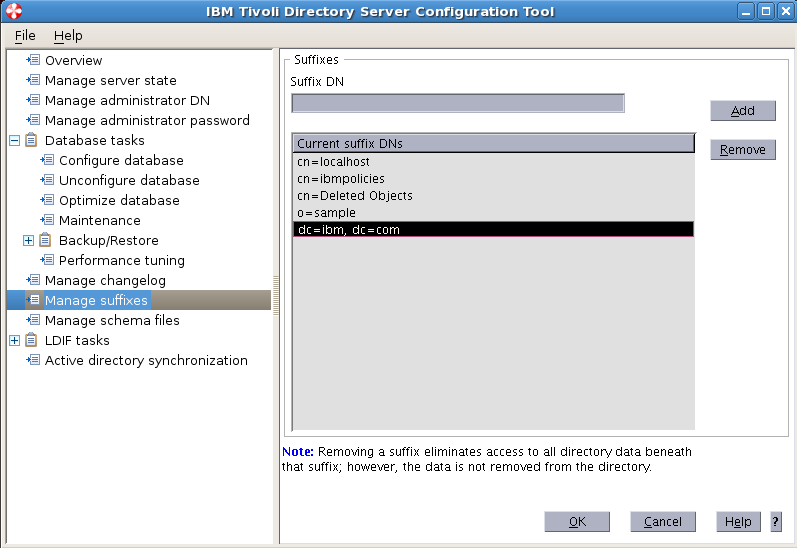
Suffix : dc=myorg,dc=com
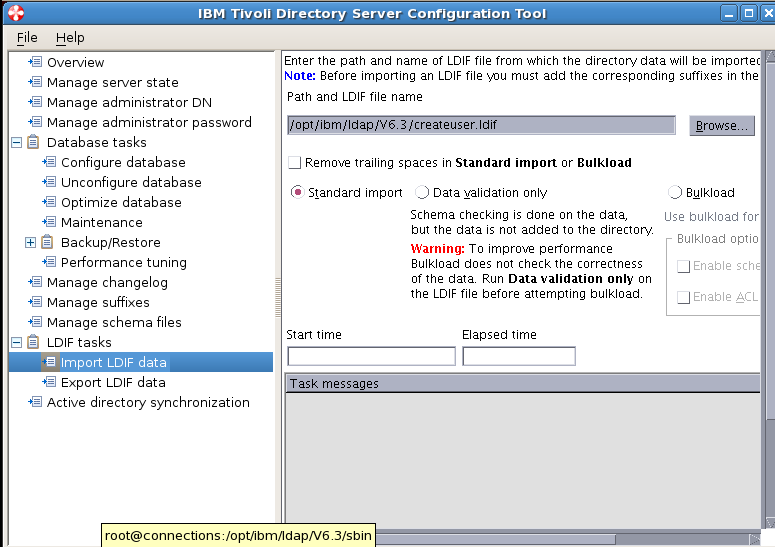
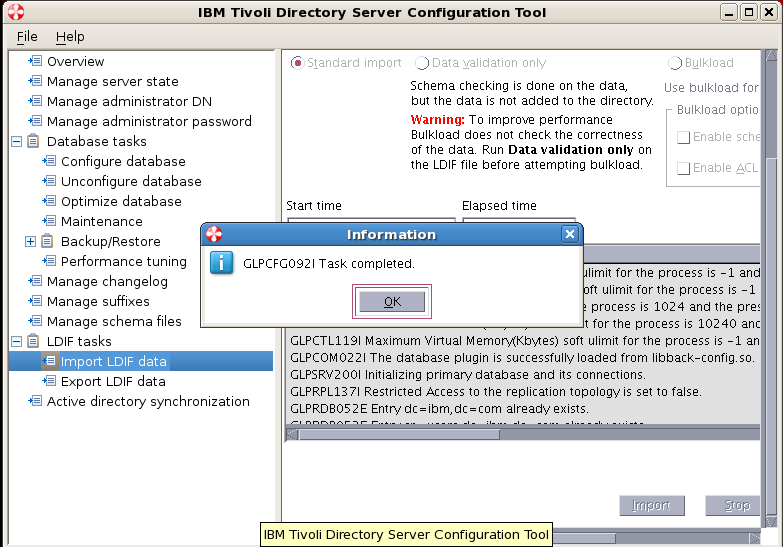
Create a file createUser.ldif
[root@connections V6.3]# vi /opt/ibm/ldap/V6.3/createuser.ldif
Copy the below lines to the createuser.ldif
dn: dc=myorg,dc=com
objectclass: domain
objectclass: top
dc: myorg,dc=com
dc: myorg
dn: cn=admusers,dc=myorg,dc=com
objectclass: container
objectclass: top
cn: admusers
dn: cn=employee,dc=myorg,dc=com
objectclass: container
objectclass: top
cn: employee
dn: cn=groups,dc=myorg,dc=com
objectclass: top
objectclass: container
cn: groups
dn: uid=wasadmin,cn=admusers,dc=myorg,dc=com
objectclass: organizationalPerson
objectclass: person
objectclass: top
objectclass: inetOrgPerson
uid: wasadmin
userpassword: wasadmin
sn: wasadmin
givenName: wasadmin
cn: wasadmin
dn: uid=wasoperator,cn=admusers,dc=myorg,dc=com
objectclass: organizationalPerson
objectclass: person
objectclass: top
objectclass: inetOrgPerson
uid: wasoperator
userpassword: wasoperator
sn: wasoperator
givenName: wasoperator
cn: wasoperator
dn: uid=cadmin,cn=admusers,dc=myorg,dc=com
objectclass: organizationalPerson
objectclass: person
objectclass: top
objectclass: inetOrgPerson
uid: cadmin
userpassword: cadmin
sn: cadmin
givenName: cadmin
cn: cadmin
dn: uid=fnadmin,cn=admusers,dc=myorg,dc=com
objectclass: organizationalPerson
objectclass: person
objectclass: top
objectclass: inetOrgPerson
uid: fnadmin
userpassword: fnadmin
sn: fnadmin
givenName: fnadmin
cn: fnadmin
dn: uid=ldapbind,cn=admusers,dc=myorg,dc=com
objectclass: organizationalPerson
objectclass: person
objectclass: top
objectclass: inetOrgPerson
uid: ldapbind
userpassword: ldapbind
sn: ldapbind
givenName: ldapbind
cn: ldapbind
dn: uid=wasmonitor,cn=admusers,dc=myorg,dc=com
objectclass: organizationalPerson
objectclass: person
objectclass: top
objectclass: inetOrgPerson
uid: wasmonitor
userpassword: wasmonitor
sn: wasmonitor
givenName: wasmonitor
cn: wasmonitor
dn: uid=wpsbind,cn=admusers,dc=myorg,dc=com
objectclass: top
objectclass: person
objectclass: organizationalPerson
objectclass: inetOrgPerson
uid: wpsbind
userpassword: wpsbind
sn: wpsbind
givenName: wpsbind
cn: wpsbind
dn: uid=conadmin,cn=admusers,dc=myorg,dc=com
objectclass: top
objectclass: person
objectclass: organizationalPerson
objectclass: inetOrgPerson
uid: conadmin
userpassword: conadmin
sn: conadmin
givenName: conadmin
cn: conadmin
dn: uid=wpsadmin,cn=admusers,dc=myorg,dc=com
objectclass: organizationalPerson
objectclass: person
objectclass: top
objectclass: inetOrgPerson
uid: wpsadmin
userpassword: wpsadmin
sn: wpsadmin
givenName: wpsadmin
cn: wpsadmin
dn: uid=vivek,cn=employee,dc=myorg,dc=com
objectclass: organizationalPerson
objectclass: person
objectclass: top
objectclass: inetOrgPerson
uid: vivek
userpassword: vivek
sn: pujari
givenName: vivek pujari
cn: vivek
dn: uid=chirag,cn=employee,dc=myorg,dc=com
objectclass: organizationalPerson
objectclass: person
objectclass: top
objectclass: inetOrgPerson
uid: chirag
userpassword: chirag
sn: pujari
givenName: chirag pujari
cn: chirag
dn: uid=ravi,cn=employee,dc=myorg,dc=com
objectclass: organizationalPerson
objectclass: person
objectclass: top
objectclass: inetOrgPerson
uid: ravi
userpassword: ravi
sn: pujari
givenName: ravi pujari
cn: ravi
dn: uid=pratik,cn=employee,dc=myorg,dc=com
objectclass: organizationalPerson
objectclass: person
objectclass: top
objectclass: inetOrgPerson
uid: pratik
userpassword: pratik
sn: pujari
givenName: pratik pujari
cn: pratik
dn: uid=santosh,cn=employee,dc=myorg,dc=com
objectclass: organizationalPerson
objectclass: person
objectclass: top
objectclass: inetOrgPerson
uid: santosh
userpassword: santosh
sn: nair
givenName: santosh nair
cn: santosh
dn: uid=vijaya,cn=employee,dc=myorg,dc=com
objectclass: organizationalPerson
objectclass: person
objectclass: top
objectclass: inetOrgPerson
uid: vijaya
userpassword: vijaya
sn: nair
givenName: vijaya nair
cn: vijaya
dn: uid=mihika,cn=employee,dc=myorg,dc=com
objectclass: organizationalPerson
objectclass: person
objectclass: top
objectclass: inetOrgPerson
uid: mihika
userpassword: mihika
sn: temkar
givenName: mihika temkar
cn: mihika
dn: uid=Akshita,cn=employee,dc=myorg,dc=com
objectclass: organizationalPerson
objectclass: person
objectclass: top
objectclass: inetOrgPerson
uid: Akshita
userpassword: Akshita
sn: temkar
givenName: Akshita temkar
cn: Akshita
dn: uid=Abha,cn=employee,dc=myorg,dc=com
objectclass: organizationalPerson
objectclass: person
objectclass: top
objectclass: inetOrgPerson
uid: Abha
userpassword: Abha
sn: temkar
givenName: Abha temkar
cn: Abha
dn: uid=Arushi,cn=employee,dc=myorg,dc=com
objectclass: organizationalPerson
objectclass: person
objectclass: top
objectclass: inetOrgPerson
uid: Arushi
userpassword: Arushi
sn: temkar
givenName: Arushi temkar
cn: Arushi
dn: uid=Adrika,cn=employee,dc=myorg,dc=com
objectclass: organizationalPerson
objectclass: person
objectclass: top
objectclass: inetOrgPerson
uid: Adrika
userpassword: Adrika
sn: temkar
givenName: Adrika temkar
cn: Adrika
dn: uid=Abhijit,cn=employee,dc=myorg,dc=com
objectclass: organizationalPerson
objectclass: person
objectclass: top
objectclass: inetOrgPerson
uid: Abhijit
userpassword: Abhijit
sn: temkar
givenName: Abhijit temkar
cn: Abhijit
dn: uid=Abhiram,cn=employee,dc=myorg,dc=com
objectclass: organizationalPerson
objectclass: person
objectclass: top
objectclass: inetOrgPerson
uid: Abhiram
userpassword: Abhiram
sn: temkar
givenName: Abhiram temkar
cn: Abhiram
dn: uid=Abhisar,cn=employee,dc=myorg,dc=com
objectclass: organizationalPerson
objectclass: person
objectclass: top
objectclass: inetOrgPerson
uid: Abhisar
userpassword: Abhisar
sn: modi
givenName: Abhisar modi
cn: Abhisar
dn: uid=Abhi,cn=employee,dc=myorg,dc=com
objectclass: organizationalPerson
objectclass: person
objectclass: top
objectclass: inetOrgPerson
uid: Abhi
userpassword: Abhi
sn: modi
givenName: Abhi modi
cn: Abhi
dn: uid=Aagney,cn=employee,dc=myorg,dc=com
objectclass: organizationalPerson
objectclass: person
objectclass: top
objectclass: inetOrgPerson
uid: Aagney
userpassword: Aagney
sn: modi
givenName: Aagney modi
cn: Aagney
dn: uid=Aadit,cn=employee,dc=myorg,dc=com
objectclass: organizationalPerson
objectclass: person
objectclass: top
objectclass: inetOrgPerson
uid: Aadit
userpassword: Aadit
sn: modi
givenName: Aadit modi
cn: Aadit
dn: uid=Achal,cn=employee,dc=myorg,dc=com
objectclass: organizationalPerson
objectclass: person
objectclass: top
objectclass: inetOrgPerson
uid: Achal
userpassword: Achal
sn: modi
givenName: Achal modi
cn: Achal
dn: uid=Achalraj,cn=employee,dc=myorg,dc=com
objectclass: organizationalPerson
objectclass: person
objectclass: top
objectclass: inetOrgPerson
uid: Achalraj
userpassword: Achalraj
sn: modi
givenName: Achalraj modi
cn: Achalraj
dn: uid=Aadesh,cn=employee,dc=myorg,dc=com
objectclass: organizationalPerson
objectclass: person
objectclass: top
objectclass: inetOrgPerson
uid: Aadesh
userpassword: Aadesh
sn: modi
givenName: Aadesh modi
cn: Aadesh
dn: uid=Durvish,cn=employee,dc=myorg,dc=com
objectclass: organizationalPerson
objectclass: person
objectclass: top
objectclass: inetOrgPerson
uid: Durvish
userpassword: Durvish
sn: modi
givenName: Durvish modi
cn: Durvish
dn: uid=Dvimidha,cn=employee,dc=myorg,dc=com
objectclass: organizationalPerson
objectclass: person
objectclass: top
objectclass: inetOrgPerson
uid: Dvimidha
userpassword: Dvimidha
sn: modi
givenName: Dvimidha modi
cn: Dvimidha
dn: uid=Dyaus,cn=employee,dc=myorg,dc=com
objectclass: organizationalPerson
objectclass: person
objectclass: top
objectclass: inetOrgPerson
uid: Dyaus
userpassword: Dyaus
sn: modi
givenName: Dyaus modi
cn: Dyaus
dn: uid=Eashan,cn=employee,dc=myorg,dc=com
objectclass: organizationalPerson
objectclass: person
objectclass: top
objectclass: inetOrgPerson
uid: Eashan
userpassword: Eashan
sn: modi
givenName: Eashan modi
cn: Eashan
dn: uid=Ekachakra,cn=employee,dc=myorg,dc=com
objectclass: organizationalPerson
objectclass: person
objectclass: top
objectclass: inetOrgPerson
uid: Ekachakra
userpassword: Ekachakra
sn: kumar
givenName: Ekachakra kumar
cn: Ekachakra
dn: uid=Ekalinga,cn=employee,dc=myorg,dc=com
objectclass: organizationalPerson
objectclass: person
objectclass: top
objectclass: inetOrgPerson
uid: Ekalinga
userpassword: Ekalinga
sn: kumar
givenName: Ekalinga kumar
cn: Ekalinga
dn: uid=Ekanga,cn=employee,dc=myorg,dc=com
objectclass: organizationalPerson
objectclass: person
objectclass: top
objectclass: inetOrgPerson
uid: Ekanga
userpassword: Ekanga
sn: kumar
givenName: Ekanga kumar
cn: Ekanga
dn: uid=Eklavya,cn=employee,dc=myorg,dc=com
objectclass: organizationalPerson
objectclass: person
objectclass: top
objectclass: inetOrgPerson
uid: Eklavya
userpassword: Eklavya
sn: kumar
givenName: Eklavya kumar
cn: Eklavya
dn: uid=Eknath,cn=employee,dc=myorg,dc=com
objectclass: organizationalPerson
objectclass: person
objectclass: top
objectclass: inetOrgPerson
uid: Eknath
userpassword: Eknath
sn: kumar
givenName: Eknath kumar
cn: Eknath
dn: uid=Eshaan,cn=employee,dc=myorg,dc=com
objectclass: organizationalPerson
objectclass: person
objectclass: top
objectclass: inetOrgPerson
uid: Eshaan
userpassword: Eshaan
sn: kumar
givenName: Eshaan kumar
cn: Eshaan
dn: uid=Eshwar,cn=employee,dc=myorg,dc=com
objectclass: organizationalPerson
objectclass: person
objectclass: top
objectclass: inetOrgPerson
uid: Eshwar
userpassword: Eshwar
sn: kumar
givenName: Eshwar kumar
cn: Eshwar
dn: uid=Falak,cn=employee,dc=myorg,dc=com
objectclass: organizationalPerson
objectclass: person
objectclass: top
objectclass: inetOrgPerson
uid: Falak
userpassword: Falak
sn: kumar
givenName: Falak kumar
cn: Falak
dn: uid=Fateh,cn=employee,dc=myorg,dc=com
objectclass: organizationalPerson
objectclass: person
objectclass: top
objectclass: inetOrgPerson
uid: Fateh
userpassword: Fateh
sn: kumar
givenName: Fateh kumar
cn: Fateh
dn: uid=Gagan,cn=employee,dc=myorg,dc=com
objectclass: organizationalPerson
objectclass: person
objectclass: top
objectclass: inetOrgPerson
uid: Gagan
userpassword: Gagan
sn: shetty
givenName: Gagan shetty
cn: Gagan
dn: uid=Gagandeep,cn=employee,dc=myorg,dc=com
objectclass: organizationalPerson
objectclass: person
objectclass: top
objectclass: inetOrgPerson
uid: Gagandeep
userpassword: Gagandeep
sn: shetty
givenName: Gagandeep shetty
cn: Gagandeep
dn: uid=Gajanan,cn=employee,dc=myorg,dc=com
objectclass: organizationalPerson
objectclass: person
objectclass: top
objectclass: inetOrgPerson
uid: Gajanan
userpassword: Gajanan
sn: shetty
givenName: Gajanan shetty
cn: Gajanan
dn: uid=Gajendra,cn=employee,dc=myorg,dc=com
objectclass: organizationalPerson
objectclass: person
objectclass: top
objectclass: inetOrgPerson
uid: Gajendra
userpassword: Gajendra
sn: shetty
givenName: Gajendra shetty
cn: Gajendra
dn: uid=Gajendranath,cn=employee,dc=myorg,dc=com
objectclass: organizationalPerson
objectclass: person
objectclass: top
objectclass: inetOrgPerson
uid: Gajendranath
userpassword: Gajendranath
sn: kapoor
givenName: Gajendranath kapoor
cn: Gajendranath
dn: uid=Gaman,cn=employee,dc=myorg,dc=com
objectclass: organizationalPerson
objectclass: person
objectclass: top
objectclass: inetOrgPerson
uid: Gaman
userpassword: Gaman
sn: kapoor
givenName: Gaman kapoor
cn: Gaman
dn: uid=Hanshal,cn=employee,dc=myorg,dc=com
objectclass: organizationalPerson
objectclass: person
objectclass: top
objectclass: inetOrgPerson
uid: Hanshal
userpassword: Hanshal
sn: kapoor
givenName: Hanshal kapoor
cn: Hanshal
dn: uid=Haresh,cn=employee,dc=myorg,dc=com
objectclass: organizationalPerson
objectclass: person
objectclass: top
objectclass: inetOrgPerson
uid: Haresh
userpassword: Haresh
sn: kapoor
givenName: Haresh kapoor
cn: Haresh
dn: uid=Hari,cn=employee,dc=myorg,dc=com
objectclass: organizationalPerson
objectclass: person
objectclass: top
objectclass: inetOrgPerson
uid: Hari
userpassword: Hari
sn: kapoor
givenName: Hari kapoor
cn: Hari
dn: uid=Harihar,cn=employee,dc=myorg,dc=com
objectclass: organizationalPerson
objectclass: person
objectclass: top
objectclass: inetOrgPerson
uid: Harihar
userpassword: Harihar
sn: patel
givenName: Harihar patel
cn: Harihar
dn: uid=Harina,cn=employee,dc=myorg,dc=com
objectclass: organizationalPerson
objectclass: person
objectclass: top
objectclass: inetOrgPerson
uid: Harina
userpassword: Harina
sn: patel
givenName: Harina patel
cn: Harina
dn: uid=Haridutt,cn=employee,dc=myorg,dc=com
objectclass: organizationalPerson
objectclass: person
objectclass: top
objectclass: inetOrgPerson
uid: Haridutt
userpassword: Haridutt
sn: patel
givenName: Haridutt patel
cn: Haridutt
dn: uid=Harilal,cn=employee,dc=myorg,dc=com
objectclass: organizationalPerson
objectclass: person
objectclass: top
objectclass: inetOrgPerson
uid: Harilal
userpassword: Harilal
sn: patel
givenName: Harilal patel
cn: Harilal
dn: uid=Harith,cn=employee,dc=myorg,dc=com
objectclass: organizationalPerson
objectclass: person
objectclass: top
objectclass: inetOrgPerson
uid: Harith
userpassword: Harith
sn: patel
givenName: Harith patel
cn: Harith
dn: uid=Harman,cn=employee,dc=myorg,dc=com
objectclass: organizationalPerson
objectclass: person
objectclass: top
objectclass: inetOrgPerson
uid: Harman
userpassword: Harman
sn: patel
givenName: Harman patel
cn: Harman
dn: uid=Harmendra,cn=employee,dc=myorg,dc=com
objectclass: organizationalPerson
objectclass: person
objectclass: top
objectclass: inetOrgPerson
uid: Harmendra
userpassword: Harmendra
sn: patel
givenName: Harmendra patel
cn: Harmendra
dn: uid=Harsh,cn=employee,dc=myorg,dc=com
objectclass: organizationalPerson
objectclass: person
objectclass: top
objectclass: inetOrgPerson
uid: Harsh
userpassword: Harsh
sn: patel
givenName: Harsh patel
cn: Harsh
dn: uid=Harshad,cn=employee,dc=myorg,dc=com
objectclass: organizationalPerson
objectclass: person
objectclass: top
objectclass: inetOrgPerson
uid: Harshad
userpassword: Harshad
sn: patel
givenName: Harshad patel
cn: Harshad
dn: uid=Harshal,cn=employee,dc=myorg,dc=com
objectclass: organizationalPerson
objectclass: person
objectclass: top
objectclass: inetOrgPerson
uid: Harshal
userpassword: Harshal
sn: patel
givenName: Harshal patel
cn: Harshal
dn: uid=Harshul,cn=employee,dc=myorg,dc=com
objectclass: organizationalPerson
objectclass: person
objectclass: top
objectclass: inetOrgPerson
uid: Harshul
userpassword: Harshul
sn: patel
givenName: Harshul patel
cn: Harshul
dn: uid=Harsith,cn=employee,dc=myorg,dc=com
objectclass: organizationalPerson
objectclass: person
objectclass: top
objectclass: inetOrgPerson
uid: Harsith
userpassword: Harsith
sn: patel
givenName: Harsith patel
cn: Harsith
==============================
==============================
Add Members to the Groups
Suffix : dc=myorg,dc=com
Create a file addmembers.ldif
[root@connections V6.3]# vi /opt/ibm/ldap/V6.3/addmembers.ldif
Copy the below lines to the addmembers.ldif
dn: cn=hr,cn=groups,dc=myorg,dc=com
objectclass: accessGroup
objectclass: ibm-searchLimits
cn: hr
ibm-searchsizelimit: 200000
ibm-searchtimelimit: 0
member: uid=Adrika,cn=employee,dc=myorg,dc=com
member: uid=Abhijit,cn=employee,dc=myorg,dc=com
member: uid=Abhiram,cn=employee,dc=myorg,dc=com
member: uid=Abhisar,cn=employee,dc=myorg,dc=com
member: uid=Abhi,cn=employee,dc=myorg,dc=com
member: uid=Aagney,cn=employee,dc=myorg,dc=com
member: uid=Aadit,cn=employee,dc=myorg,dc=com
member: uid=Achal,cn=employee,dc=myorg,dc=com
member: uid=Achalraj,cn=employee,dc=myorg,dc=com
member: uid=Aadesh,cn=employee,dc=myorg,dc=com
member: uid=Durvish,cn=employee,dc=myorg,dc=com
dn: cn=accounts,cn=groups,dc=myorg,dc=com
objectclass: groupOfUniqueNames
cn: account
uniquemember: uid=Dvimidha,cn=employee,dc=myorg,dc=com
uniquemember: uid=Dyaus,cn=employee,dc=myorg,dc=com
uniquemember: uid=Eashan,cn=employee,dc=myorg,dc=com
uniquemember: uid=Ekachakra,cn=employee,dc=myorg,dc=com
uniquemember: uid=Ekalinga,cn=employee,dc=myorg,dc=com
uniquemember: uid=Ekanga,cn=employee,dc=myorg,dc=com
uniquemember: uid=Eklavya,cn=employee,dc=myorg,dc=com
uniquemember: uid=Eknath,cn=employee,dc=myorg,dc=com
uniquemember: uid=Eshaan,cn=employee,dc=myorg,dc=com
uniquemember: uid=Eshwar,cn=employee,dc=myorg,dc=com
uniquemember: uid=Falak,cn=employee,dc=myorg,dc=com
uniquemember: uid=Fateh,cn=employee,dc=myorg,dc=com
dn: cn=admins,cn=groups,dc=myorg,dc=com
objectclass: groupOfUniqueNames
cn: admins
uniquemember: uid=wasadmin,cn=admusers,dc=myorg,dc=com
uniquemember: uid=wasoperator,cn=admusers,dc=myorg,dc=com
uniquemember: uid=cadmin,cn=admusers,dc=myorg,dc=com
uniquemember: uid=fnadmin,cn=admusers,dc=myorg,dc=com
uniquemember: uid=ldapbind,cn=admusers,dc=myorg,dc=com
uniquemember: uid=wasmonitor,cn=admusers,dc=myorg,dc=com
uniquemember: uid=wpsbind,cn=admusers,dc=myorg,dc=com
uniquemember: uid=conadmin,cn=admusers,dc=myorg,dc=com
uniquemember: uid=wpsadmin,cn=admusers,dc=myorg,dc=com