Archive by Author | santosh_nair

Different ways to find the Version of WAS

There are various ways to check the versions of the WebSphere Application Server Installation
1.Executing VersionInfo.sh
2.Executing genVersionReport.sh
3.Using Wsadmin scripting command
4.Using Admin console
5.Viewing SystemOut.logs

Method 1 : Executing VersionInfo.sh

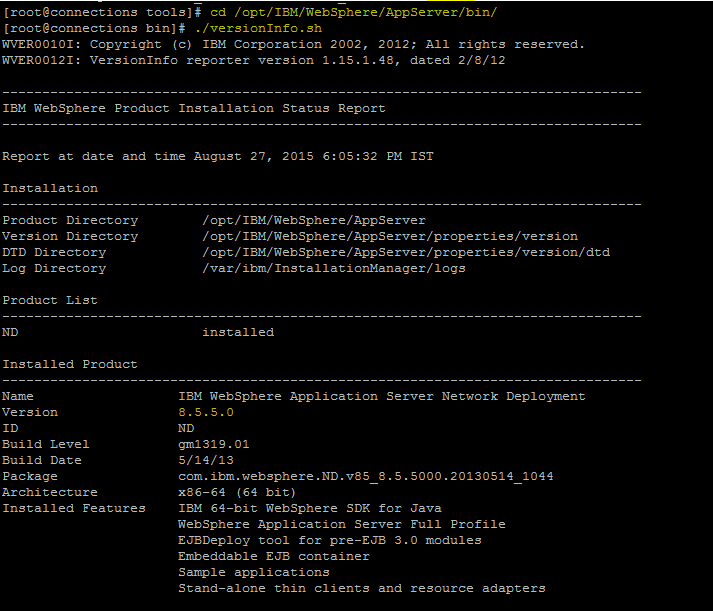
VersionInfo.sh script within the bin directory will give following details
> Version of the WAS
> Bit type ie 32 bit or 64 bit
> Installation Path
> Architecture  etc

a) Navigate to the bin directory of the WAS_HOME path
[root@mercury bin]#cd /opt/IBM/WebSphere/AppServer/bin

b) Execute ./versionInfo.sh from the bin folder

[root@mercury bin]#./versionInfo.sh

versionInfo

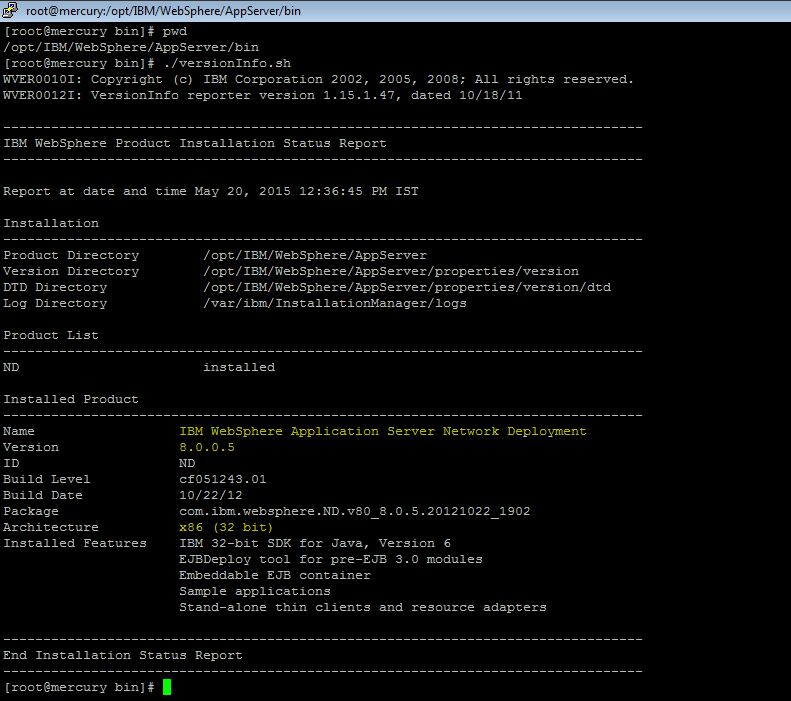
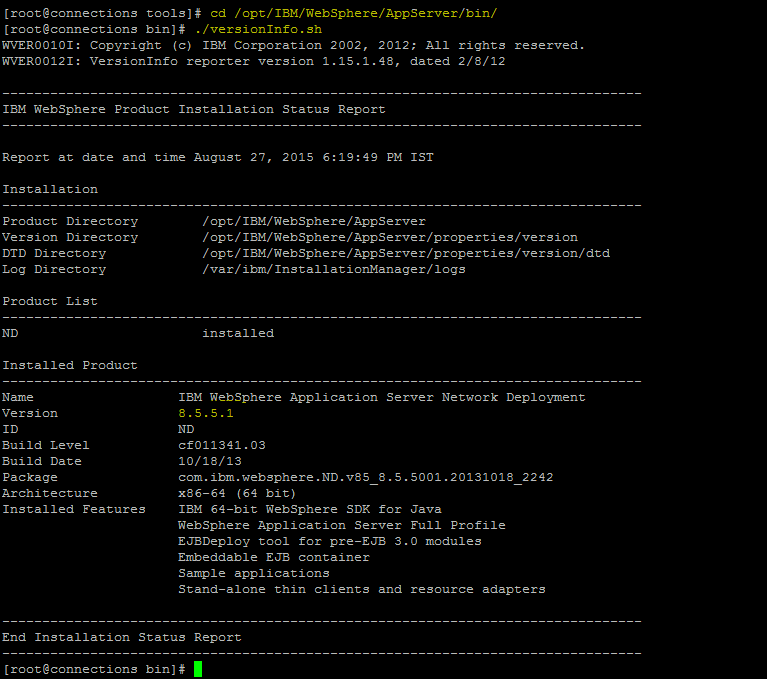
c) View the Output to find the Version Details of the WAS ..

d) Use “#./versionInfo.sh -long ” to get detailed output . It will include the fixes , ifixes etc

e) Use “#./versionInfo.sh -help” to get the other options for avaliable with versioninfo

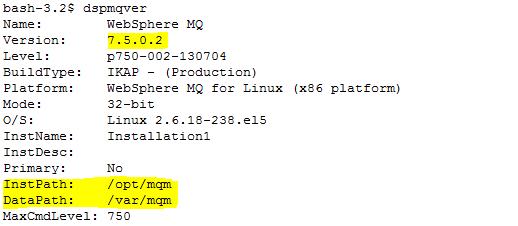
Here in the below example the version is highlighted in Yellow .
I have installed Websphere ND v8.0.0.5 with 32 Bit


Method 2 : Executing genVersionReport.sh
The genVersionReport command uses the versionInfo command to generate the versionReport.html report file in the current working directory. The report includes a list of installed fix packs and interim fixes. VersionReport.html  can be opened with any borwser

a) Navigate to the bin directory of the WAS_HOME/bin path
[root@mercury bin]#cd /opt/IBM/WebSphere/AppServer/bin

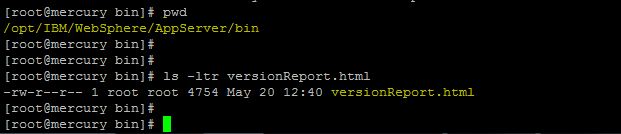
b) Execute genVersionReport.sh from the <WAS_HOME>/bin directory

[root@mercury bin]# ./genVersionReport.sh
genVersionInfo

c) It will create a file versionReport.html in the bin directory as shown below
genVersionInfo1

d) Open the versionReport.html using a browser

genVersionInfo2

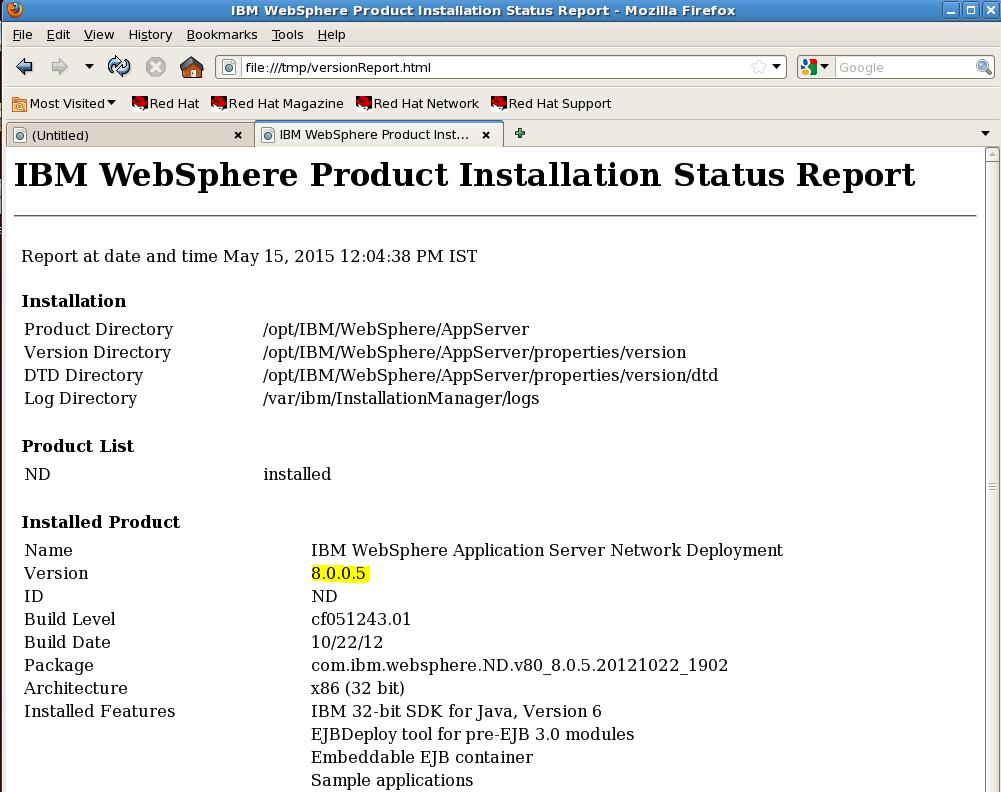
Highlighted in Yellow is the Version viz Websphere ND v8.0.0.5 with 32 Bit


Method 3 : Using Wsadmin scripting command
The version details of WAS Installation can be found using the wsadmin commands too..

a) Navigate to the <profile_home>/bin directory
[root@mercury bin]# cd /opt/IBM/WebSphere/AppServer/profiles/wp_profile/bin

b) Get the Cell Name, Node Name and Server Name of the JVM server
[root@mercury bin]# cd /opt/IBM/WebSphere/AppServer/profiles/wp_profile/config/cells/mercuryCell/nodes/
mercuryNode/servers/WebSphere_Portal

In My Example its as follows
Cell Name :
mercuryCell
Node Name :mercuryNode
Server Name : WebSphere_Portal

c) Execute the wsadmin.sh and provide the necessary credentials
[root@mercury bin]# ./wsadmin.sh

d) Set the Server Variable using the Cell , Node and Server Name from above step
wsadmin>set server [$AdminControl completeObjectName cell=CellName,node=NodeName,name=ServerName,type=Server,*]

For Eg
wsadmin>set server [$AdminControl completeObjectName cell=mercuryCell,node=mercuryNode,name=WebSphere_Portal,type=Server,*]

Output of the command WebSphere:name=WebSphere_Portal,process=WebSphere_Portal,platform=proxy,node=mercuryNode,
j2eeType=J2EEServer,version=8.0.0.5,type=Server,mbeanIdentifier=cells/mercuryCell/nodes/
mercuryNode/servers/WebSphere_Portal/server.xml#Server_1358966625559,cell=mercuryCell
,spec=1.0,processType=UnManagedProcess

versionInfo2

e) After the Server Variable is set , Execute the $AdminControl getAttribute $server serverVersion to get the server Version.

wsadmin>$AdminControl getAttribute $server serverVersion

versionInfo3

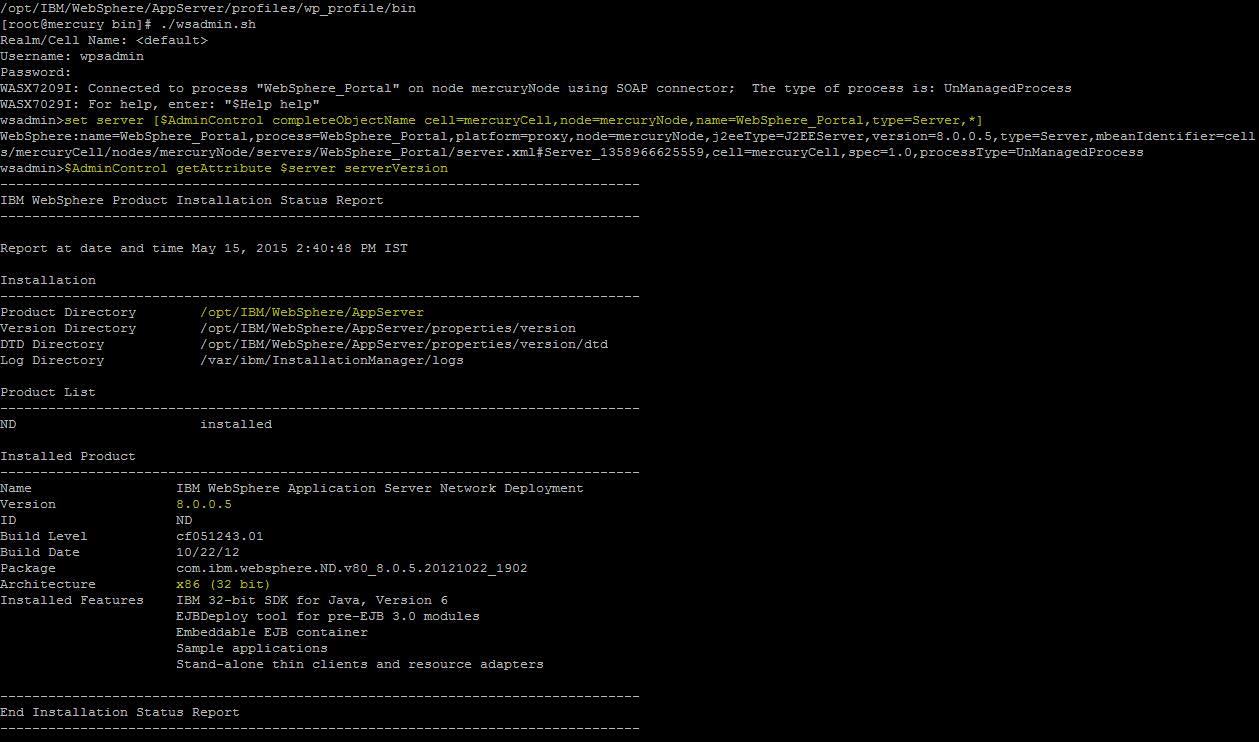
The Output is similar to VersionInfo.sh which is Websphere ND v8.0.0.5 and its 32 Bit

f) Some More commands to get the Platform Version and the Server Status
wsadmin>$AdminControl getAttribute $server platformVersion

versionInfo4

wsadmin>$AdminControl getAttribute $server state


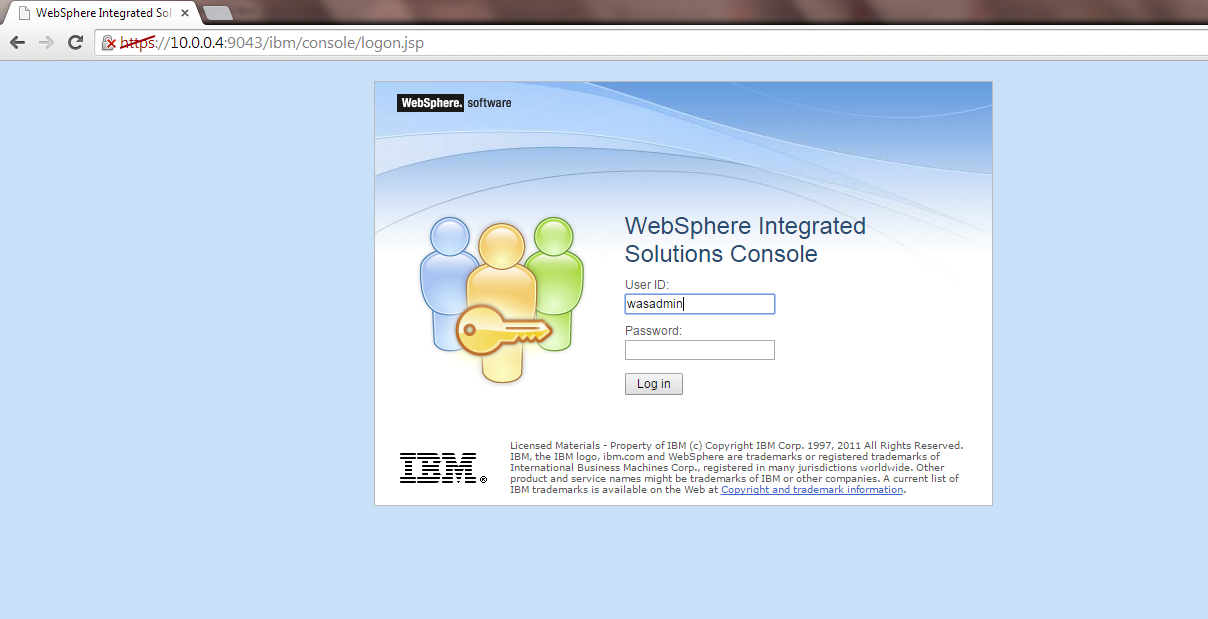
Method 4 : Using Admin console
a) Login to the WAS admin console
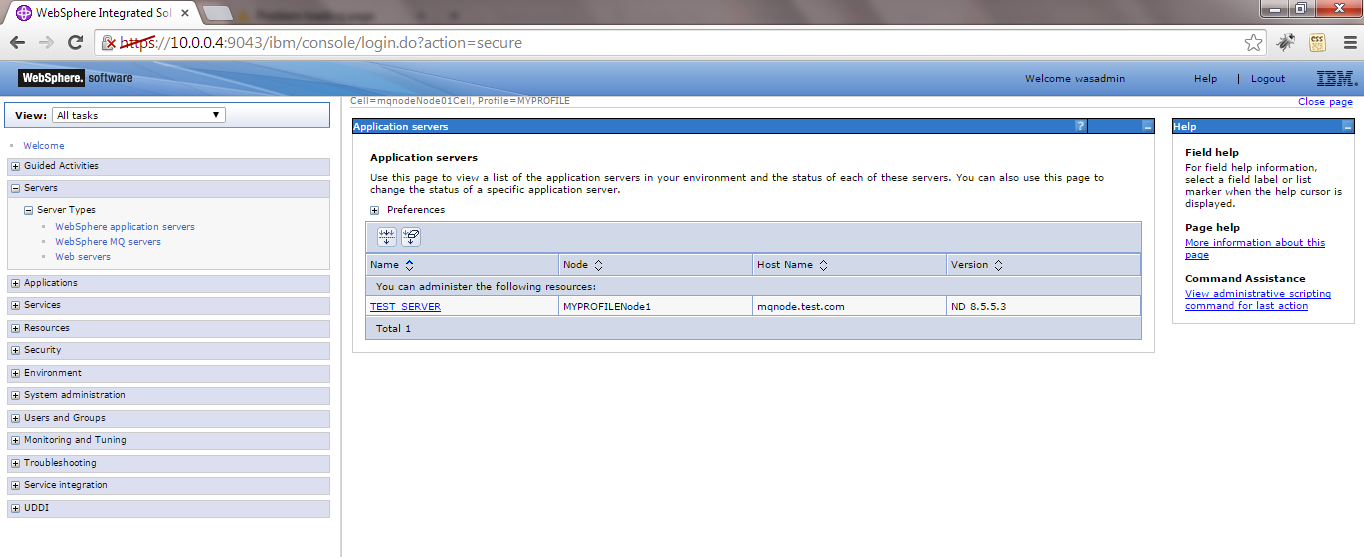
b) Click on the Welcome link on the left side

WAS_VersionInfo

WAS_VersionInfo1

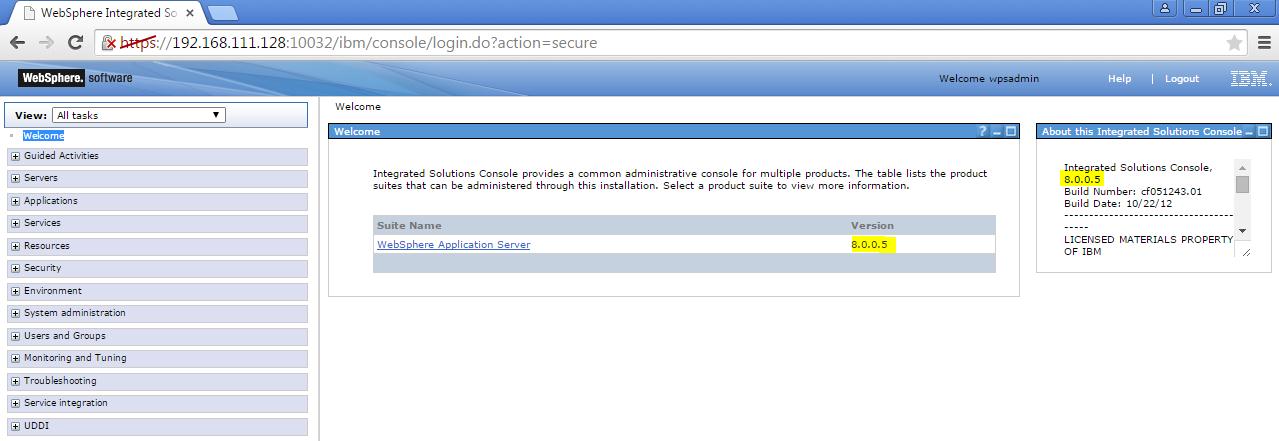
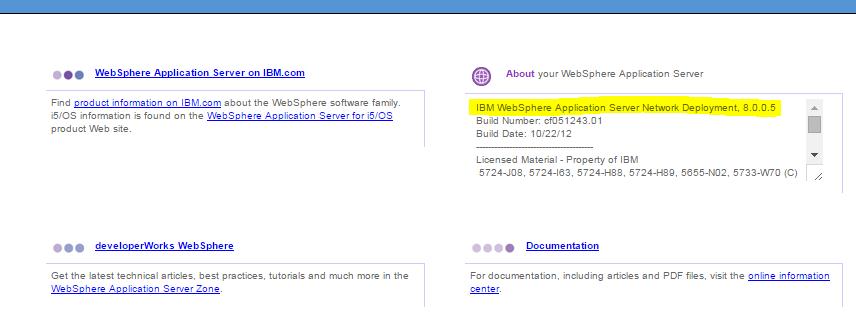
Here we can see the versions

c) Alternatively we could get the version from Product Information link
1) Navigate to Application servers > serverName .
Here my server name is “WebSphere_Portal”

2) Click on Runtime tab
WAS_VersionInfo2
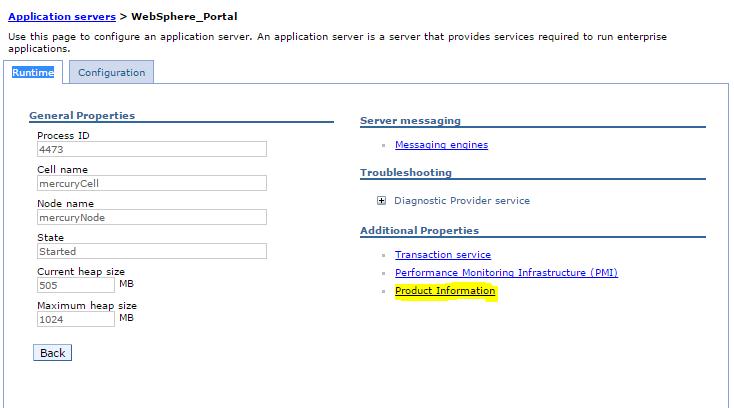
c) On the Runtime tab there is a link on the right Side “Product Information ” Link

WAS_VersionInfo3

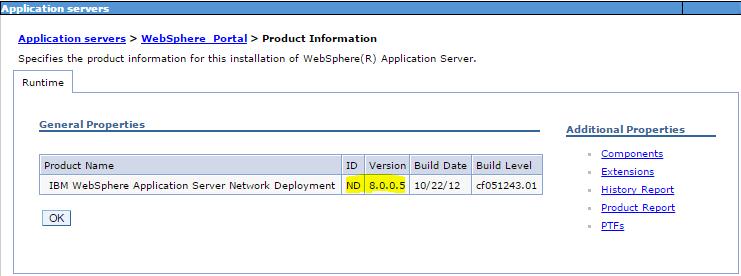
d) Click on Application servers > WebSphere_Portal > Product Information > Product Report

WAS_VersionInfo4
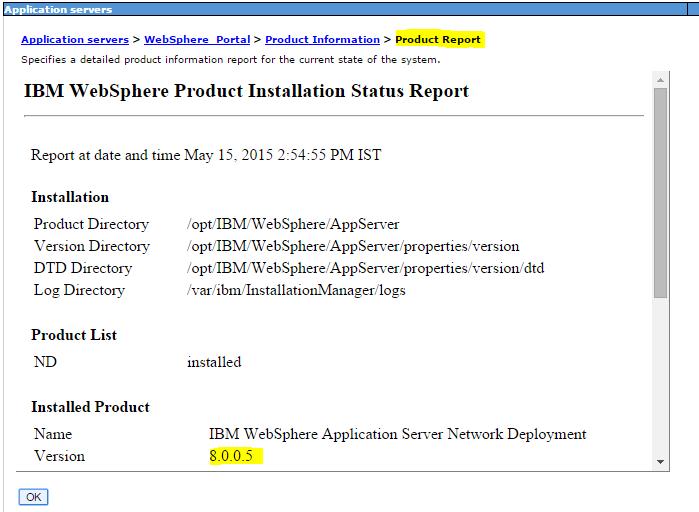
Here we will get the version Details of the WAS Version : Websphere ND v8.0.0.5 


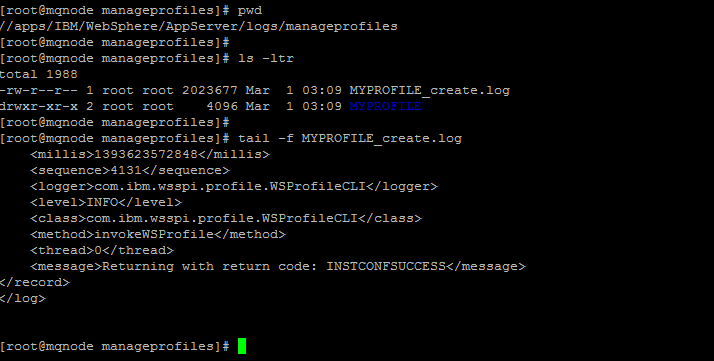
Method 5 : Viewing SystemOut.logs
The Version of the WAS is also visible in the SystemLogs
When Ever a systemOut.log is created it appends the few parameters in the starting of the file
>Websphere Version and Build
>Host Operating System
>Java version
>was.install.root etc

a) Navigate to the Logs folder of the Websphere JVM process <profile_root>/logs/<serverName>

[root@mercury]# cd /opt/IBM/WebSphere/AppServer/profiles/wp_profile/logs/Websphere_Portal

b) View the starting few lines  of the systemOut.log using vi or head or more command

Tail_VersionInfo

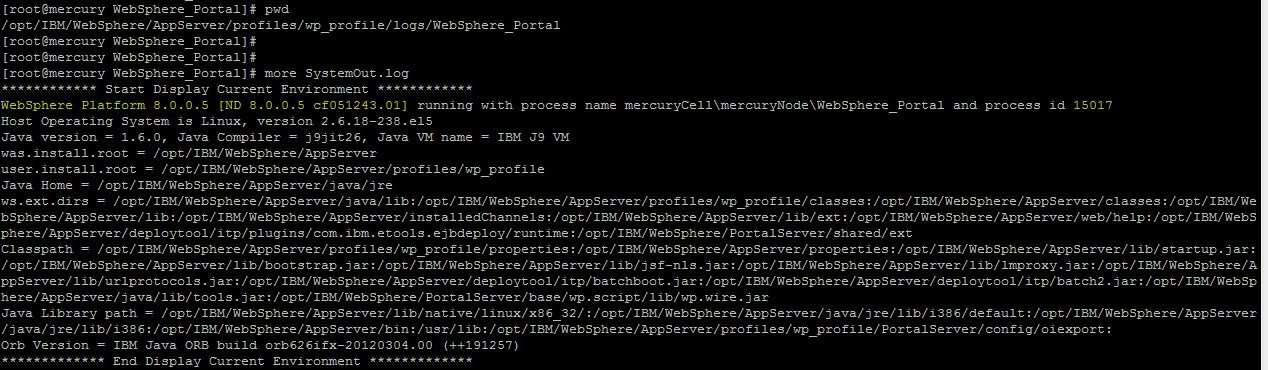
c) Here we can see the version details of the WAS ie
WebSphere Platform 8.0.0.5 [ND 8.0.0.5 cf051243.01]


To get automated mail updates of my Posts..
Please subscribe to the site http://webspherepundit.com
And also like the Facebook Page
https://www.facebook.com/webspherepundit


Mqconfig: Check Kernal Parameter needs for MQ

The mqconfig command is run to verify the system configuration matches or exceeds that which is required by IBM MQ. The configuration values are minimum values, and large installations might require values greater than those checked by this command.

1) When i ran mqconfig before Installing MQ ,  these were the failures for the Kernal Paramater

mqinstall9
2) You need to modify these Parameters which are failed

Run the below commands to check the values of the Semaphores paramaters

a) These parameters can only be changed with a root or a superuser .
b) These changes also may affect the other applications which are running on that Node. These needs to be concurred by the other application owners if any
#cat /proc/sys/kernel/shmmni
#cat /proc/sys/kernel/shmall
#cat /proc/sys/kernel/shmmax
#cat /proc/sys/kernel/sem
#cat /proc/sys/fs/file-max

For eg
mqinstall10
3) To Modify these values as per the MQ recommendations , Log on as a user with root authority.

4) Open the file /etc/sysctl.conf with a text editor, then add or change the following entries to the values shown
a ) #vi /etc/sysctl.conf
b) Enter the below parameters in this file and Save and Exit
kernel.shmmni = 4096
kernel.shmall = 2097152
kernel.shmmax = 268435456
kernel.sem = 500 256000 250 1024
fs.file-max = 524288

c) To load these sysctl values immediately, enter the command
#sysctl -p
Capture12
4) Maximum open files : ie “nofiles
If the system is heavily loaded, you might need to increase the maximum possible number of open files.
Issuing the following command to check the current set value
cat /proc/sys/fs/file-max

a) Edit the /etc/security/limits.conf files
b) Add the below values in the limits.conf
mqm soft nofile 10240
mqm hard nofile 10240

Capture13
5) Maximum Process : ie “nproc
a) A running WebSphere MQ queue manager consists of a number of thread programs, and each connected application will increase the number of threads running in the queue manager processes.
b)  You should ensure that the maximum number of processes which the mqm user is allowed to run is not restricted .
c) Set
nproc for the mqm user to 4090 or more.
d) Edit the /etc/security/limits.d/90-nproc.conf to increase the nproc limit for all users .You can also set it for specific user too ..
mqm soft nproc 4090

6) ReRun the mqconfig.sh to check the all the kernal paramaters are Passed

mqinstall16

7) Once all the paramaters are sucessful you could proceed with the installation of the MQ on these nodes

NOTE : These are the basic kernal values you need for MQ . But these may vary based on your application load and usage . So you may have to do a Trial and Error method to arrive at an appropriate value . but in most of the cases these values suffice


To get regular mail updates on my Posts..
Please subscribe to the site http://webspherepundit.com
And also like the Facebook Page
https://www.facebook.com/webspherepundit

Websphere MQ 7.5 Installation on Linux

Steps to Install MQ 7.5 on Linux

1) Ensure that all the prerequisites are validated and checked before downloading and installing it
2) Recommended to create two partitions for the Installation and the Data filesystem ( ie /opt/mqm and /var/mqm)
3) Its Important to check/modify  the kernal parameters for the Unix using the mqconfig.sh. I have created a Post for this  . You can refer to the Link  HERE

The current mqconfig.sh output before installation ( i have done the  necessary changes in linux kernal parameters)

mqinstall16

All are PASSED

NOTE: These values may differ based on large setup , load etc 

4) Download the MQ setup from the Passport Advantage
5) I have saved the setup  WS_MQ_LINUX_ON_X86_32B_V7.5.0.2.tar     in /IBMSoftware/MQLinux_7.5

mqinstall1

6) Extract the tar file in the same location using tar -xvf command

mqinstall2
7) The tar file consists of the rpms for MQ and other supporting packages for it

mqinstall3
8) Check if MQ is already installed using rpm command : rpm -qa | grep -i mq
mqinstall4
9) Login as root or any super user

a) Create the mqm user and mqm groups using the Unix commands
#groupadd mqm 

#useradd -g mqm mqm 
b) Execute the “ ./mqlicense.sh” script to accept the License .
mqinstall6
Press Enter , Enter to go to the last of the License Agreement

Enter “ 1” to accept the license
mqinstall7

NOTE : If you don’t accept the License and try to install the rpms you will receive the below error
Product cannot be installed until the license agreement has been accepted

mqinstall5
10) Run the rpm command to install the MQ rpms
ie rpm -ivh < rpm package name >;

You can simply run “ rpm -ivh *.rpm” from the folder where the MQsetup Tar was extracted . In my case its /IBMSoftware/MQLinux_7.5

a) “rpm -ivh *.rpm” will take care of the dependencies between the rpms .
Alternatively you could run individual rpms 

[root@mercury MQLinux_7.5]# rpm -ivh MQSeriesServer-7.5.0-2.i386.rpm

b) Also below are the sequence of the dependencies which needs to be followed if individually installing the rpms
 
mqinstall8

NOTE: Running these rpms will create the user mqm and the group mqm with user mqm as it member if the users are not allready created 

11) Check if MQ is installed properly . you can use rpm -qa | grep -i MQ to check the rpms installed
Capture3

a) Use rpm -qi MQSeriesServer-7.5.0-2  to get more information on the specific package like versions , path of installation , license etc.

Capture
12) Navigate to the locations /opt/mqm and /var/mqm and validate the permissions . It should be mqm

13) Check the users and group mqm creation

mqinstall18

mqinstall19
14) Switch user to mqm using su – mqm
a) # su – mqm
b) Load the environment variable for MQ using setmqenv
$. /opt/mqm/bin/setmqenv

mqinstall20
NOTE: a) You can Ignore the message AMQ8588
b) Also you can add “. /opt/mqm/bin/setmqenv ” in the .bash_profile file of                                   the 
user  to load the Env Variables every time automatically when logging in.

15 ) Validate the versions of MQ execute “dspmqver” as mqm user

mqinstall21
Here its 7.5.0.2 with “Installation Path” as /opt/mqm and “Data Path” as /var/mqm

16 ) You could create some test Queue Managers to validate the installation too ( i will write a separate post for the Queue Manager creation )

This is how we install the MQ on a Linux Server .


To get regular mail updates on my Posts..
Please subscribe to the site http://webspherepundit.com
And also like the Facebook Page
https://www.facebook.com/webspherepundit

Web Based Mode for Ibm Installation Manager 1.8

With the Release of Ibm Installation Manager 1.8.0 , IBM has added one more Mode for Installation/Un-Installation etc of Websphere Product viz the Web Based Mode

So we have the Following Modes in IIM 1.8:
1) Graphical Mode
2) Silent mode
3) Console Mode
4) Web Based Mode

I have downloaded 1.8.2 for Linux from IBM FIX central . Click HERE for the download

NOTE : Use this Mode ONLY if you have trouble accessing the other Modes . Ensure  you have a Very Stable and High Speed Network to try this But I would not Recommend it

If there is any glitch in the network your installation may be in an inconsistent State Hence use Web Based as a Last Resort

Activity :
a) Install IIM 1.8.2
b) Start the ibmim-web Services from IIM
c) Access the IIM using browser
d) Change the port no of Ibmim-web

Steps :
1) Installation of IIM 1.8.2

a) Download IIM 1.8.2 from Fix Central
b) Extract the zip file in the server

ibmim-web1

c) Install IIM so run #./installc -acceptLicense

NOTE : I am installing IIM using root , but you could use any other user which has the rights to install IIM , In that case use userinstc

ibmim-web2

d) After the Installation of IIM 1.8 .2 Verify it using “#./imcl -version

ibmim-web3


2) Start the IIM Web Mode
The Modules needed to run the IIM Web is allready installed with the IIM 1.8.2 installation under /opt/IBM/InstallationManager/eclipse/web/ibmim-web

a)  To start the Webserver which will start the IIM Web Mode execute the “ibmim-web”
Its present in /opt/IBM/InstallationManager/eclipse/web/ibmim-web

Once this command is run it will also prompt the url for accessing the web iim . Here in this case its http://10.0.0.03:9090/ibmim

ibmim-web4

b)  You can run ibmim-web as background using “&”

#/opt/IBM/InstallationManager/eclipse/web/ibmim-web &

ibmim-web5

3) Verify the Process and the Ports
Check the Process and the Port no for ibmim-web using ps and netstat command

# ps -ef | grep ibmim
# netstat -ntlp | grep 9090

ibmim-web6


4) Access the browser to the url “http://10.0.0.03:9090/ibmim” 

Note : Ensure that you have network connectivity from the desktop to the server you are connecting. Also check the proxy settings of the Browser

ibmim-web7


Navigate to the File options of the  IIM

ibmim-web8


Uninstallation Option of IIM using the IIM Web Mode

ibmim-web9


In this way we can use the IIM Web Mode to Installation , Un-Installation etc etc for Websphere Products


===============================================================

Change the Port No for IBM IM – Web 

===============================================================

There may be situations wherein you would want to change the Port No of the IBM IM – Web
It could be due to the following
1) Port no are already used by some other application
2) Company policy to have a specific range of Ports
3) Difficulty in opening the firewall ports etc etc


a) Stop the ibmim-web process
1) You could terminate the process or Break the command prompt using Ctrl+C
2) Or to stop the web server, from the main menu, select File > Stop server.

b) Modify the port
Edit the ibmim-web.ini file to change the port no . This file is within the /opt/IBM/InstallationManager/eclipse/web/ibmim

ibmim-web10

NOTE: Take the backup before  changing it 

There are two parameters like

-Dorg.osgi.service.http.port=9090
-Dorg.osgi.service.http.port.secure=9095

You need to change the port as per your need to both Http and Https Attribute .

ibmim-web11

Below I changed the http port to 9091

ibmim-web12

c) Start the ibmim-web Services
You can run ibmim-web as background using “&”

#/opt/IBM/InstallationManager/eclipse/web/ibmim-web &

e) Access the url “http://10.0.0.03:9091/ibmim”

ibmim-web13


In this way we can change the port no for IBM Installation Manager Web Mode


To get regular mail updates on my Posts..
Please subscribe to the site http://webspherepundit.com
And also like the Facebook Page
https://www.facebook.com/webspherepundit


IMCL Console Mode for Installation

There may be situations where you will not have the access to the GUI mode of Ibm Installation Manager or may find it difficult to installation using response file.

In such cases you could use the Console mode of IIM

A) Using IMCL console mode  we can also install , uninstall upgrade the WAS  Products.

Activity : 
Here i will show a sample to Install “IBM WebSphere SDK Java Technology Edition (Optional) 7.0.4.1”  using IIM Console Mode 

But you can install all the possible software’s supported by IIM

Steps :
1) Ensure All the prerequisites are satisfied etc
2) Execute “imcl -c ” to Launch the Ibm Installation Manager in the Console Mode

[root@wasnode tools]# ./imcl -c
=====> IBM Installation Manager
Select:
1. Install – Install software packages
2. Update – Find and install updates and fixes to installed software packages
3. Modify – Change installed software packages
4. Roll Back – Revert to an earlier version of installed software packages
5. Uninstall – Remove installed software packagesOther Options:
L. View Logs
S. View Installation History
V. View Installed Packages
————————
P. Preferences
————————
A. About IBM Installation Manager
————————
X. Exit Installation Manager—–> P=====> IBM Installation Manager> PreferencesSelect:
1. Repositories
2. Appearance
3. Files for Rollback
4. SSL/TLS
5. HTTP/FTP Proxy
6. Passport Advantage
7. Updates

R. Return to Main Menu
—–> [1] 1

=====> IBM Installation Manager> Preferences> Repositories

Repositories:
1. [X] /IBMSoftware/was8.5_IHS_8.5/was8.5.5/SDK
2. [X] /IBMSoftware/was8.5_IHS_8.5/was8.5.5/WASND
3. [X] /IBMSoftware/was8.5_IHS_8.5/was8.5.5/WASND/repository.config
4. [X] /IBMSoftware/was8.5_IHS_8.5/was8.5.5/SDK/repository.config

Other Options:
D. Add Repository

S. [X] Search service repositories during installation and updates

R. Restore Defaults
A. Apply Changes and Return to Preferences Menu
P. Temporarily Keep Changes and Return to Preferences Menu

—–> D

=====> IBM Installation Manager> Preferences> Repositories> Add repository

Enter a new repository location. To skip, press Enter:
—–> /IBMSoftware/was8.5_IHS_8.5/was8.5.5/SDK

=====> IBM Installation Manager> Preferences> Repositories> Add repository

ERROR: The repository is already added to the list.

Enter a new repository location. To skip, press Enter:
—–>

=====> IBM Installation Manager> Preferences> Repositories

Repositories:
1. [X] /IBMSoftware/was8.5_IHS_8.5/was8.5.5/SDK
2. [X] /IBMSoftware/was8.5_IHS_8.5/was8.5.5/WASND
3. [X] /IBMSoftware/was8.5_IHS_8.5/was8.5.5/WASND/repository.config
4. [X] /IBMSoftware/was8.5_IHS_8.5/was8.5.5/SDK/repository.config

Other Options:
D. Add Repository

S. [X] Search service repositories during installation and updates

R. Restore Defaults
A. Apply Changes and Return to Preferences Menu
P. Temporarily Keep Changes and Return to Preferences Menu

—–> R

=====> IBM Installation Manager> Preferences> Repositories

Repositories:

Other Options:
D. Add Repository

S. [X] Search service repositories during installation and updates

R. Restore Defaults
A. Apply Changes and Return to Preferences Menu
P. Temporarily Keep Changes and Return to Preferences Menu

—–> D

=====> IBM Installation Manager> Preferences> Repositories> Add repository

Enter a new repository location. To skip, press Enter:
—–> /IBMSoftware/was8.5_IHS_8.5/was8.5.5/SDK
Checking repositories…

=====> IBM Installation Manager> Preferences> Repositories

Repositories:
1. [X] /IBMSoftware/was8.5_IHS_8.5/was8.5.5/SDK

Other Options:
D. Add Repository

S. [X] Search service repositories during installation and updates

R. Restore Defaults
A. Apply Changes and Return to Preferences Menu
P. Temporarily Keep Changes and Return to Preferences Menu

—–> A

=====> IBM Installation Manager> Preferences

Select:
1. Repositories
2. Appearance
3. Files for Rollback
4. SSL/TLS
5. HTTP/FTP Proxy
6. Passport Advantage
7. Updates

R. Return to Main Menu
—–> [1] R

=====> IBM Installation Manager

Select:
1. Install – Install software packages
2. Update – Find and install updates and fixes to installed software packages
3. Modify – Change installed software packages
4. Roll Back – Revert to an earlier version of installed software packages
5. Uninstall – Remove installed software packages

Other Options:
L. View Logs
S. View Installation History
V. View Installed Packages
————————
P. Preferences
————————
A. About IBM Installation Manager
————————
X. Exit Installation Manager

—–> 1
Checking repositories…
Loading repositories…
Checking availability of packages…

=====> IBM Installation Manager> Install

Select packages to install:
1. [ ] IBM WebSphere SDK Java Technology Edition (Optional) 7.0.4.1
2. [ ] IBM WebSphere SDK Java Technology Edition Version 7.0 for Liberty 7.0.4.1

O. Check for Other Versions, Fixes, and Extensions

C. Cancel
—–> [C] 1

=====> IBM Installation Manager> Install> Select

IBM WebSphere SDK Java Technology Edition (Optional) 7.0.4.1

Options:
1. Choose version 7.0.4.1 for installation.
2. Show all available versions of the package.

C. Cancel
—–> [1] 2

=====> IBM Installation Manager> Install> Select> Versions

IBM WebSphere SDK Java Technology Edition (Optional)

Available versions:
1. [X] Version 7.0.4.1

Other Options:
O. OK, C. Cancel
—–> [O]
Preparing and resolving the selected packages…
Loading fixes…

=====> IBM Installation Manager> Install

Select packages to install:
1. [X] IBM WebSphere SDK Java Technology Edition (Optional) 7.0.4.1
2. [ ] IBM WebSphere SDK Java Technology Edition Version 7.0 for Liberty 7.0.4.1

O. Check for Other Versions, Fixes, and Extensions

N. Next, C. Cancel
—–> [N]
Finding compatible package groups…
.

=====> IBM Installation Manager> Install> Location

Existing package groups:
1. [X] IBM WebSphere Application Server V8.5

Selected group id: “IBM WebSphere Application Server V8.5”
Selected location: “/opt/IBM/WebSphere/AppServer”

B. Back, N. Next, C. Cancel
—–> [N]

=====> IBM Installation Manager> Install> Location> Summary

Target Location:
Package Group Name : IBM WebSphere Application Server V8.5
Installation Directory : /opt/IBM/WebSphere/AppServer
Shared Resources Directory : /opt/IBM/IMShared

Packages to be installed:
IBM WebSphere SDK Java Technology Edition (Optional) 7.0.4.1

Options:
G. Generate an Installation Response File

B. Back, I. Install, C. Cancel
—–> [I]
25%                    50%                    75%                     100%
——————|——————|——————|——————|
……………………………………………………………………………………………

=====> IBM Installation Manager> Install> Location> Summary> Completion

The install completed successfully.

Options:
F. Finish
—–> [F]

=====> IBM Installation Manager

Select:
1. Install – Install software packages
2. Update – Find and install updates and fixes to installed software packages
3. Modify – Change installed software packages
4. Roll Back – Revert to an earlier version of installed software packages
5. Uninstall – Remove installed software packages

Other Options:
L. View Logs
S. View Installation History
V. View Installed Packages
————————
P. Preferences
————————
A. About IBM Installation Manager
————————
X. Exit Installation Manager

—–> V

=====> IBM Installation Manager> Installed Packages

View the following installed packages and fixes. Enter the number to see the details of a package group, package, or fix.
1-. IBM WebSphere Application Server V8.5
2. IBM WebSphere Application Server Network Deployment 8.5.5.0
3. IBM WebSphere SDK Java Technology Edition (Optional) 7.0.4.1

Other Options:
O. OK

—–> [O]

=====> IBM Installation Manager

Select:
1. Install – Install software packages
2. Update – Find and install updates and fixes to installed software packages
3. Modify – Change installed software packages
4. Roll Back – Revert to an earlier version of installed software packages
5. Uninstall – Remove installed software packages

Other Options:
L. View Logs
S. View Installation History
V. View Installed Packages
————————
P. Preferences
————————
A. About IBM Installation Manager
————————
X. Exit Installation Manager

—–> X

==================================================================

We have installed “IBM WebSphere SDK Java Technology Edition (Optional) 7.0.4.1”  for the existing WAS Installation


============================================================

B) Check for the installation Completion

[root@wasnode tools]# ./imcl listInstalledPackages
com.ibm.cic.agent_1.6.2000.20130301_2248
com.ibm.websphere.IBMJAVA.v70_7.0.4001.20130510_2103
com.ibm.websphere.ND.v85_8.5.5003.20140730_1249


C) Similarly you can use the IMCL console mode for the Installation , Updation and Installation

===========================================================

To get regular mail updates on my Posts..
Please subscribe to the site http://webspherepundit.com
And also like the Facebook Page
https://www.facebook.com/webspherepundit

Websphere Application Server Fixpack Installation using IMCL

Steps to Install a WAS  FixPack

a) Check if the Fixpack which you are going to install will be compatible with the WAS, OS , Applications which runs on it etc
b) Download the Fixpack from the IBM Fix Central
c) Extract the Fixpack
d) Run “versionInfo.sh -long” to get the version before fixpack

NOTE : TAKE THE BACKUP OF THE IIM Installation PATH and DATA Path , TAKE THE BACKUP OF THE COMPLETE WAS INSTALLATION DIRECTORY


/opt/IBM/WebSphere/AppServer/bin/versionInfo.sh -long > ~/versionInfo_beforeFixpack.txt


[root@wasnode tools]# /opt/IBM/WebSphere/AppServer/bin/versionInfo.sh
WVER0010I: Copyright (c) IBM Corporation 2002, 2012; All rights reserved.
WVER0012I: VersionInfo reporter version 1.15.1.48, dated 2/8/12——————————————————————————–
IBM WebSphere Product Installation Status Report
——————————————————————————–Report at date and time March 12, 2015 9:27:36 PM ISTInstallation
——————————————————————————–
Product Directory /opt/IBM/WebSphere/AppServer
Version Directory /opt/IBM/WebSphere/AppServer/properties/version
DTD Directory /opt/IBM/WebSphere/AppServer/properties/version/dtd
Log Directory /var/ibm/InstallationManager/logsProduct List
——————————————————————————–
ND installedInstalled Product
——————————————————————————–
Name IBM WebSphere Application Server Network Deployment
Version 8.5.5.0
ID ND
Build Level gm1319.01
Build Date 5/14/13
Package com.ibm.websphere.ND.v85_8.5.5000.20130514_1044
Architecture x86 (32 bit)
Installed Features IBM 32-bit WebSphere SDK for Java
WebSphere Application Server Full Profile

e) Stop All the JAVA Processes like dmgr , nodeagent or servers based on which server you are installing
f) For a distributed server , Apply Fixpack for the DMGR first and then the Nodes
g) Execute ./imcl listInstalledPackages to check the versions currently Installed

[root@wasnode tools]# ./imcl listInstalledPackages
com.ibm.cic.agent_1.6.2000.20130301_2248
com.ibm.websphere.IBMJAVA.v70_7.0.4001.20130510_2103
com.ibm.websphere.ND.v85_8.5.5000.20130514_1044
[root@wasnode tools]#

h) Execute ./imcl listInstalledPackages to check the directory where WAS currently Installed

[root@wasnode tools]# ./imcl listInstallationDirectories
/opt/IBM/WebSphere/AppServer

i) List the packages which are available in the Fixpack extracted Directory “/IBMSoftware/was8.5_IHS_8.5/was8.5.5/FP/”

We need to update “com.ibm.websphere.ND.v85” Package as the Product which is installed is “com.ibm.websphere.ND.v85_8.5.5000.20130514_1044”  ( From the versionInfo and listInstalledPackages )

[root@wasnode tools]# ./imcl listAvailablePackages -repositories /IBMSoftware/was8.5_IHS_8.5/was8.5.5/FP/
com.ibm.websphere.BASE.v85_8.5.5003.20140730_1249
com.ibm.websphere.BASETRIAL.v85_8.5.5003.20140730_1249
com.ibm.websphere.DEVELOPERS.v85_8.5.5003.20140730_1249
com.ibm.websphere.DEVELOPERSILAN.v85_8.5.5003.20140730_1249
com.ibm.websphere.EXPRESS.v85_8.5.5003.20140730_1249
com.ibm.websphere.EXPRESSTRIAL.v85_8.5.5003.20140730_1249
com.ibm.websphere.ND.v85_8.5.5003.20140730_1249
com.ibm.websphere.NDDMZ.v85_8.5.5003.20140730_1249
com.ibm.websphere.NDDMZTRIAL.v85_8.5.5003.20140730_1249
com.ibm.websphere.NDTRIAL.v85_8.5.5003.20140730_1249

j) Install the Fixpack by running “imcl install”

Command: imcl install packageID[_version][,featureID]
-repositories source_repository
-installationDirectory installation_directory
-acceptLicense
-sP — Show Progress

[root@wasnode tools]# ./imcl install com.ibm.websphere.ND.v85_8.5.5003.20140730_1249 -repositories /IBMSoftware/was8.5_IHS_8.5/was8.5.5/FP -installationDirectory /opt/IBM/WebSphere/AppServer -acceptLicense -sP
                         25%                       50%                     75%                     100%
——————|——————|——————|——————|
……………………………………………………………………………………………Updated to com.ibm.websphere.ND.v85_8.5.5003.20140730_1249 in the /opt/IBM/WebSphere/AppServer directory.

k) Verify the Installation
We will see that the Websphter.ND is v85_8.5.5003.20140730

[root@wasnode tools]# ./imcl listInstalledPackages
com.ibm.cic.agent_1.6.2000.20130301_2248
com.ibm.websphere.IBMJAVA.v70_7.0.4001.20130510_2103
com.ibm.websphere.ND.v85_8.5.5003.20140730_1249


[root@wasnode tools]# /opt/IBM/WebSphere/AppServer/bin/versionInfo.sh
WVER0010I: Copyright (c) IBM Corporation 2002, 2012; All rights reserved.
WVER0012I: VersionInfo reporter version 1.15.1.48, dated 2/8/12——————————————————————————–
IBM WebSphere Product Installation Status Report
——————————————————————————–Report at date and time March 12, 2015 10:41:14 PM ISTInstallation
——————————————————————————–
Product Directory /opt/IBM/WebSphere/AppServer
Version Directory /opt/IBM/WebSphere/AppServer/properties/version
DTD Directory /opt/IBM/WebSphere/AppServer/properties/version/dtd
Log Directory /var/ibm/InstallationManager/logsProduct List
——————————————————————————–
ND installed
IBMJAVA7 installedInstalled Product
——————————————————————————–
Name IBM WebSphere Application Server Network Deployment
Version 8.5.5.3
ID ND
Build Level cf031430.01
Build Date 7/30/14
Package com.ibm.websphere.ND.v85_8.5.5003.20140730_1249
Architecture x86 (32 bit)
Installed Features IBM 32-bit WebSphere SDK for Java
WebSphere Application Server Full Profile
EJBDeploy tool for pre-EJB 3.0 modules
Embeddable EJB container
Stand-alone thin clients and resource adapters

l) Recheck the Ownership of the “/opt/IBM/WebSphere/AppServer” change the ownership to the owner of the WAS Instance

[root@wasnode tools]# chown -R wasadmin:wasadmin /opt/IBM/WebSphere/AppServer

m) Start the JVM servers and veiw the System logs to check if there are any errors


To get regular mail updates on my Posts..
Please subscribe to the site http://webspherepundit.com
And also like the Facebook Page
https://www.facebook.com/webspherepundit


Important IMCL Commands

 1: Check the version of IBM Installation Manager

Command: ./imcl version

[root@wasnode tools]# pwd
/opt/IBM/InstallationManager/eclipse/tools
[root@wasnode tools]#
[root@wasnode tools]# ./imcl version
Installation Manager (installed)
Version: 1.6.2
Internal Version: 1.6.2000.20130301_2248
[root@wasnode tools]#

imclversion

=========================================================================
 2: List Installed Packages
Command: ./imcl listInstalledPackages

[root@wasnode tools]# ./imcl listInstalledPackages
com.ibm.cic.agent_1.6.2000.20130301_2248
com.ibm.websphere.IBMJAVA.v70_7.0.4001.20130510_2103
com.ibm.websphere.ND.v85_8.5.5003.20140730_1249

====> com.ibm.websphere.IBMJAVA.v70_7.0.4001.20130510_2103   JAVA SDK
====> com.ibm.websphere.ND.v85_8.5.5003.20140730_1249              WAS ND 8.5

imclinstalledversion
=========================================================================
 3: List Installed Directory
Command: ./imcl listInstallationDirectories

[root@wasnode tools]# ./imcl listInstallationDirectories
/opt/IBM/WebSphere/AppServer

The Installation of WAS ND and SDK is done at “/opt/IBM/WebSphere/AppServer

imclinstalleddirectory
=========================================================================
 4) Uninstalling packages by using imcl
Command: ./imcl uninstall
Uninstall packages from the tools directory by using Installation Manager command line (imcl) uninstall commands.
Before you begin
•To identify the package_id_version,feature_id, run the listAvailablePackages command.

Procedure
To uninstall a package by using imcl:
1) Navigate to the tool directory
2) Run the uninstall command: using imcl

imcl uninstall package_id_version,feature_id -installationDirectory installation_directory

NOTE : There are many options available with imcl, use that as per your requirement

3) List the Installed packages to verify the packages you want to uninstall
BE VERY CAREFUL BEFORE YOU SELECT THE PACKAGE IDs .. Bcoz there may be many Other Websphere Packages installed on different directories

[root@wasnode tools]# ./imcl listInstalledPackages
com.ibm.cic.agent_1.6.2000.20130301_2248
com.ibm.websphere.IBMJAVA.v70_7.0.4001.20130510_2103
com.ibm.websphere.ND.v85_8.5.5003.20140730_1249

We will be uninstalling “com.ibm.websphere.IBMJAVA.v70_7.0.4001.20130510_2103 com.ibm.websphere.ND.v85_8.5.5003.20140730_1249″

4) List the directories where the Websphere Packages are installed
BE VERY CAREFUL BEFORE YOU SELECT THE PACKAGE IDs .. Bcoz There many be many Other Websphere Packages installed on different directories

[root@wasnode tools]# ./imcl listInstallationDirectories
/opt/IBM/WebSphere/AppServer
[root@wasnode tools]#

Here I have only one location where WAS is installed

5) Launch the uninstall option for imcl command line

[root@wasnode tools]# ./imcl uninstall com.ibm.websphere.ND.v85_8.5.5003.20140730_1249 com.ibm.websphere.IBMJAVA.v70_7.0.4001.20130510_2103 -installationDirectory /opt/IBM/WebSphere/AppServer
[root@wasnode tools]#

6) Validate it using “imcl listInstalledPackages” to ensure the WAS packages are removed

[root@wasnode tools]# ./imcl listInstalledPackages
com.ibm.cic.agent_1.6.2000.20130301_2248
[root@wasnode tools]#

7) Delete the WAS Installed Folders post un-installation
/opt/IBM/WebSphere/AppServer

imcluninstall

Video

This is how we uninstall WAS ND
=========================================================================
 5: List Available Packages in the Repositories

Command: ./imcl listAvailablePackages
You need to use “imcl listAvailablePackages” command . It will display the Offerings and packages within the Repositories.

[root@wasnode tools]# ./imcl listAvailablePackages -repositories /IBMSoftware/was8.5_IHS_8.5/was8.5.5/WASND
com.ibm.websphere.ND.v85_8.5.5000.20130514_1044[root@wasnode tools]#
[root@wasnode tools]# ./imcl listAvailablePackages -repositories /IBMSoftware/was8.5_IHS_8.5/was8.5.5/SDK
com.ibm.websphere.IBMJAVA.v70_7.0.4001.20130510_2103
com.ibm.websphere.liberty.IBMJAVA.v70_7.0.4001.20130510_2103
[root@wasnode tools]#

=========================================================================

 6: Install of Websphere ND 8.5 using imcl command line

Command: ./imcl install
To install the Product using imcl command you need to use “install” Option of imcl
a) Ensure all the prerequisites are satisfied like space , permission etc
b) Extract the WAS binaries in the server which you have downloaded
c) Execute the “imcl listAvailablePackages “ in the repository to validate the packages

[root@wasnode tools]# cd /opt/IBM/InstallationManager/eclipse/tools
[root@wasnode tools]# ./imcl listAvailablePackages -repositories /IBMSoftware/was8.5_IHS_8.5/was8.5.5/WASND

com.ibm.websphere.ND.v85_8.5.5000.20130514_1044
[root@wasnode tools]#

d) Execute “imcl install” to Install the WAS ND Packages “com.ibm.websphere.ND.v85_8.5.5000.20130514_1044”

[root@wasnode tools]#./imcl install com.ibm.websphere.ND.v85_8.5.5000.20130514_1044 -repositories /IBMSoftware/was8.5_IHS_8.5/was8.5.5/WASND -installationDirectory /opt/IBM/WebSphere/AppServer -acceptLicense -sP
25%               50%                     75%                       100%
——————|——————|——————|——————|
……………………………………………………………………………………………
Installed com.ibm.websphere.ND.v85_8.5.5000.20130514_1044 to the /opt/IBM/WebSphere/AppServer directory.
[root@wasnode tools]#

Similarly you can install the SDK 7 Package too

[root@wasnode tools]# ./imcl listAvailablePackages -repositories /IBMSoftware/was8.5_IHS_8.5/was8.5.5/SDK
com.ibm.websphere.IBMJAVA.v70_7.0.4001.20130510_2103
com.ibm.websphere.liberty.IBMJAVA.v70_7.0.4001.20130510_2103
[root@wasnode tools]#
[root@wasnode tools]# ./imcl install com.ibm.websphere.IBMJAVA.v70_7.0.4001.20130510_2103 -repositories /IBMSoftware/was8.5_IHS_8.5/was8.5.5/SDK -installationDirectory /opt/IBM/WebSphere/AppServer -acceptLicense -sP25%                     50%                   75%                100%
——————|——————|——————|——————|
……………………………………………………………………………………………
Installed com.ibm.websphere.IBMJAVA.v70_7.0.4001.20130510_2103 to the /opt/IBM/WebSphere/AppServer directory.

e) List the Installed packages to verify the packages you have installed

[root@wasnode tools]# ./imcl listInstalledPackages
com.ibm.cic.agent_1.6.2000.20130301_2248
com.ibm.websphere.IBMJAVA.v70_7.0.4001.20130510_2103
com.ibm.websphere.ND.v85_8.5.5003.20140730_1249

f) List the directories where the Websphere Packages are installed

[root@wasnode tools]# ./imcl listInstallationDirectories
/opt/IBM/WebSphere/AppServer
[root@wasnode tools]#

This completes the installation of WAS ND and JAVA SDK 7

=========================================================================
 6: Updation of Websphere ND 8.5.5.1 FIXPACK using imcl command line
Command : ./imcl install

Current Version : WAS ND 8.5.5.0
New Version : WAS ND 8.5.5.1

Procedure
a) Stop All the WAS Processes ( dmgr, Nodeagent , Server ) Also Apply the Fixpack to Dmgr First before applying to other nodes

b) Take the tar backup of the WAS directories, Profiles, IIM, IIM Data ( var/ibm ) etc to revert in case of any issues

c) Check the Current version of the WAS Installation using “./imcl listInstalledPackages”

[root@connections tools]# cd /opt/IBM/InstallationManager/eclipse/tools
[root@connections tools]# ./imcl listInstalledPackages
com.ibm.cic.agent_1.8.2001.20150409_1833
com.ibm.websphere.ND.v85_8.5.5000.20130514_1044

The version is WAS ND 8.5.5.0
Imcl

d) Check the Path of the WAS installation using “./imcl listInstallationDirectories”

[root@connections bin]# cd /opt/IBM/InstallationManager/eclipse/tools
[root@connections tools]# ./imcl listInstallationDirectories
/opt/IBM/WebSphere/AppServer

Imcl3

e) Also Check the Version of WAS using “versionInfo.sh”

[root@connections tools]# cd /opt/IBM/WebSphere/AppServer/bin/
[root@connections bin]# ./versionInfo.sh
WVER0010I: Copyright (c) IBM Corporation 2002, 2012; All rights reserved.
WVER0012I: VersionInfo reporter version 1.15.1.48, dated 2/8/12——————————————————————————–
——————————————————————————–
Name IBM WebSphere Application Server Network Deployment
Version 8.5.5.0
ID ND

Imcl2

e) Extract the Fixpack zip 8.5.5-WS-WASND-FP0000001-part1.zip & 8.5.5-WS-WASND-FP0000001-part2.zip in the same Folder .

I have extracted it in /IBMsoftware/Fixpacks/WASND_8.5.5.1FP/

f) List the Available packages in the fixpack Extracted path ie /IBMsoftware/Fixpacks/WASND_8.5.5.1FP/

Command : ./imcl listAvailablePackages -repositories /IBMsoftware/Fixpacks/WASND_8.5.5.1FP/

[root@connections tools]# ./imcl listAvailablePackages -repositories /IBMsoftware/Fixpacks/WASND_8.5.5.1FP/ com.ibm.websphere.BASE.v85_8.5.5001.20131018_2242
…………………..
com.ibm.websphere.ND.v85_8.5.5001.20131018_2242
………………………..
com.ibm.websphere.NDTRIAL.v85_8.5.5001.20131018_2242
[root@connections tools]#
[root@connections tools]#

Here we can see “com.ibm.websphere.ND.v85_8.5.5001.20131018_2242” Package .. We will upgrade this package as we are using websphere.ND.V8.5.5

Imcl5

g) Update the Fixpack using the imcl command
Command: ./imcl install com.ibm.websphere.ND.v85_8.5.5001.20131018_2242 -repositories /IBMsoftware/Fixpacks/WASND_8.5.5.1FP/ -installationDirectory /opt/IBM/WebSphere/AppServer -acceptLicense -sP

[root@connections tools]# ./imcl install com.ibm.websphere.ND.v85_8.5.5001.20131018_2242 -repositories /IBMsoftware/Fixpacks/WASND_8.5.5.1FP/ -installationDirectory /opt/IBM/WebSphere/AppServer -acceptLicense -sP
25%                  50%                     75%                     100%
——————|——————|——————|——————|
…………………………………………:….

Imcl6

h) After the completion of the above command .  check the updated version of WAS , it should be WAS 8.5.5.1 now .
We can see that the package is now “com.ibm.websphere.ND.v85_8.5.5001.20131018_2242″

[root@connections ]# cd /opt/IBM/InstallationManager/eclipse/tools/
[root@connections tools]# ./imcl listInstalledPackages
com.ibm.cic.agent_1.8.2001.20150409_1833
com.ibm.websphere.ND.v85_8.5.5001.20131018_2242
[root@connections tools]#

Imcl7

i) Check the versionInfo.sh to see if the Version of the WAS has been updated .

[root@connections tools]# cd /opt/IBM/WebSphere/AppServer/bin/
[root@connections bin]# ./versionInfo.sh
WVER0010I: Copyright (c) IBM Corporation 2002, 2012; All rights reserved.
——————————————————————————–Name IBM WebSphere Application Server Network Deployment
Version 8.5.5.1
ID ND ………….

Imcl8

j) Start the Dmgr, NodeAgent, WAS Servers after the fixpack updation and check the SystemOut.log to see if there are any errors

This is how we can easily update the fixpack using imcl


To get regular mail updates on my Posts..
Please subscribe to the site http://webspherepundit.com
And also like the Facebook Page
https://www.facebook.com/webspherepundit

=========================================================================

Silent Installation of IHS , Plugin and Customization Toolbox 8.5.5 using Response File

Following are the steps for the silent installation

1) Download the necessary packages and the fixpacks from the Passport Advantage
2) Ensure the necessary access is available .. in our case its root ( Though we can install using a non-root user)
3) Create the necessary filesystems ( we will be installing in /opt )
4) Check for sufficient space in the filesystem to extract the zip files and the installation of the Binaries

5) Install the IBM Installation Manager
You can use the Record Function of the Ibm Installation Manager .
Click on the below Link for the Post on Record Function of IIM to create the Response File

Click Here LINK :

6) I have pasted the sample Response File for Installation of IHS , Plugin and Customisation Tool

### SAMPLE RESPONSE FILE FOR IHS, PLUGIN And CUSTOMISATION TOOLBOX ###

<?xml version=”1.0″ encoding=”UTF-8″?>
<!–The “acceptLicense” attribute has been deprecated. Use “-acceptLicense” command line option to accept license agreements.–>
<agent-input acceptLicense=’true’>
<server>
<repository location=’/installers/IBMHTTP8.5.5’/>
<repository location=’/installers/WASSupplements04’/>
</server>
<profile id=’IBM HTTP Server V8.5_MYAPP’ installLocation=’/opt/IBM/HTTPServer‘>
<data key=’eclipseLocation’ value=’/opt/IBM/HTTPServer‘/>
<data key=’user.import.profile’ value=’false’/>
<data key=’cic.selector.os’ value=’linux’/>
<data key=’cic.selector.arch’ value=’x86’/>
<data key=’cic.selector.ws’ value=’gtk’/>
<data key=’user.ihs.allowNonRootSilentInstall’ value=’true’/>
<data key=’user.ihs.http.server.service.name’ value=’none’/>
<data key=’user.ihs.httpPort’ value=’80‘/>
<data key=’user.ihs.installHttpService’ value=’false’/>
<data key=’cic.selector.nl’ value=’en’/>
</profile>
<install modify=’false’>
<offering id=’com.ibm.websphere.IHS.v85′ version=’8.5.5004.20141119_1746′ profile=’IBM HTTP Server V8.5_MYAPP‘ features=’core.feature,arch.64bit’ installFixes=’none’/>
<offering id=’com.ibm.websphere.PLG.v85′ version=’8.5.5004.20141119_1746′ profile=’Web Server Plug-ins for IBM WebSphere Application Server V8.5_MYAPP’ features=’core.feature,com.ibm.jre.6_64bit’ installFixes=’none’/>
<offering id=’com.ibm.websphere.WCT.v85′ version=’8.5.5004.20141119_1746′ profile=’WebSphere Customization Toolbox V8.5_MYAPP’ features=’core.feature,pct’ installFixes=’none’/>
</install>
<profile id=’Web Server Plug-ins for IBM WebSphere Application Server V8.5_MYAPP’ installLocation=’/opt/IBM/Plugins‘>
<data key=’eclipseLocation’ value=’/opt/IBM/Plugins‘/>
<data key=’user.import.profile’ value=’false’/>
<data key=’cic.selector.os’ value=’linux’/>
<data key=’cic.selector.arch’ value=’x86’/>
<data key=’cic.selector.ws’ value=’gtk’/>
<data key=’cic.selector.nl’ value=’en’/>
</profile>
<profile id=’WebSphere Customization Toolbox V8.5_MYAPP’ installLocation=’/opt/IBM/Toolbox‘>
<data key=’eclipseLocation’ value=’/opt/IBM/Toolbox‘/>
<data key=’user.import.profile’ value=’false’/>
<data key=’cic.selector.os’ value=’linux’/>
<data key=’cic.selector.arch’ value=’x86’/>
<data key=’cic.selector.ws’ value=’gtk’/>
<data key=’cic.selector.nl’ value=’en’/>
</profile>
<preference name=’com.ibm.cic.common.core.preferences.eclipseCache’ value=’/opt/IMShared‘/>
<preference name=’com.ibm.cic.common.core.preferences.connectTimeout’ value=’30’/>
<preference name=’com.ibm.cic.common.core.preferences.readTimeout’ value=’45’/>
<preference name=’com.ibm.cic.common.core.preferences.downloadAutoRetryCount’ value=’0’/>
<preference name=’offering.service.repositories.areUsed’ value=’true’/>
<preference name=’com.ibm.cic.common.core.preferences.ssl.nonsecureMode’ value=’false’/>
<preference name=’com.ibm.cic.common.core.preferences.http.disablePreemptiveAuthentication’ value=’false’/>
<preference name=’http.ntlm.auth.kind’ value=’NTLM’/>
<preference name=’http.ntlm.auth.enableIntegrated.win32′ value=’true’/>
<preference name=’com.ibm.cic.common.core.preferences.preserveDownloadedArtifacts’ value=’true’/>
<preference name=’com.ibm.cic.common.core.preferences.keepFetchedFiles’ value=’false’/>
<preference name=’PassportAdvantageIsEnabled’ value=’false’/>
<preference name=’com.ibm.cic.common.core.preferences.searchForUpdates’ value=’false’/>
<preference name=’com.ibm.cic.agent.ui.displayInternalVersion’ value=’false’/>
<preference name=’com.ibm.cic.common.sharedUI.showErrorLog’ value=’true’/>
<preference name=’com.ibm.cic.common.sharedUI.showWarningLog’ value=’true’/>
<preference name=’com.ibm.cic.common.sharedUI.showNoteLog’ value=’true’/>
</agent-input>

### SAMPLE RESPONSE FILE FOR IHS, PLUGIN And CUSTOMISATION TOOLBOX ###

Sample Attachment of the Response File :IHS_Plugins_WCT_8554_Response

7) The Minimal Changes needed to suit your environment

a) Path of the Extracted Binaries and the repository.config files
<repository location=’/installers/IBMHTTP8.5.5‘/>
<repository location=’/installers/WASSupplements04‘/>
<repository location=’/installers/WASSupplements04/WASFP/’/>

b) Installation path of the IHS
<profile id=’IBM HTTP Server V8.5_MYAPP’ installLocation=’/opt/IBM/HTTPServer‘>
<data key=’eclipseLocation’ value=’/opt/IBM/HTTPServer’/>

c) Port changes for IHS
<data key=’user.ihs.httpPort’ value=’80‘/>

d) Plugin Installation Path
<profile id=’Web Server Plug-ins for IBM WebSphere Application Server V8.5_MYAPP’ installLocation=’/opt/IBM/Plugins‘>
<data key=’eclipseLocation’ value=’/opt/IBM/Plugins‘/>

e) Customization Toolbox Installation Path
<profile id=’WebSphere Customization Toolbox V8.5_MYAPP’ installLocation=’/opt/IBM/Toolbox‘>
<data key=’eclipseLocation’ value=’/opt/IBM/Toolbox‘/>

f) IIM Shared location
<preference name=’com.ibm.cic.common.core.preferences.eclipseCache’ value=’/opt/IMShared‘/>


8) Once the response file is ready . Save this response file in the Server at location of your choise
I have kept it in /tmp/IHS_Plugins_WCT_85_Install_Response.xml

Ensure necessary permissions are available for this file execute the imcl command

bash-3.2$ #cd /opt/IBM/InstallationManager/eclipese/tools/
#./imcl input /tmp/IHS_Plugins_WCT_85_Install_Response.xml -acceptLicense -sP

9) Once the installation is completed you can navigate to the folder locations to verify the versions and the Installation Directories of IHS , Plugin and Customization toolBox 8.5


To get regular mail updates on my Posts..
Please subscribe to the site http://webspherepundit.com
And also like the Facebook Page
https://www.facebook.com/webspherepundit


java.lang.OutOfMemoryError: Failed to create a thread: retVal -1073741830, errno 11

I Recently got this issue when starting the App cluster Member for the first time ““java.lang.OutOfMemoryError: Failed to create a thread: retVal -1073741830, errno 11″”

Issue :

a) The Dmgr started properly but when i when tried to start the cluster from the Dmgr for the first time i got this error in the System Out “java.lang.OutOfMemoryError: Failed to create a thread: retVal -1073741830, errno 11”

Error Stack :

Caused by: java.lang.OutOfMemoryError: Failed to create a thread: retVal -1073741830, errno 11
at java.lang.Thread.startImpl(Native Method)
at java.lang.Thread.start(Thread.java:947)
at com.ibm.ws.dcs.vri.common.ThreadManager.getThread(ThreadManager.java:334)
at com.ibm.ws.dcs.vri.common.impl.DCSStackImpl.(DCSStackImpl.java:178)
at com.ibm.ws.dcs.rsmodule.impl.DCSRSStackImpl.(DCSRSStackImpl.java:215)
at com.ibm.ws.dcs.vri.common.impl.DCSCoreStackImpl.(DCSCoreStackImpl.java:79)
at com.ibm.ws.dcs.vri.common.impl.DCSCoreStackImpl.getInstance(DCSCoreStackImpl.java:75)
at com.ibm.ws.dcs.vri.common.impl.DCSStackFactory.getCoreStack(DCSStackFactory.java:92)
… 39 morestyle=”text-align: left;”>[3/12/15 19:31:53:888 IST] 00000001 WsServerImpl E WSVR0009E: Error occurred during startup
com.ibm.ws.exception.RuntimeError: Unable to start the CoordinatorComponentImpl
at com.ibm.ws.hamanager.runtime.CoordinatorComponentImpl.start

(CoordinatorComponentImpl.java:320)
at com.ibm.ws.runtime.component.ContainerHelper.startComponents(ContainerHelper.java:539)
at com.ibm.ws.runtime.component.ContainerImpl.startComponents(ContainerImpl.java:627)
at com.ibm.ws.runtime.component.ContainerImpl.start(ContainerImpl.java:618)
at com.ibm.ws.runtime.component.ServerImpl.start(ServerImpl.java:523)
at com.ibm.ws.runtime.WsServerImpl.bootServerContainer(WsServerImpl.java:311)
at com.ibm.ws.runtime.WsServerImpl.start(WsServerImpl.java:224)
at com.ibm.ws.runtime.WsServerImpl.main(WsServerImpl.java:697)
at com.ibm.ws.runtime.WsServer.main(WsServer.java:59)
at sun.reflect.NativeMethodAccessorImpl.invoke0(Native Method)
at sun.reflect.NativeMethodAccessorImpl.invoke(NativeMethodAccessorImpl.java:60)
at sun.reflect.DelegatingMethodAccessorImpl.invoke(DelegatingMethodAccessorImpl.java:37)
at java.lang.reflect.Method.invoke(Method.java:611)

Steps Tried :

a) Tried to Start the cluster Members using ./startServer.sh server1 but still the error in the SystemOut.log
I felt the heap memory was not sufficient for the JVM increased by 512 MB but still same error 🙂

b) On Revisitng the SystemOutLogs and concluded that it seems to be Native Memory issue error from the Java Stack Error

c) Checked the System Resources like CPU , Memory but they were all fine . Finally i checked the Ulimit
All the Parameters were unlimited except the “Max no of Process” (nproc) which was 1024 .

d) The Value for ulimit nproc was very less than the recommended .
In Linux here is a new configurations (/etc/security/limits.d/90-nproc.conf ) which overrides the nproc setting in the /etc/security/limits.conf
Sample output of /etc/security/limits.d/90-nproc.conf
#* soft nproc 1024

WebSphere instance only uses a few hundred of threads and it will go on increasing depending on the Load and the other instances in the server .
We also have to take into account the other threads which are running on the Machine . So the nproc count may reach if too many threads are opened

Solution:

a) Edit the /etc/security/limits.d/90-nproc.conf to increase the nproc limit for all users .You can also set it for specific user too ..
    NOTE : A reboot is not required for this to take effect, however, the user must be completely logged out of the putty or the session and relogin to take the effect. The next time the user logs back in, the new value will be in place. This can be checked by running ‘ulimit -u’ as the user in question.

b) Update the /etc/security/limits.conf file for the nproc values to 131072 ( or any  higher value )

It is recommended to set the ulimit -u or nproc to a value of 131072 when running on Linux to safely account for all the forked threads within processes that could be created

There are many documents avaliable on the internet for the steps to change the ulimit . please go through them too .

c) After I made those changes to the ulimit & 90-nproc.conf

d) Now i restarted my cluster member and it started without any error now 🙂

NOTE : There could be other reasons though for the “java.lang.OutOfMemoryError: Failed to create a thread: retVal -1073741830, errno 11” .. this is ONE of them 

To get regular mail updates on my Posts..
Please subscribe to the site http://webspherepundit.com
And also like the Facebook Page
https://www.facebook.com/webspherepundit

Create Application Server Profile using Manageprofile.sh

In Most of the customers location there is no GUI access to the server hence will will not be able to create a profile using the Graphical mode

In these cases we will have to use the command line to create the profile
It can be done using manageprofile.sh command in the /bin folder

Create a StandAlone Application Server Profile

Step1: Ensure there is sufficient space in the Profile Path in my case /appprofiles Folder .
Step2: Ensure that the Profile like the profile Name , Node Name , Cell Name , Profile Path is available with you before creation
Step3: List the Profiles
Navigate to /bin Path ie /apps/IBM/WebSphere/AppServer/bin
[root@mqnode bin]#./manageprofiles.sh -listProfiles
[Dmgr}

This indicates all the profile available within the WAS Installation /apps/IBM/WebSphere/
So we already have a profile “Dmgr”

Step4: Use the templatePath /profileTemplates/default for a StandAlone Appserver Profile

Step5: Execute manageprofiles.sh -create

[root@mqnode bin]#cd /apps/IBM/WebSphere/AppServer/bin
[root@mqnode bin]# ./manageprofiles.sh -create –profileName MYPROFILE –profilePath /appprofiles/MYPROFILE –templatePath /apps/IBM/WebSphere/AppServer/profileTemplates/default –serverName TEST_SERVER  –nodeName MYPROFILENode1 –hostName mqnode.test.com –enableAdminSecurity true –adminUserName wasadmin –adminPassword wasadmin@12
INSTCONFSUCCESS: Success: Profile MYPROFILE now exists. Please consult /appprofiles/MYPROFILE/logs/AboutThisProfile.txt for more information about this profile.

Ensure We get “INSTCONFSUCCESS” Success output . It will indicate the profile was created successfully

websphere, manageprofile.sh , Profile, StandAlone Profile

Capture1

NOTE : There are many options for manageprofile.sh like startingPort etc ..

Step6: We also need to Check the ProfileCreation logs to validate and check for any errors
a) Check the Profile Path ie /appprofiles/MYPROFILE to see if the Folder exists and the folder structure created under it
b) Navigate to /apps/IBM/WebSphere/AppServer/logs/manageprofiles/
tail -f <ProfileName>_create.log

ie [root@mqnode bin]#tail -f MYPROFILE_create.log 

Capture3
NOTE : If the profile creation fails , this logs will give the reasons for the failure

[root@mqnode bin]# cat /appprofiles/MYPROFILE/logs/AboutThisProfile.txt

Capture2

Step7: Start The Server
Capture5


Step8: Login to the Admin Console using the credentials provided while creating the profile ie wasadmin/wasadmin@12
Ports can be viewed from the AboutThisProfile.txt file

[root@mqnode bin]# cat /appprofiles/MYPROFILE/logs/AboutThisProfile.txt
Enable administrative security (recommended): True
Administrative console port: 9060
Administrative console secure port: 9043

Capture7

Capture8

Step9 : If needed change the Ownership of the Profile folder to the WAS Application Owner
you can use [root@mqnode bin]#chown -R wasuser:wasuser /appprofiles/MYPROFILE

With this we have created a StandAlone Application Server Profile


To get regular mail updates on my Posts ,  Please subscribe to the site http://webspherepundit.com and also like the Facebook Pagehttps://www.facebook.com/webspherepundit